Tag: motion Graphics

  • Tip: Wrapping text around a circle in After Effects

    Tip: Wrapping text around a circle in After Effects

    I saw a post on the After Effects mailing list today asking how to wrap text around a circle in After Effects. Here’s how it’s done;

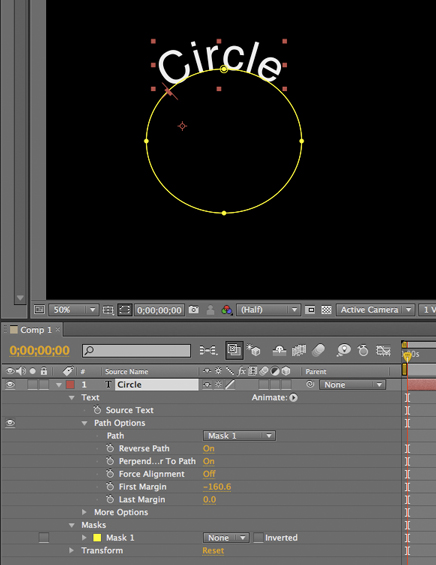
    1) Create a text layer with the text you want.
    2) Select the layer and then, with the Ellipse tool, draw a circular Mask on the Text layer.
    3) Open the Layer in the Timeline by clicking it’s disclosure triangle and then open the ‘Text’ section too.
    4) Open the ‘Path Options” and in there you’ll see a drop down menu under ‘Path’ where you can select your Mask, the text should now wrap around the circle.
    5) You can use the controls under ‘Path’, and the controls on the selected path in the Composition panel to adjust it to suit.

    Tip! Remember to save it as a preset for future jobs so you don’t have to continuously repeat the process each time you need a circular path text effect!

    Tip! There are also a load of free Animation Presets that create text on paths in the Effects and Presets panel, or you can Browse them in Bridge to get a real preview of what they look like before applying them.

  • Creating a Cityscape in 3D

    I want to share an example of one of my tutorials that I’m very proud to say inspired a great piece of work, “Black Day to Freedom” by the amazing Rob Chiu. I met Rob after watching a very inspiring talk he gave at the Flash on the Beach conference a few years back. I approached him after the talk to tell him how much I enjoyed it and was blown away when he told me that the movie he had shown was partly inspired by my own tutorials. We have since kept in touch and Rob has contributed to my latest book, Design Essentials for the Motion Media Artist.

    I’ve recently recorded the tutorial on video and want to share it with you. I’m in the process of updating some of my most popular demos and tutorials for my video2brain Adobe After Effects CS5 Learn by Video DVD.I’m featuring one FREE tutorial per week for the next five weeks here in my blog. If you like these free tutorials you can also buy the DVD here.

    My 3D Cityscape tutorial is one that I’ve had great feedback on and it really was one of the biggest compliments when an artist I admire told me that this demo had inspired some of his own work. Rob Chiu (AKA The Ronin) is a well respected live action commercial director and photographer. Black Day to Freedom was one of his first films, an animation entirely built in After Effects. This was actually inspired at least technically by this tutorial where a very basic city is built with skyscrapers and lights. Rob took this as a starting point and created his own world to help anchor the story. You can find out more about Rob on his website or you can read the foreword he wrote and see exmples of his work in my latest book, Design Essentials for the Motion Media Artist.

    The tutorial was developed co-written with myself and my good friend, Paul Tuersley, visual effects artist and After Effects guru of the highest order. Paul has worked on various feature films including Kick Ass, Angels and Demons and 10,000 BC. Paul came up with the initial idea to build a real 3D environment from basic flat layers within After Effects. This technique has now been used widely in a variety of different ways both in Motion Graphic designs and animation projects. Paul is also the moderator at AE Enhancers, a fabulous resource for After Effects artists that you should also check out.

    In this updated tutorial you’ll see how easy it is to create graphics from absolutely nothing, directly within After Effects. You’ll also see how to create 3D environments and build scenes for your animations. I’ve also included the project file you’ll need to go through the tutorial here 3D_City.aep. After going through the tutorial I’d love to see examples of what you’ve done with it so please post links in the comments section.


  • Creative After Effects Bonus Tutorials

    Creative After Effects Bonus Tutorials

    These Creative After Effects Bonus Tutorials are ones created specifically for readers of my “Creative After Effects”books but are also freely available to everyone who visits my website.They were designed for previous versions of After Effects but still contain useful tips, tricks and techniques. These books contain many more in depth tutorials on Adobe After Effects and related topics. It also includes a free CD full of goodies and training materials for your delectation!I welcome feedback from readers as it is essential to the growth and development of the book and website. If you have any comments or feedback please feel free to leave comments.
    Keylight Training movie This is a sample movie from my book “Creative After Effects 7″. The tutorial focusses on how to use The Foundry’s Keylight in After Effects to key out really badly shot DV footage. Angie shares tips and tricks on how to avoid problems and to fix them once they occur.
    Character Animation tutorial I’ve done a fair bit of character animation using After Effects, mainly cut-out animation, similar to the style Terry Gilliam used in the Monty Python animations and not too dissimilar to South Park’s style of animation.Till Parenting was introduced, I always used complex nesting procedures to link the individual parts of my characters together. I would draw them in Illustrator with each part on a separate layer, bring it in as a Comp and then Pre-comp the body parts together as needed.Parenting gets rid of the need for complex nesting hierarchies, I can now link the body parts together in one composition. This tutorial simplifies and demystifies the processes, making them less intimidating to those who have never used Parenting.
    The Talking Dog Lip syncing Tutorial for After Effects 6 is based on the After Effects 5.5 Production Bundle but can also be followed using the version 5.0 PB. If you want to get hold of an updated After Effects CS5 version of this tutorial, complete with new footage, it’s available as part of my After Effects CS5 Learn by Video DVD in association with Adobe’s Todd Kopriva.
    This tutorial shows you how to use Motion Math scripts and Time Remapping on a 3D – rendered character to automate the process of lip-synching. I used this technique in an animated program which was broadcast on a major UK TV network.
    Multipass for After Effects 5.5 and Cinema 4DXL These comprehensive tutorials cover techniques for creating multipass renders as well as importing and manipulating the multiple passes in After Effects 5.5.Using a whole host of old and new features to bring your 3D scene to life you will learn the basic principles and discover the power and flexibility that can be achieved by rendering out your 3D scene in passes.

    Download files:

    Cinema 4DXL (Version 7.303)

    Multipass tutorials

    Tutorial notes: Cinema 4D Multipass Project files: Cinema 4D project files

    After Effects 5.5

    Multipass tutorials

    Tutorial notes: After Effects Multipass Tutorial Notes

    Project files: After Effects project files Footage files: Movies, Lights, Footage files

    The Cinema 4D tutorial was co-written by myself and Tim Clapham of HelloLux. Find out more about Tim and HelloLux by here.

  • Free tutorial – creating a 1960s retro opening title sequence

    Free tutorial – creating a 1960s retro opening title sequence

    My dear friend and esteemed and talented After Effects aficionado, Aharon Rabinowitz has posted my 1960’s retro “Pop-art” tutorial up on Red Giant TV. I actually recorded it in the 1960’s but it’s taken this long for technology to catch up to a stage where it can broadcast a whole hour (almost) of FREE After Effects video training online! Download and enjoy, it’s all free and includes tutorial files! You’ll love Aharon’s “authentic” Scottish accent at the end!

  • Adobe After Effects Training DVD and book

    Adobe After Effects Training DVD and book

    Well, it’s all happening this week! My new book, “Design Essentials for the Motion Media Artist” finally went on sale. I’m so excited and can’t wait to hear what people think of it – waiting for the first reviews is always an anxious time!

    As well as the book, I also have a new training DVD on the way which I worked on with the amazing Todd Kopriva from Adobe. “Adobe After Effects CS5 – Learn by Video” was produced by the brilliant team at video2brain and is available to pre-order now.


    As a little taster of what’s to come is available to view completely free now. Adobe After Effects CS5: Frequently Asked Questions – Zip Past Common Hurdles
    In this free course, Todd Kopriva, co-author of Adobe After Effects CS5 Learn by Video, helps you avoid common After Effects hiccups with a collection of answers to Frequently Asked Questions. Whether you´re having audio hiccups, getting pixelated vector graphics, or getting oversized files or jerky playback, Todd equips you to zip past these common hurdles and get back to creating great effects. I hope you enjoy these free tutorials and look forward to hearing your feedback.

  • Digital Arts Online Tutorials

    Free tutorials, created for Digital Arts magazine

    Master Particles in Adobe After Effects

    Shatter and Card Dance are two of After Effects CS4’s most underrated particle effects. Both were created by Brain Maffitt’s Atomic Power Corporation, before being bought by Adobe to include in After Effects. Both Card Dance and Shatter allow you to divide your layer into particles determined by layer map. They also allow you to animate pieces in 3D space, and interact with After Effects’ cameras and lights. This tutorial will help you understand how layers can be used as displacement maps or control layers for other layers in your compositions. This process is just as useful when controlling VFX as it is for motion graphics.

    Create easy infographics in After Effects

    Make diagrams easier to understand – by animating them, with tips from motion-graphics and animation expert Angie Taylor. Infographics are hugely useful for explaining a complex or technical subject visually. A quick and easy way to create compelling animated infographics is to break down and reconstruct technical drawings or plans – we see them all the time on the TV news, where they’re popular for explaining abstract or tricky subjects to a broad audience. In this tutorial, Angie Taylor shows that going back to the basics of animating simple shapes and 2D graphics can be just what you need to provide you with a clean and simple design.

    Handling particles in After Effects

    If your budget doesn’t stretch to pricey plug-in particle filters, use After Effects’ internal tools. After Effects CS3 includes built-in particle filters you can use in your projects. Although they are not as powerful as some of the specialist 3D particle filters (like Trapcode’s amazing Particular plug-in), you can use them to achieve fairly convincing animations of natural phenomena such as fire, smoke, rain and dust. All you need is patience and a natural affinity for tweaking sliders. In this tutorial, Angie Taylor shows you how to create fire, smoke effects and 3D rocks, all using After Effects’ built-in 3D particle filters, to create part of the title sequence for Taylor’s forthcoming animation Hellwoman, a spoof of the movie Hellboy.

    Make your text 3D in After Effects

    Make your message stand out by transforming text with 3D extrusions in After Effects. After Effects CS3 includes fabulous 3D, per-character text animators, but the ability to actually extrude text into solid 3D objects usually requires third-party plug-ins. Unless, of course, you use the trick shared here by animator, designer and After Effects expert Angie Taylor, which permits you to extrude the text with no extra software. There are other ways of creating true 3D text in After Effects, using filters like the Shatter filter. However, the trouble with Shatter is that it’s quite difficult to get the edges of the text looking decent and crisp. The following technique is great as it’s fairly straightforward and quick to carry out. It also allows you to use 3D animators with your extruded text.

    DVD motion menu design in Adobe After Effects

    Creating multi-dimensional, interactive menus from pen-and-paper sketches is simple – we show you how. In this tutorial, Angie Taylor shows how to put Adobe After Effects and Photoshop to work to create a DVD menu design. The example she uses here was originally created for a DVD of the pioneering all-girl punk bank The Slits, who are currently touring the US. Tessa Pollitt, the band’s bassist, drew the sketch that the menu is based on, and the band felt that it represented The Slits’ overall aesthetic so neatly that they asked Taylor to use it in the menu. This is a particularly good tutorial if you’re already familiar with the basics of After Effects but need a little practice. You’ll learn how to add motion to static images without animating the images themselves – a neat trick to master – by separating different elements or layers of the drawing into a multi-dimensional format, and then guiding the camera through them.

    Advanced track and clone in AE

    Visual-effects and motion-graphics specialist Angie Taylor shows how to use After Effects’ Clone Stamp tool to convincingly add to moving footage.

  • Copyright or wrong?

    Copyright or wrong?

    I’ve been busy putting the finishing touches to my forthcoming book, “Design Essentials for the Motion Media Artist“.

    It’s funny, I’ve written books before. Software books, teaching people how to use Adobe After Effects to be specific. I was commissioned to write these books, at the time there were very few books on the subject and there was a growing demand for them. I must say, I hated writing them, the process was so bogged down with technical checking and they had to be written in a very standard, linear way which I found stifling.

    I’m pleased to say that this book was different. It’s about the principles of art and design, a subject very close to my heart, something I live and breathe so writing it was very hard work but also, a real pleasure. That is, till it came to illustrating the book. Creating my own images and diagrams was fine, no problem. But when it came time to adding photographs of famous inventors, artists, artworks and examples of motion graphics, the nightmares started.

    I tried my best to get clearance for the images, but to no avail. First of all I had to find out who the copyright owners were, this is not as easy as you may think. In some cases several people claim to own copyright so how do I know which one to believe? Even after finding out and writing to them, I’d often get no response. One day I rang the Galleria Nazionale delle Marche in Italy to ask for permission to use a reproduction of The Flagellation by Piero Della Francesca, I greeted them in my best pigeon Italian (which admittedly is pretty poor!) I asked if there was anyone there who spoke English and they promptly hung up on me! This happened three times!

    This was an extreme example but fairly typical in that nobody seemed interested in my offers to pay for written permissions to use their work. It seems that everybody wants to protect their work but nobody wants to sell you the rights to use it, so what’s the point in protecting it, what are they protecting it from exactly?

    I have no intention of stealing anybody’s work, using it for any obscene publication, claiming that it was mine, all I wanted to do was pay tribute to some of my favorite pieces of work, and their creators. I presumed that copyright was intended to prevent the creators from losing revenue but if they’re not making it easy for people to pay, how do they expect to make any money? It seems very sad that the creative outpourings of artists and designers are surrounded by a cobweb of bureaucracy that prevents them from getting exposure, making money, providing inspiration for others and being shared, loved and developed into the art and design of tomorrow.

    Since encountering this situation I have read up on copyright and want to share a couple of really interesting articles on the subject. The Abolish Copyright website explains why this system is so antiquated and has some great links to other articles. Anyone who is planning to provide web content in the UK should read up about the Digital Economy Bill which is being pushed through parliament as we speak. It’s likely to make matters a whole lot worse by propping up and supporting bad business models by giving unprecedented power to private entities to impose sanctions based on suspicion rather than due process. They can even take away your internet access if they suspect you of having copyright items on your website, it’s crazy! But, it’s not too late to act, The Open Rights Group will help you fight this insidious and draconian bill before it’s too late!

    Finally, as a celebration of those brave individuals who stick two fingers up at copyright law, and as a tribute to Malcolm McLaren, a true eccentric Englishman who helped change the face of music. Bow Wow Wow‘s fantastic “C30, C60, C90 – Go!” – listen free on Last FM.

  • The Influence of Punk 02

    The Influence of Punk 02

    In the first article in this three-part series, I spoke about the influence of punk in motion graphic design, the Punk rock revolution in the UK and how inspiring it was to young people like me. Today I’ll talk about some of the great designers who emerged from that scene. I’ll start by looking at two of the key players who defined the style of the Punk Rock movement in the UK.

    There’s not one person responsible for the style of Punk, it was a coming together of minds and styles. A collective, group activity gained momentum, and as a result, the various styles of the people involved merged into an established fashion. But the pivotal people were the ones who recognized the elements that would excite and brought them together with style, panache and, of course an eye for design.

    The punk movement grew out of a disillusionment, with the establishment, the music scene, fashion, the media. What better way to show your dissatisfaction than to tear it all up and start again? That’s exactly what punks did. Essays on design refer to this as Deconstruction. This wasn’t a new concept, post-modern art movements like the Dadaists and, ironically, the Constructivists used techniques of disassembly and reassembly to shake up the status quo and embrace a new way of looking at things.

    In New York in the early seventies, bands like the New York Dolls would dress up in womens clothes in an attempt to shock away the apathy that existed in the music scene. Richard Hell was the one who became a blueprint for thousands of young punks, defining the spikey hair and ripped t-shirt look before anyone else. But it was really Vivienne Westwood who took the look and developed it into a recognizable style. Now one of our top designers, she started off with a small clothes shop on the Kings Road in London. She and Malcolm McClaren owned Let it Rock, a shop selling biker gear and teddy boy clothes. In 1974 this was revamped and renamed SEX, catering to the S&M scene and positioning itself nicely to shock the nation and take punk rock to the headlines.

    The Sex Pistols hung out in the shop and that’s where the whole thing took off, the band formed, McClaren became the manager, and Vivienne designed clothes for them under the label, Seditionaries – it was a symbiotic relationship. At Art School Malcolm McClaren met Jamie Reid, a political activist and Situationist who was producing a radical magazine called Suburban Press. He used a cut and paste style of graphics in this magazine, and it was then that he defined his trade-mark ransom-note lettering that was made famous by the Sex Pistols first album Never Mind the Bollocks, Here’s the Sex Pistols.

    In the next installment we’ll take a look at the designers who emerged from, or were directly influenced by the Punk movement.

    Patti Smith – Smells Like Teen Spirit, listen free on Last FM

  • Thoughts

    OK, it’s been a while since I posted a blog, I’ve been really busy trying to reinvent myself again! The last year has been an odd one. I decided to take a few months off from doing international events after IBC 2007, due to sheer exhaustion. But just as I was ready to return, Adobe made major changes in terms of events and marketing. Unfortunately, as a result, most of the freelancers in the UK (including myself) have lost a lot of UK-based demo work. Freelancers in the UK region have had to find alternative sources of income to replace this work.

    Luckily there still seem to be a few companies in need of freelance demo artists so I am still doing the odd demo here and there;

    IBC


    NAB Europe

    But on the whole the slow down in demo work has been a good thing as it has encouraged me to get more involved in the creative pursuits that I have been studiously avoiding due to fear of failure! I’m now concentrating my time on writing my new book (which is not software based but still related to the industry) and teaching at Sussex Downs college and the University of Brighton. I’m also working on my own creative project when I can find time and am still doing freelance After effects work for production companies in the London/South East area.

    Anyway, I’m looking for a bit of feedback regarding how many people in the digital media industry have traditional art or design training (art college or similar). Please feel free to respond to this post with a little info regarding the job you do, and how you got into the industry. Thanks for any responses,

    Angie x