Tag: Design

  • Lip Sync in After Effects

    Lip Sync in After Effects

    Lip-syncing is something that all animators will be asked to do at some point in their career. The following technique automates the process of lip sync in After Effects and uses only built-in features of Adobe After Effects – no extra software is required! This video tutorial is an updated version for Adobe CS5. Tutorial files and a text-based version of the tutorial for older versions of After Effects are available here if you want to follow along.


    This project
    was a test project for a job for the BBC. They contacted me and asked if it was possible to create a minute of lip-synced animation on a cartoon character. The budget was really tight, as was the deadline, so I had only one day to create a character that lip-synced to a provided sound track for a full minute.

    Of course it was the BBC so I could hardly say no! So I said “Yes, no problem, I’ll take the job!” The minute I put the phone down I thought, “Oh Blimey! What have I got myself into?” I went to bed that night worrying about how I’d manage to get the job done. I tossed and turned, having nightmares about failing in my first job with the BBC. Then suddenly I sat bolt upright in bed and thought, “hang on a minute, what if I use Time Remapping with the Convert Audio To Keyframes Assistant, I’m sure that’ll work!” (That’s the kind of sad geek I really am!) 😉

    Anyway, I leapt out of bed, ran over to my computer and put together a test project to see if it would work. This is the very project I put together as a test to see if the technique would work. Luckily, it did and I got the job done on time!

    The audio used in this tutorial is contributed with kind permission. “Memories Of Your Own” – Words and Music by Jason A. Levine © Jason Levine 2007

  • Reviews for Design Essentials for the Motion Media Artist

    Reviews for Design Essentials for the Motion Media Artist

    I found this to be a really great book and is suitable for anyone who works or has an interest in motion graphics or animation. It would help someone who is studying at college, but is also very useful for those that have been in the industry a long time. I fall into the later category and was formally trained at art school in the early 80’s but I found it very useful to revisit many of the fundamental ideas that I was taught in those days which give me a solid grounding. It also gave me many new ideas and covered areas that did not exist or were in their infancy when I was a student.

    I really liked the sections on colour, typography and especially the section on composition which everyone in the industry should be familiar with but clearly are not. I’m sure this would fill in the gaps for people such as avid editors who have a purely technical background and would also inspire those who are creative technophobes to get stuck in with the computer packages today which frighten many with their complexity.

    I have shown the book to my manager at Sky and he will be buying some copies for the post production dept to read. He was was also very impressed.

    5.0 out of 5 stars on Amazon
    Paul Mark Provencher “ppro” reviewed Design Essentials for the Motion Media Artist: A Practical Guide to Principles & Techniques,

    I live in the corporate world of information technology. For the most part, this existence for me is based in an engineering mindset – plan, design, build, test, deliver.

    In my IT world, artists are thought to be undisciplined in these areas. Angie Taylor’s book makes it clear that successful artists clearly execute in much the same way as the best scientists. While they bring a creative streak that may not appear in engineering and science, they owe their success in business to their ability to plan, execute and deliver a satisfactory product on time, on budget.

    The author takes the reader through a series of concepts, starting with sketching. At first I didn’t understand what this had to do with Motion Media. But it very quickly became obvious why this was important. The book gives a great primer and cites numerous references (including current online resources) that may be used to dig in deeper.

    From there the book explores a number of concepts familiar to practicing artists – composition, story-boards, software packages (again with numerous references to some terrific resources), and all while developing the concepts in a way that follows the workflow of projects.

    I am reading this book (and several others) to gain a better command of the concepts I hope to apply to the use of my HD-movie capability of my DSLR. I believe that making movies, even if they end up being glorified home movies of my family, will benefit from a basic understanding of what goes into good motion media.

    This book has something to offer beginners like me as well as practicing professionals who need to update their understanding of motion media. I will probably read this book twice – the illustrations are wonderful, and perfectly on point, the explanations are very understandable, even for someone with little experience in this field (though I have been a photographer for a long time).

    The many resources cited as places to dig deeper are all quality products and have clearly been vetted thoroughly by the author.

    This is a solid book with much to offer. If you’re just getting into motion media like me, or perhaps you’d like to step into the latest tools and concepts, don’t hesitate to buy and read this book.

    View this book’s reviews on Amazon.com

  • Tip: Wrapping text around a circle in After Effects

    Tip: Wrapping text around a circle in After Effects

    I saw a post on the After Effects mailing list today asking how to wrap text around a circle in After Effects. Here’s how it’s done;

    1) Create a text layer with the text you want.
    2) Select the layer and then, with the Ellipse tool, draw a circular Mask on the Text layer.
    3) Open the Layer in the Timeline by clicking it’s disclosure triangle and then open the ‘Text’ section too.
    4) Open the ‘Path Options” and in there you’ll see a drop down menu under ‘Path’ where you can select your Mask, the text should now wrap around the circle.
    5) You can use the controls under ‘Path’, and the controls on the selected path in the Composition panel to adjust it to suit.

    Tip! Remember to save it as a preset for future jobs so you don’t have to continuously repeat the process each time you need a circular path text effect!

    Tip! There are also a load of free Animation Presets that create text on paths in the Effects and Presets panel, or you can Browse them in Bridge to get a real preview of what they look like before applying them.

  • Creating a Cityscape in 3D

    I want to share an example of one of my tutorials that I’m very proud to say inspired a great piece of work, “Black Day to Freedom” by the amazing Rob Chiu. I met Rob after watching a very inspiring talk he gave at the Flash on the Beach conference a few years back. I approached him after the talk to tell him how much I enjoyed it and was blown away when he told me that the movie he had shown was partly inspired by my own tutorials. We have since kept in touch and Rob has contributed to my latest book, Design Essentials for the Motion Media Artist.

    I’ve recently recorded the tutorial on video and want to share it with you. I’m in the process of updating some of my most popular demos and tutorials for my video2brain Adobe After Effects CS5 Learn by Video DVD.I’m featuring one FREE tutorial per week for the next five weeks here in my blog. If you like these free tutorials you can also buy the DVD here.

    My 3D Cityscape tutorial is one that I’ve had great feedback on and it really was one of the biggest compliments when an artist I admire told me that this demo had inspired some of his own work. Rob Chiu (AKA The Ronin) is a well respected live action commercial director and photographer. Black Day to Freedom was one of his first films, an animation entirely built in After Effects. This was actually inspired at least technically by this tutorial where a very basic city is built with skyscrapers and lights. Rob took this as a starting point and created his own world to help anchor the story. You can find out more about Rob on his website or you can read the foreword he wrote and see exmples of his work in my latest book, Design Essentials for the Motion Media Artist.

    The tutorial was developed co-written with myself and my good friend, Paul Tuersley, visual effects artist and After Effects guru of the highest order. Paul has worked on various feature films including Kick Ass, Angels and Demons and 10,000 BC. Paul came up with the initial idea to build a real 3D environment from basic flat layers within After Effects. This technique has now been used widely in a variety of different ways both in Motion Graphic designs and animation projects. Paul is also the moderator at AE Enhancers, a fabulous resource for After Effects artists that you should also check out.

    In this updated tutorial you’ll see how easy it is to create graphics from absolutely nothing, directly within After Effects. You’ll also see how to create 3D environments and build scenes for your animations. I’ve also included the project file you’ll need to go through the tutorial here 3D_City.aep. After going through the tutorial I’d love to see examples of what you’ve done with it so please post links in the comments section.


  • Creative After Effects Bonus Tutorials

    Creative After Effects Bonus Tutorials

    These Creative After Effects Bonus Tutorials are ones created specifically for readers of my “Creative After Effects”books but are also freely available to everyone who visits my website.They were designed for previous versions of After Effects but still contain useful tips, tricks and techniques. These books contain many more in depth tutorials on Adobe After Effects and related topics. It also includes a free CD full of goodies and training materials for your delectation!I welcome feedback from readers as it is essential to the growth and development of the book and website. If you have any comments or feedback please feel free to leave comments.
    Keylight Training movie This is a sample movie from my book “Creative After Effects 7″. The tutorial focusses on how to use The Foundry’s Keylight in After Effects to key out really badly shot DV footage. Angie shares tips and tricks on how to avoid problems and to fix them once they occur.
    Character Animation tutorial I’ve done a fair bit of character animation using After Effects, mainly cut-out animation, similar to the style Terry Gilliam used in the Monty Python animations and not too dissimilar to South Park’s style of animation.Till Parenting was introduced, I always used complex nesting procedures to link the individual parts of my characters together. I would draw them in Illustrator with each part on a separate layer, bring it in as a Comp and then Pre-comp the body parts together as needed.Parenting gets rid of the need for complex nesting hierarchies, I can now link the body parts together in one composition. This tutorial simplifies and demystifies the processes, making them less intimidating to those who have never used Parenting.
    The Talking Dog Lip syncing Tutorial for After Effects 6 is based on the After Effects 5.5 Production Bundle but can also be followed using the version 5.0 PB. If you want to get hold of an updated After Effects CS5 version of this tutorial, complete with new footage, it’s available as part of my After Effects CS5 Learn by Video DVD in association with Adobe’s Todd Kopriva.
    This tutorial shows you how to use Motion Math scripts and Time Remapping on a 3D – rendered character to automate the process of lip-synching. I used this technique in an animated program which was broadcast on a major UK TV network.
    Multipass for After Effects 5.5 and Cinema 4DXL These comprehensive tutorials cover techniques for creating multipass renders as well as importing and manipulating the multiple passes in After Effects 5.5.Using a whole host of old and new features to bring your 3D scene to life you will learn the basic principles and discover the power and flexibility that can be achieved by rendering out your 3D scene in passes.

    Download files:

    Cinema 4DXL (Version 7.303)

    Multipass tutorials

    Tutorial notes: Cinema 4D Multipass Project files: Cinema 4D project files

    After Effects 5.5

    Multipass tutorials

    Tutorial notes: After Effects Multipass Tutorial Notes

    Project files: After Effects project files Footage files: Movies, Lights, Footage files

    The Cinema 4D tutorial was co-written by myself and Tim Clapham of HelloLux. Find out more about Tim and HelloLux by here.

  • A free tutorial gift for the holidays

    A free tutorial gift for the holidays

    Well, another year comes to an end and the holidays are about to begin. What better way to spend your time off than sitting back comfortably and allowing me to entertain you with some of my latest After Effects CS5 tutorials?

    Here’s a free tutorial movie for you, taken from the “Jumpstarts” section of the video2brain After Effects CS5 Learn by Video DVD that I created this year in collaboration with Todd Kopriva from Adobe. You’ll also find lots of other free tutorials alongside this one so please enjoy them and let us know what you think. You can read what Eran Stern said about our DVD training here in his blog.

    After Effects has great tools for character animation called the Puppet tools. The Puppet Pin tool places a mesh over your footage using the alpha channel. You can add points to this mesh that allow to distort it and animate it, providing some really natural movement for your animations and motion graphics projects.

    The Puppet tool is as fun to use as a kids toy so get stuck in, have some fun and learn how to use this great set of tools to create your own fun animations.

    You can also find links to lots of other free tutorials and an extensive reading list right here on my website.

    Happy Holidays!

    Angie Taylor

    Promote your Page too

  • Is drawing important for designers?

    Is drawing important for designers?

    Drawing from Sketchbook © Angie Taylor 1999

    It’s a hot debate, as a designer, is it important to have drawing skills? I mean, you don’t need to draw anymore really? Surely computers can do it all for you now, download a few images, treat them with filters, composite them together in Adobe PhotoshopBob’s yer uncle (as we say in the UK!)

    But drawing is not only a process used to create finished aesthetic imagery to include in a finished design, it’s much more than that. It’s a learning process that is an important stage in the development of a confident visual language. When you draw something you learn to see with a different, more focused awareness. You start to question why things appear in a certain way, as a result you can understand how things are constructed, how light interacts with surfaces and how colors affect each other. Things that may not occur to you by just simply looking at an object. you need to truly understand these things to make your drawings work. Even if you don’t like your finished drawings, that really doesn’t matter, it’s the process of losing yourself in the craft of drawing that matters.

    And it’s never too late to learn, in the Drawing chapter of my book, Design Essentials for the Motion Media Artist I talk about my mother who didn’t start drawing till she was in her 70’s. It has made a huge difference to her life and now she can draw and paint like she would never have thought. You can check out excerpts from this chapter using Amazon’s “Search Inside” feature now. The chapter also contains some of the exercises that helped me learn to draw during my time at Art College. There’s also a resources section on this website that contains some tips, tricks and links to useful tutorials, websites and a complete reading list.

    Drawing Exercise from Design Essentials book - draw 6 circular objects with the same drawing implement achieving different textures for each
    Drawing Exercise from Design Essentials book – draw 6 circular objects with the same drawing implement achieving different textures for each

    Writing this book inspired me to include more about drawing in my software tutorial too. I recently recorded a new video training workshop for video2brain on Animation Character Design in Adobe Illustrator which will be available soon. In this tutorial I showed that you don’t need to limit yourself to using traditional drawing materials. In one of the tutorials I show how to create body shapes from primitive shapes and then use Illustrators fabulous drawing tools to sculpt these into more organic shapes, it’s an addictive and very creative process.

    So, I hope that you’ll give drawing a chance, pick up whichever implement inspires you to make marks and get sketching! don’t worry about the outcome, just enjoy the process!

    Using primitive shapes in Adobe Illustrator to create complex body shapes © Angie Taylor 2010
    Using primitive shapes in Adobe Illustrator to create complex body shapes © Angie Taylor 2010
  • Free tutorial – creating a 1960s retro opening title sequence

    Free tutorial – creating a 1960s retro opening title sequence

    My dear friend and esteemed and talented After Effects aficionado, Aharon Rabinowitz has posted my 1960’s retro “Pop-art” tutorial up on Red Giant TV. I actually recorded it in the 1960’s but it’s taken this long for technology to catch up to a stage where it can broadcast a whole hour (almost) of FREE After Effects video training online! Download and enjoy, it’s all free and includes tutorial files! You’ll love Aharon’s “authentic” Scottish accent at the end!

  • Adobe After Effects Training DVD and book

    Adobe After Effects Training DVD and book

    Well, it’s all happening this week! My new book, “Design Essentials for the Motion Media Artist” finally went on sale. I’m so excited and can’t wait to hear what people think of it – waiting for the first reviews is always an anxious time!

    As well as the book, I also have a new training DVD on the way which I worked on with the amazing Todd Kopriva from Adobe. “Adobe After Effects CS5 – Learn by Video” was produced by the brilliant team at video2brain and is available to pre-order now.


    As a little taster of what’s to come is available to view completely free now. Adobe After Effects CS5: Frequently Asked Questions – Zip Past Common Hurdles
    In this free course, Todd Kopriva, co-author of Adobe After Effects CS5 Learn by Video, helps you avoid common After Effects hiccups with a collection of answers to Frequently Asked Questions. Whether you´re having audio hiccups, getting pixelated vector graphics, or getting oversized files or jerky playback, Todd equips you to zip past these common hurdles and get back to creating great effects. I hope you enjoy these free tutorials and look forward to hearing your feedback.

  • Creative Constipation:

    Creative Constipation:

    I was describing a friend ofWaiting for ideas mine as suffering from creative constipation recently. It’s a common complaint, many designers suffer from it and it can be the result of multifarious causes; tight deadlines, the distractions of every-day life, worrying about friends and families, an untidy desk. All of these have been my obstructions at one time or another, preventing my creative juices from running freely.

    Fear of failure is the main culprit though, not just failure in the eyes of others but more importantly, failure to oneself. As a creative I’m cursed by the desire to create, it’s a necessary ablution – required to purge my brain of the incessant busy-ness it experiences on a daily basis. I have important things to say, I need to communicate!

    But it’s not just a simple case of drawing, designing or writing just any-old-thing, it has to be good, to mean something, to make sense and, most importantly, to inspire and evoke reaction. This pressure I place upon myself is enormous, it’s enough to make me seize up into a foetal ball – like a anally-retentive hedgehog.

    Luckily I’ve discovered ways of dealing with this potentially crippling condition. When  a bad case of CC kicks in, the natural response is to sit in front of a computer screen in a frozen state of panic, waiting for that elusive “idea” to formulate. This will never happen. OK, I lied, it might happen but chances are that, if it does, it will be a crappy idea.

    In order to free your mind and to come up with the best ideas you just need to get working. If you are a writer, just start writing! Any old rubbish that comes to your mind will do, whether it’s related to the subject or not. The exercise of writing will free you up and you’ll find that eventually you will start to incorporate the subject at hand and little gems will appear amongst the sentences. Once this happens, go over it again, delete the rubbish, elaborate on the good stuff and craft it into something positive.

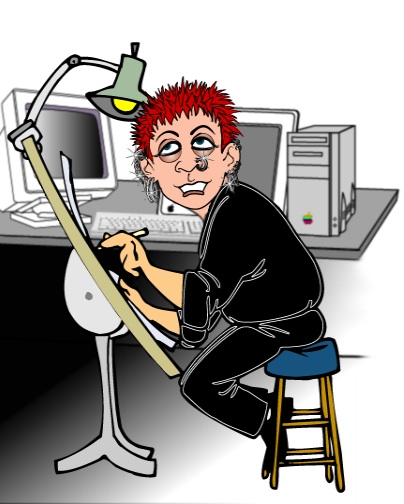
    If you’re a designer or artist, get away from the computer! Pick up  a sketchbook and start drawing. If you can’t draw then go out and take some photographs or even Google images for inspiration by typing in key words. Drag what you find into a a document to create a mood board (I use Curio for this as it maintains links to the original files).

    If you’re working on a design think about the individual components separately as this can be less intimidating than thinking about the job as one, huge, insurmountable project. Spend an hour playing with fonts, not just fonts on your computer but looking around at shop signs, magazines, anywhere you see type. Tracing letter-forms from magazines can be a great way of “feeling” a font instead of just liking it. Spend another hour with some paint, playing with it, experimenting to find color combinations that please you or convey the feeling you want to get across.

    From these experiments your ideas will grow, some will be awful but elements will shine through that you can use in the current, or future projects. The ideal is find time to do creative exercises like these on a regular basis, even when there’s no deadline. Modern life and work pressures make this very difficult but a good employer knows that to get the best out of creative talent, employees need inspiration and time for experimentation. Most creative agencies make sure their staff are looked after fairly well with generous time off (compared to other industries) and a good working environment. (Why do you think most production companies have fridges full of wholesome food, drinks and the odd bit of alcohol?) 🙂

    If you’re a freelancer, remember that you are your own employer so don’t be too hard on yourself. Allow time for experimentation and inspiration. Avoid stress, look after yourself and don’t forget to have the odd bit of fun. Finally, once the ideas start coming, enjoy it but don’t get too cocky or over-confident. You want to be freed up by these exercises but not to the extent where you’re producing nothing but a vast quantity of digital diarrhea!

    Angie’s track of the day – Free Your Mind – En Vogue
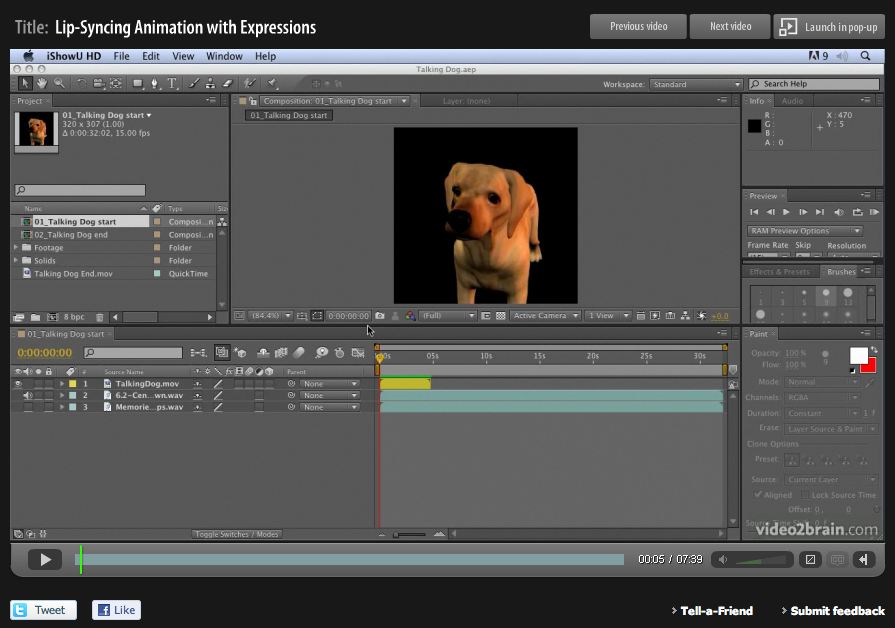
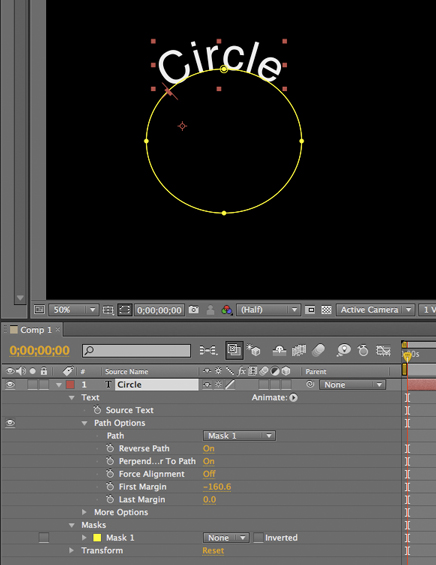
  • Copyright or wrong?

    Copyright or wrong?

    I’ve been busy putting the finishing touches to my forthcoming book, “Design Essentials for the Motion Media Artist“.

    It’s funny, I’ve written books before. Software books, teaching people how to use Adobe After Effects to be specific. I was commissioned to write these books, at the time there were very few books on the subject and there was a growing demand for them. I must say, I hated writing them, the process was so bogged down with technical checking and they had to be written in a very standard, linear way which I found stifling.

    I’m pleased to say that this book was different. It’s about the principles of art and design, a subject very close to my heart, something I live and breathe so writing it was very hard work but also, a real pleasure. That is, till it came to illustrating the book. Creating my own images and diagrams was fine, no problem. But when it came time to adding photographs of famous inventors, artists, artworks and examples of motion graphics, the nightmares started.

    I tried my best to get clearance for the images, but to no avail. First of all I had to find out who the copyright owners were, this is not as easy as you may think. In some cases several people claim to own copyright so how do I know which one to believe? Even after finding out and writing to them, I’d often get no response. One day I rang the Galleria Nazionale delle Marche in Italy to ask for permission to use a reproduction of The Flagellation by Piero Della Francesca, I greeted them in my best pigeon Italian (which admittedly is pretty poor!) I asked if there was anyone there who spoke English and they promptly hung up on me! This happened three times!

    This was an extreme example but fairly typical in that nobody seemed interested in my offers to pay for written permissions to use their work. It seems that everybody wants to protect their work but nobody wants to sell you the rights to use it, so what’s the point in protecting it, what are they protecting it from exactly?

    I have no intention of stealing anybody’s work, using it for any obscene publication, claiming that it was mine, all I wanted to do was pay tribute to some of my favorite pieces of work, and their creators. I presumed that copyright was intended to prevent the creators from losing revenue but if they’re not making it easy for people to pay, how do they expect to make any money? It seems very sad that the creative outpourings of artists and designers are surrounded by a cobweb of bureaucracy that prevents them from getting exposure, making money, providing inspiration for others and being shared, loved and developed into the art and design of tomorrow.

    Since encountering this situation I have read up on copyright and want to share a couple of really interesting articles on the subject. The Abolish Copyright website explains why this system is so antiquated and has some great links to other articles. Anyone who is planning to provide web content in the UK should read up about the Digital Economy Bill which is being pushed through parliament as we speak. It’s likely to make matters a whole lot worse by propping up and supporting bad business models by giving unprecedented power to private entities to impose sanctions based on suspicion rather than due process. They can even take away your internet access if they suspect you of having copyright items on your website, it’s crazy! But, it’s not too late to act, The Open Rights Group will help you fight this insidious and draconian bill before it’s too late!

    Finally, as a celebration of those brave individuals who stick two fingers up at copyright law, and as a tribute to Malcolm McLaren, a true eccentric Englishman who helped change the face of music. Bow Wow Wow‘s fantastic “C30, C60, C90 – Go!” – listen free on Last FM.

  • Women of Punk 02

    Women of Punk 02

    Growing up in Scotland in 1975, I had no idea what was going on the other side of the Atlantic. Little did I know that American “women of punk” were in the process of breaking ground so that people like me could find a voice and be accepted despite our inherent weirdness!

    The first woman who I remember having the ideals and attitude that define the category of “punk” was the wonderful and truly original, Patti Smith. I’m sure Patti hates labels as much as I do. In fact the majority of folks labeled “punk” would kick and scream against having it safety-pinned to them. Sadly it’s human nature to feel the need to classify so, Patti, sorry for calling you a punk but please see it as the badge of honor it’s intended to be!

    Patti was 29 in 1975, a veteran in punk terms, when she released Horses, her debut ground-breaking mix of rock and poetry. Lenny Kaye, the bands guitarist was also a writer. Lenny has been accused of instigating the use of “Punk Rock” to describe the raw, basic, gut-formed music that was desperately in need of a genre-defining moniker.

    Horses is one of my top albums of all time. It fits into my elite category of “albums I never get tired of hearing” (of which there are only about 20). She continues to record and perform today and her recent albums are just as compelling as they ever were. She’s one of those rare individuals who, as well as writing her own fabulous originals (like title-track Horses) can take other artists songs and make them completely her own, take for example her cover of Them‘s Gloria or, more recently, Nirvana’s, Smells Like Teen Spirit.

    Patti also had a big influence on the “Punk look”, and on design. She was the first woman I remember seeing wearing a biker jacket, jeans and cowboy boots, just like the guys, and she looked great with her straggly hair and gaunt beauty. She lived with photographer, Robert Mapplethorpe who produced countless iconic images of Patti, including the album covers.

    Patti was part of the legendary CBGBs and Max’s Kansas City scene in New York in the the early seventies. The scene was frequented by other great luminaries of the punk scene like Iggy Pop, Velvet Underground, Andy Warhol, The Ramones, Wayne (Jayne) County and of course Debbie Harry who started out as a waitress at the clubs and went on to form 80’s supergroup, Blondie. Debbie Harry brought sex to the Punk Rock movement, most female punks were considered unattractive by regular guys but Debbie Harry toyed with their affections by pouting at the camera, then following this with mocking, teasing gestures. Sadly, partly due to her cuteness, I think she never got the recognition she deserved as a top song-writer and performer. She and Blondie wrote some of the greatest punk love songs of all time including “Picture This“, “Denis“, “Hangin on the Telephone” and “In the Flesh“. After all, punks fall in love too y’know!

    Nico became noticed as part of the Velvet Underground/ Andy Warhol scene at the Chelsea Hotel in New York. Her gorgeously, deep, flat vocals can be heard on Femme Fatale, I’ll be Your Mirror and All tomorrow’s Parties as well as others considered to be some of the best Velvet Underground tracks. Although the Velvets can’t really be considered punks their influence on the punk movement can’t be underestimated. People like Siouxsie Sioux had ground broken for them by the likes of Nico with her fusing of 60’s Berlin beatnik, Marlene Deitrich style deep vocals and a passion for the art of singing that can also be seen in the likes of Beth Gibbons from Portishead.

    There were countless other acts that influenced me and others, and still continue to do so. Joan Jett was a rock chic of the highest order, as was the Pretenders, Chrissie Hynde. You just have to look at the amazing Alison Mossheart of The Kills, Discount, and more recently, Dead Weather to see their influence carried down the generations.

    Without these ground-breaking women we wouldn’t have had PJ Harvey, Kate Bush, Annie Lennox, Madonna, Bjork who are mainstream pop icons of today. And we definitely wouldn’t have any of the women that formed the UK punk scene who we’re going to take a look at in the next installment. I hope you enjoy my little nostalgic trip down memory lane. Please listen to the music and please feel free to chime in if you think I’ve missed anyone!