Tag: creative professionals

  • Basics on Solids in Adobe After Effects

    Basics on Solids in Adobe After Effects

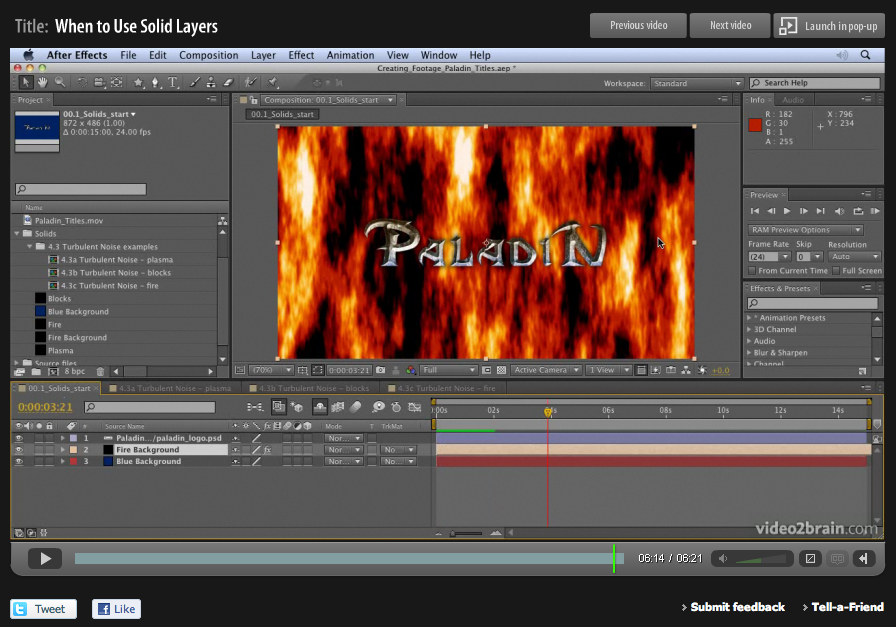
    When designing motion graphics in Adobe After Effects there are times you just need to create a plain old layer to apply effects to. Solids are just right for this purpose, and for lots of other uses in After Effects.

    This video is aimed at a basic level. It shows you how to create solid-color layers and walks you through some of their uses.

    You can find more free videos like these from our After Effects CS5 Learn by Video product on the video2brain website. Please enjoy them – happy keyframing!

  • Animated Character Design in Adobe Illustrator

    Animated Character Design in Adobe Illustrator

    I’m very pleased to offer my readers a couple of free tutorials from my very first video2brain workshop on Adobe Illustrator. This workshop will teach you how to use Illustrator’s tools and features to prepare 2D files for animation in Adobe After Effects.

    You’ll learn how to make the most of Illustrator’s drawing tools and Autotrace feature, and to how use Live Paint and Kuler to recolor artwork. You’ll also get tons of tips and tricks for giving artwork a hand-drawn look and find out how to set up layers, aspect ratios, and transparency options for importing into After Effects.

    I’ll share many of my techniques for using Illutrator’s extensive drawing capabilities to create characters for animation. Topics covered include:

    • Setting up your workspace for video and animation
    • Working with Autotrace, Live Paint, and Kuler
    • Using multiple artboards for creating storyboards
    • Taking advantage of views and workspaces
    • Drawing freehand in Illustrator using a variety of tools including the new improved Eraser tool and the Blob Brush tool

    Whether you’re a motion graphic designer, animators, storyboard artists, video editors or illustrators, if you want to create 2D animation from flat, vector-based artwork, this workshop will be an invaluable resource.

    The lessons are wrapped in a feature-rich interface that lets you jump to any topic and bookmark individual sections for later review. Full-Screen mode provides a hi-def, immersive experience, and Watch-and-Work mode shrinks the video into a small window so you can play the videos alongside your application. Also included are exercise files that give you an easy way to try out the techniques you learn.

    Click here to get an overview of the workshop and download free tutorials using the following links;

    Working with Live Paint

    Working with the Brush Tool

  • Hand-drawn animation with After Effects Paint tools

    Hand-drawn animation with After Effects Paint tools

    Week four of 2011 brings my fourth FREE Giveaway Tutorial.

    This tutorial comes from my Adobe After Effects CS5 Learn by Video DVD from video2brain.

    The paint tools in After Effects are usually used for cloning or filling in mattes, but they can also be used to create stop-motion-style animation. In this movie you’ll see how they can be used to create a stop-motion style without the need for painful frame-by-frame tweaking of keyframes or drawings.

    In this Jumpstart tutorial I’ll show you how to create a little animated stickman, creating a looping walk cycle. I hope you can use the tips and tricks from this tutorial to create your own unique twist on my idea. If you do please come back here and post a link to your creation, I’d love to see it!

    There are a few Jumpstart tutorials included with the Learn by Video DVD. These  are designed to give you a quick overview of a particular technique.  The DVD also contains many more detailed tutorials, designed to take you through techniques and tech you After Effects using a more detailed step-by-step approach. I hope you enjoy watching them as much as I enjoyed making them.

    Happy Keyframing!

  • Lip Sync in After Effects

    Lip Sync in After Effects

    Lip-syncing is something that all animators will be asked to do at some point in their career. The following technique automates the process of lip sync in After Effects and uses only built-in features of Adobe After Effects – no extra software is required! This video tutorial is an updated version for Adobe CS5. Tutorial files and a text-based version of the tutorial for older versions of After Effects are available here if you want to follow along.


    This project
    was a test project for a job for the BBC. They contacted me and asked if it was possible to create a minute of lip-synced animation on a cartoon character. The budget was really tight, as was the deadline, so I had only one day to create a character that lip-synced to a provided sound track for a full minute.

    Of course it was the BBC so I could hardly say no! So I said “Yes, no problem, I’ll take the job!” The minute I put the phone down I thought, “Oh Blimey! What have I got myself into?” I went to bed that night worrying about how I’d manage to get the job done. I tossed and turned, having nightmares about failing in my first job with the BBC. Then suddenly I sat bolt upright in bed and thought, “hang on a minute, what if I use Time Remapping with the Convert Audio To Keyframes Assistant, I’m sure that’ll work!” (That’s the kind of sad geek I really am!) 😉

    Anyway, I leapt out of bed, ran over to my computer and put together a test project to see if it would work. This is the very project I put together as a test to see if the technique would work. Luckily, it did and I got the job done on time!

    The audio used in this tutorial is contributed with kind permission. “Memories Of Your Own” – Words and Music by Jason A. Levine © Jason Levine 2007

  • Reviews for Design Essentials for the Motion Media Artist

    Reviews for Design Essentials for the Motion Media Artist

    I found this to be a really great book and is suitable for anyone who works or has an interest in motion graphics or animation. It would help someone who is studying at college, but is also very useful for those that have been in the industry a long time. I fall into the later category and was formally trained at art school in the early 80’s but I found it very useful to revisit many of the fundamental ideas that I was taught in those days which give me a solid grounding. It also gave me many new ideas and covered areas that did not exist or were in their infancy when I was a student.

    I really liked the sections on colour, typography and especially the section on composition which everyone in the industry should be familiar with but clearly are not. I’m sure this would fill in the gaps for people such as avid editors who have a purely technical background and would also inspire those who are creative technophobes to get stuck in with the computer packages today which frighten many with their complexity.

    I have shown the book to my manager at Sky and he will be buying some copies for the post production dept to read. He was was also very impressed.

    5.0 out of 5 stars on Amazon
    Paul Mark Provencher “ppro” reviewed Design Essentials for the Motion Media Artist: A Practical Guide to Principles & Techniques,

    I live in the corporate world of information technology. For the most part, this existence for me is based in an engineering mindset – plan, design, build, test, deliver.

    In my IT world, artists are thought to be undisciplined in these areas. Angie Taylor’s book makes it clear that successful artists clearly execute in much the same way as the best scientists. While they bring a creative streak that may not appear in engineering and science, they owe their success in business to their ability to plan, execute and deliver a satisfactory product on time, on budget.

    The author takes the reader through a series of concepts, starting with sketching. At first I didn’t understand what this had to do with Motion Media. But it very quickly became obvious why this was important. The book gives a great primer and cites numerous references (including current online resources) that may be used to dig in deeper.

    From there the book explores a number of concepts familiar to practicing artists – composition, story-boards, software packages (again with numerous references to some terrific resources), and all while developing the concepts in a way that follows the workflow of projects.

    I am reading this book (and several others) to gain a better command of the concepts I hope to apply to the use of my HD-movie capability of my DSLR. I believe that making movies, even if they end up being glorified home movies of my family, will benefit from a basic understanding of what goes into good motion media.

    This book has something to offer beginners like me as well as practicing professionals who need to update their understanding of motion media. I will probably read this book twice – the illustrations are wonderful, and perfectly on point, the explanations are very understandable, even for someone with little experience in this field (though I have been a photographer for a long time).

    The many resources cited as places to dig deeper are all quality products and have clearly been vetted thoroughly by the author.

    This is a solid book with much to offer. If you’re just getting into motion media like me, or perhaps you’d like to step into the latest tools and concepts, don’t hesitate to buy and read this book.

    View this book’s reviews on Amazon.com

  • Tip: Wrapping text around a circle in After Effects

    Tip: Wrapping text around a circle in After Effects

    I saw a post on the After Effects mailing list today asking how to wrap text around a circle in After Effects. Here’s how it’s done;

    1) Create a text layer with the text you want.
    2) Select the layer and then, with the Ellipse tool, draw a circular Mask on the Text layer.
    3) Open the Layer in the Timeline by clicking it’s disclosure triangle and then open the ‘Text’ section too.
    4) Open the ‘Path Options” and in there you’ll see a drop down menu under ‘Path’ where you can select your Mask, the text should now wrap around the circle.
    5) You can use the controls under ‘Path’, and the controls on the selected path in the Composition panel to adjust it to suit.

    Tip! Remember to save it as a preset for future jobs so you don’t have to continuously repeat the process each time you need a circular path text effect!

    Tip! There are also a load of free Animation Presets that create text on paths in the Effects and Presets panel, or you can Browse them in Bridge to get a real preview of what they look like before applying them.

  • Creating a Cityscape in 3D

    I want to share an example of one of my tutorials that I’m very proud to say inspired a great piece of work, “Black Day to Freedom” by the amazing Rob Chiu. I met Rob after watching a very inspiring talk he gave at the Flash on the Beach conference a few years back. I approached him after the talk to tell him how much I enjoyed it and was blown away when he told me that the movie he had shown was partly inspired by my own tutorials. We have since kept in touch and Rob has contributed to my latest book, Design Essentials for the Motion Media Artist.

    I’ve recently recorded the tutorial on video and want to share it with you. I’m in the process of updating some of my most popular demos and tutorials for my video2brain Adobe After Effects CS5 Learn by Video DVD.I’m featuring one FREE tutorial per week for the next five weeks here in my blog. If you like these free tutorials you can also buy the DVD here.

    My 3D Cityscape tutorial is one that I’ve had great feedback on and it really was one of the biggest compliments when an artist I admire told me that this demo had inspired some of his own work. Rob Chiu (AKA The Ronin) is a well respected live action commercial director and photographer. Black Day to Freedom was one of his first films, an animation entirely built in After Effects. This was actually inspired at least technically by this tutorial where a very basic city is built with skyscrapers and lights. Rob took this as a starting point and created his own world to help anchor the story. You can find out more about Rob on his website or you can read the foreword he wrote and see exmples of his work in my latest book, Design Essentials for the Motion Media Artist.

    The tutorial was developed co-written with myself and my good friend, Paul Tuersley, visual effects artist and After Effects guru of the highest order. Paul has worked on various feature films including Kick Ass, Angels and Demons and 10,000 BC. Paul came up with the initial idea to build a real 3D environment from basic flat layers within After Effects. This technique has now been used widely in a variety of different ways both in Motion Graphic designs and animation projects. Paul is also the moderator at AE Enhancers, a fabulous resource for After Effects artists that you should also check out.

    In this updated tutorial you’ll see how easy it is to create graphics from absolutely nothing, directly within After Effects. You’ll also see how to create 3D environments and build scenes for your animations. I’ve also included the project file you’ll need to go through the tutorial here 3D_City.aep. After going through the tutorial I’d love to see examples of what you’ve done with it so please post links in the comments section.


  • Creative After Effects Bonus Tutorials

    Creative After Effects Bonus Tutorials

    These Creative After Effects Bonus Tutorials are ones created specifically for readers of my “Creative After Effects”books but are also freely available to everyone who visits my website.They were designed for previous versions of After Effects but still contain useful tips, tricks and techniques. These books contain many more in depth tutorials on Adobe After Effects and related topics. It also includes a free CD full of goodies and training materials for your delectation!I welcome feedback from readers as it is essential to the growth and development of the book and website. If you have any comments or feedback please feel free to leave comments.
    Keylight Training movie This is a sample movie from my book “Creative After Effects 7″. The tutorial focusses on how to use The Foundry’s Keylight in After Effects to key out really badly shot DV footage. Angie shares tips and tricks on how to avoid problems and to fix them once they occur.
    Character Animation tutorial I’ve done a fair bit of character animation using After Effects, mainly cut-out animation, similar to the style Terry Gilliam used in the Monty Python animations and not too dissimilar to South Park’s style of animation.Till Parenting was introduced, I always used complex nesting procedures to link the individual parts of my characters together. I would draw them in Illustrator with each part on a separate layer, bring it in as a Comp and then Pre-comp the body parts together as needed.Parenting gets rid of the need for complex nesting hierarchies, I can now link the body parts together in one composition. This tutorial simplifies and demystifies the processes, making them less intimidating to those who have never used Parenting.
    The Talking Dog Lip syncing Tutorial for After Effects 6 is based on the After Effects 5.5 Production Bundle but can also be followed using the version 5.0 PB. If you want to get hold of an updated After Effects CS5 version of this tutorial, complete with new footage, it’s available as part of my After Effects CS5 Learn by Video DVD in association with Adobe’s Todd Kopriva.
    This tutorial shows you how to use Motion Math scripts and Time Remapping on a 3D – rendered character to automate the process of lip-synching. I used this technique in an animated program which was broadcast on a major UK TV network.
    Multipass for After Effects 5.5 and Cinema 4DXL These comprehensive tutorials cover techniques for creating multipass renders as well as importing and manipulating the multiple passes in After Effects 5.5.Using a whole host of old and new features to bring your 3D scene to life you will learn the basic principles and discover the power and flexibility that can be achieved by rendering out your 3D scene in passes.

    Download files:

    Cinema 4DXL (Version 7.303)

    Multipass tutorials

    Tutorial notes: Cinema 4D Multipass Project files: Cinema 4D project files

    After Effects 5.5

    Multipass tutorials

    Tutorial notes: After Effects Multipass Tutorial Notes

    Project files: After Effects project files Footage files: Movies, Lights, Footage files

    The Cinema 4D tutorial was co-written by myself and Tim Clapham of HelloLux. Find out more about Tim and HelloLux by here.

  • Adobe After Effects Training DVD and book

    Adobe After Effects Training DVD and book

    Well, it’s all happening this week! My new book, “Design Essentials for the Motion Media Artist” finally went on sale. I’m so excited and can’t wait to hear what people think of it – waiting for the first reviews is always an anxious time!

    As well as the book, I also have a new training DVD on the way which I worked on with the amazing Todd Kopriva from Adobe. “Adobe After Effects CS5 – Learn by Video” was produced by the brilliant team at video2brain and is available to pre-order now.


    As a little taster of what’s to come is available to view completely free now. Adobe After Effects CS5: Frequently Asked Questions – Zip Past Common Hurdles
    In this free course, Todd Kopriva, co-author of Adobe After Effects CS5 Learn by Video, helps you avoid common After Effects hiccups with a collection of answers to Frequently Asked Questions. Whether you´re having audio hiccups, getting pixelated vector graphics, or getting oversized files or jerky playback, Todd equips you to zip past these common hurdles and get back to creating great effects. I hope you enjoy these free tutorials and look forward to hearing your feedback.

  • Decoupling Production

    I’m interested in the trend of decoupling going on in the world of TV and film production companies. It’s the world that I used to live in so it’s close to my heart. Decoupling refers to the process of reducing costs to the client by outsourcing some of the work to freelancers or external services, rather than providing them in house. Decoupling offers big opportunities to everyone in our industry from company directors to freelancers and runners, if we can be brave enough to embrace it.

    Increasingly, over the past 20 years, production companies have been expected to be flexible, pressurised to increase their skills, enabling them to deliver every possible service and format to their clients. This entails increasing staff to cover all areas of production, extending the capabilities of the company so they can also generate content for new and emerging mediums (web, mobile devices, games etc). The result is increased costs due to wages and also investment in bigger studio spaces.

    The inevitable has happened, the work that was plentiful during these times of development has somewhat dried up. Production companies are competing even harder for the same jobs and clients find it harder to differentiate between companies as they all offer essentially the same services. Frustrated freelancers who weren’t finding the right amount of work (or satisfaction from it) started to create their own collectives which for a while injected some new life into the industry but they too have suffered from what I call the “jack of all trades syndrome”. Feeling that they must offer all services in-house, often stretching the capabilities of their employees and making the work suffer as a result.

    Of course there are pros and cons with everything in life, this is no exception. On a positive note, decoupling could provide the opportunity to return to an industry where craft specialization matters. Instead of all production companies offering essentially the same services and competing for every scrap of work, each could become king of a particular area, passing work onto other companies when the work is more suited to their specific skill-field. A certain amount of this already goes on within Soho but I really believe this could be extended. It would improve the quality of work, employee morale and confidence within individual companies.

    By letting some of their in house designers go and instead using freelancers, companies could open up to diversity, calling on different specialist skills appropriate for each job. It could create healthy competition between freelance creatives but also opportunity to create alliances and a network for swapping skills. In house designers can sometimes find it hard to maintain focus and motivation, so those more suited to a freelance lifestyle could benefit greatly here.

    However, I worked as a freelancer in the industry for over 12 years so I know, only too well the challenges that can be faced. Remote working is not easy, you need to be motivated, focused, pro-active and willing to network. Ideas can be harder to develop on your own, it’s amazing how much creative development goes on during breaks around the coffee machine or meetings in the pub after work for production companies. Get rid of your in house team and you risk losing the teamwork that’s so valuable for the development of ideas and a sense of company identity. It can also be hard to find the right people at the right time to work on a production, they may be busy with another company.

    On the whole though I see decoupling as an exciting prospect. It increases the unknown to the equation. Risk and uncertainty can be scary but embrace them and you often find new exciting challenges that, combined with a bit of initiative, can be the impetus to creativity in it’s truest sense. I’d love to hear the thoughts of other design professionals about the whole debate associated with decoupling, and also any stories about the challenges associated with remote working. What are these difficulties and how can we find ways of making it work?

  • MacWorld 2010 – Are you going to San Fransisco?

    I’m hoping to see a few of you at MacWorld 2010 where I’ll be speaking next year. I love San Fransisco so will be taking a little extra time out to hang out with my old friends, Amacker and Nina at the Lucky 13 bar on Castro. I also hope to catch up with all my other SF buddies, it’s always hard to fit everything in as there are so many people I love in the bay area!

    If you’d like to attend you can click on the banner to the left to get a discount. Click on the Register button and then just use my personal priority code, ATAYLOR when you register.
    Below are details about the talk I’ll be delivering;

    Users Conference US964: Creative Video Workflow – From Storyboard to Completion – Feb. 12, 2010    3:00 PM – 4:15 PM

    Angie Taylor will take you on a journey through a typical video project, showing the entire process including the creation of sketches, brainstorms and storyboards, audio production and clean up, editing, and producing the final project. Angie will also discuss how creative professionals can bring unity and clarity to complex creative projects. Aspects of automating time sheets, liaising with clients, auditing jobs and packaging final files for delivery will be explored within this session.

    Anyone with personal or professional interests in creating digital videos and working with tools such as After Effects, Flash, Flow, CS4, Illustrator, Photoshop, Premiere Pro, Final Cut Pro and Soundbooth, will benefit from this session.

    If you are interested in a streamlined way to look at the digital video process including tips and tricks using various software tools that will help maximize the creative input and minimize the project complexities, then this session is for you!

    Angie’s Shuffle Track of the Day: San Fransisco – Scott McKenzie – listen free on Last FM