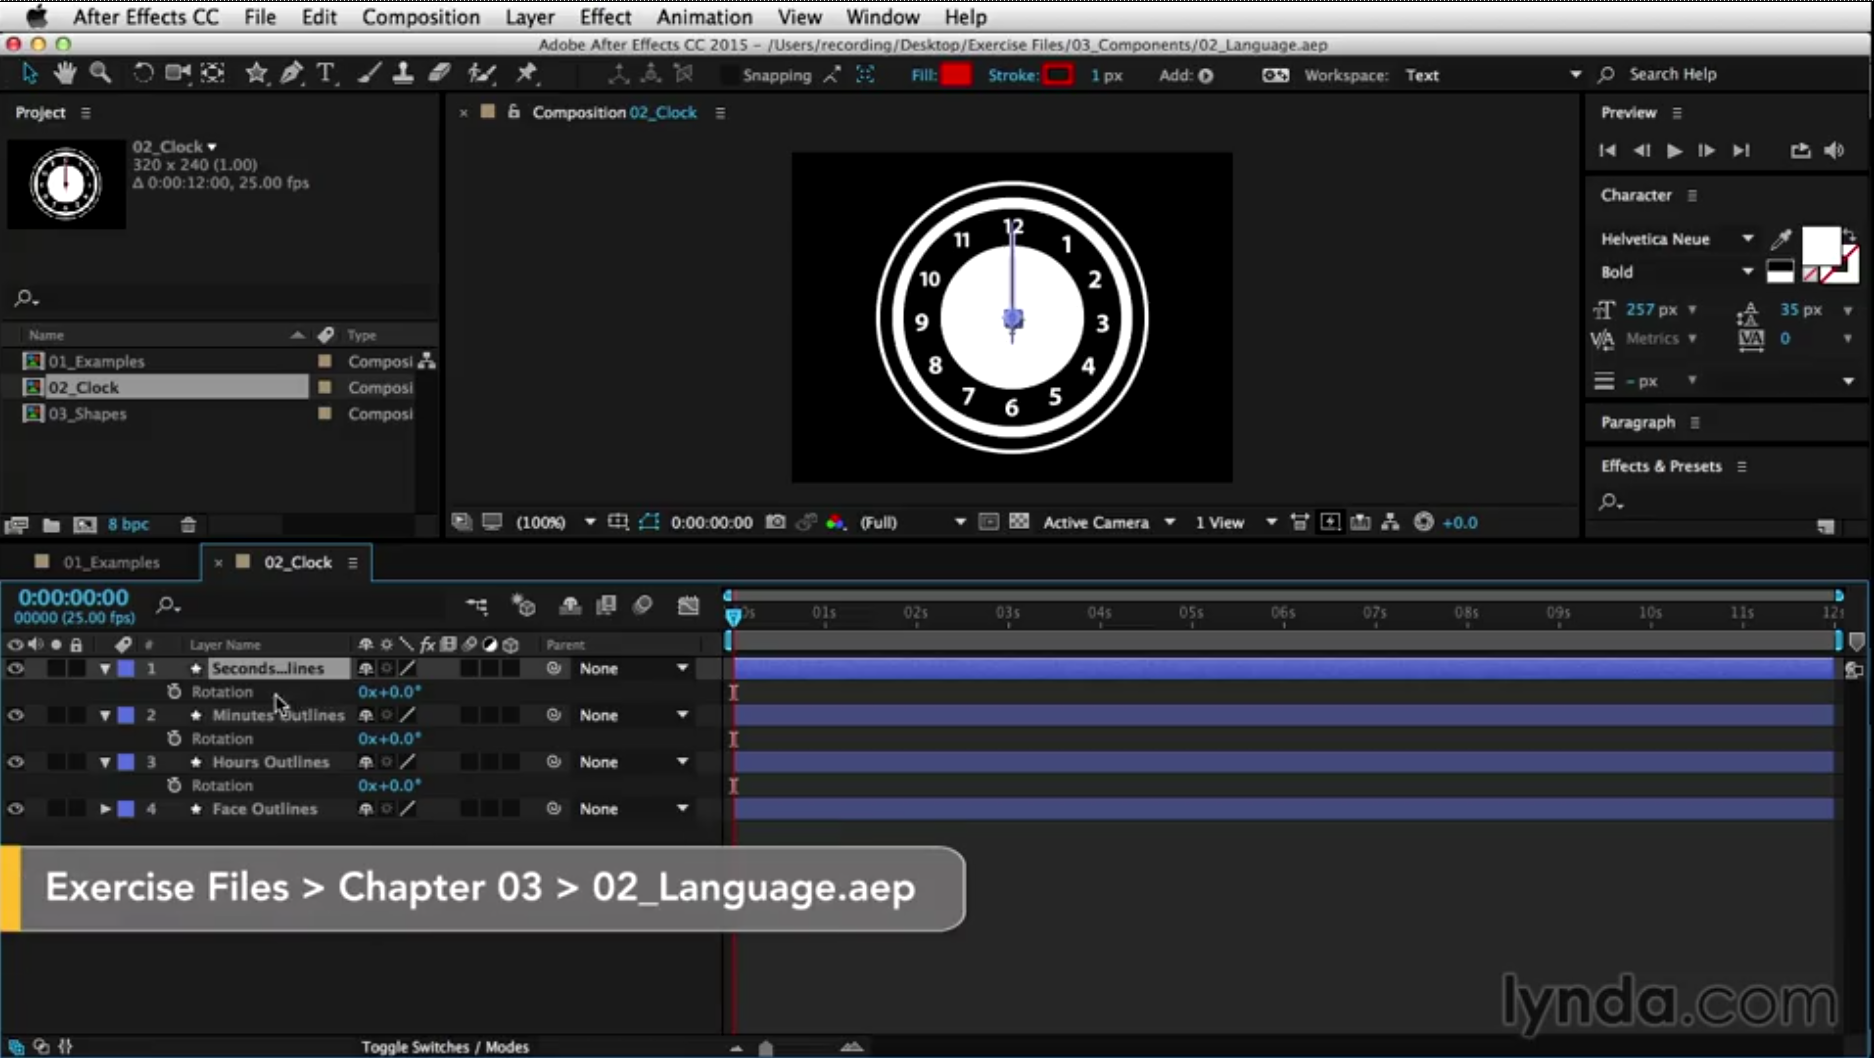
Expression language tutorial – taught by Angie Taylor as part of the After Effects Expressions for Premiere Pro Editors
Tag: angie Taylor
-
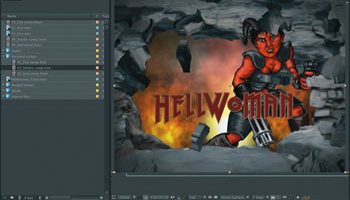
3D fire in After Effects
Creating 3D fire in After Effects

If your budget doesn’t stretch to pricey plug-in filters you can use the native effects to create fantastic 3D fire in After Effects. Read my article in Digital Arts about how to achieve this. The tutorial features a step-by-step guide that’s easy to follow.
After Effects includes built-in particle filters you can use in your projects. Although they are not as powerful as some of the specialist 3D particle filters (like Trapcode’s amazing Particular plug-in), you can use them to achieve fairly convincing animations of natural phenomena such as fire, smoke, rain and dust.
All you need is patience and a natural affinity for tweaking sliders. In this tutorial, Angie Taylor shows you how to create fire, smoke effects and 3D rocks, all using After Effects’ built-in 3D particle filters, to create part of the title sequence for animation, Hellwoman, a spoof of the movie Hellboy.
Visit the Digital Arts website to get free access to this tutorial.
-
After Effects World Conference
Where VFX, Motion Graphics and creativity connect

Never before has an After Effects user conference of this magnitude been available. Until now. Uniquely designed with the needs of motion graphics & visual effects professionals in mind, as well as professional editors new to After Effects, it’s your opportunity to amp up your software aptitude, build professional connections and freely engage in creative exploration.
Discount Code
Special 10% discount for all Angie Taylor subscribers and customers. Use the customer code ANGIEAEW near the end of the registration process to redeem. Contact Event Manager Jack Reilly for further information.
What you get
Three and a half days, and over 40 cutting-edge training sessions to build your efficiency and elevate your creativity using this sophisticated software. You’ll interact directly and learn first-hand from iconic After Effects trainers and users.
After Effects World Conference will also bring attendees into the heart of the Adobe brain trust. On Friday, all of our speakers and attendees will depart the hotel to spend the day at the Adobe offices! Once there, attendees will be treated to panel discussions, a mini expo, workshops with the founders and designers of After Effects, and a special keynote presentation.
After Effects is the industry standard for motion graphics and visual effects. It’s a feature-rich program, and now, even includes a new 3D pipeline with Cinema 4D. After Effects allows users to create something truly great. Join us at After Effects World Conference and learn how.
-
After Effects Twitter Tips
Here’s my latest collection of After Effects Twitter Tips from my archive. Learn all sorts of useful tips and tricks in bite sized portions. Make sure to Follow me on Twitter to get these tips regularly as well as other goodies I like to share.

After Effects tip – To make a one node camera point at a layer, select the layer, then with the unified camera tool selected, hit the F key AFTER EFFECTS TIP | Copy & Paste any mask shape into a position property to make layer move along the path. Click on property name to select AFTER EFFECTS TIP | Give Adobe your feedback | Report Feature Requests & bugs here; http://t.co/s7f1NOPs @AdobeAE #AfterEffects AFTER EFFECTS TIP | To stretch or squash an animation – select all keyframes – hold Alt key & drag first or last Keyframe in selected group After Effects Tip | Video tutorial – Use the Stroke effect on Illustrator paths to make handwriting animate on screen http://t.co/0E6UHcKOsr After Effects Tip of the day! How to make a layer follow a path copied from Adobe Illustrator artwork. http://fb.me/CEapjgCw After Effects tip; add new Refine Matte effect to ANY matte in AE to refine edges or add motion blur. Not just for Rotobrush! Fabulous tool! After Effects tip; Animating characters, use expression pickwhip 2 link body parts 2 cntrl layer. Expression control effect 4 each movement. After Effects Tip; How to make a layer follow a path copied from Adobe Illustrator artwork; http://bit.ly/f8tP4w After Effects tip; Lay down markers in time with audio by previewing the audio and hitting * on number pad when you want markers to appear. After Effects tip; to edit the path of an effect’s positional property (e.g. Particles) got to Layer panel & choose effect in target menu. After Effects tip; To use more than one layer as matte without precomping. Add multiple copies of Sett Matte effect to layer needing matted. After Effects Tip: @butlerm_com Try combining transfer modes, use more than one layer with a different mode and opacity value on each! 🙂 After Effects tip: Add keyframes for hidden Transform properties by selecting layers & hitting alt & property letter (eg alt-p for position) After Effects tip: Applied a preset & wanna find out how it’s made? Select layers then double-hit the U key to expose adjusted properties. After Effects tip: Make 3D layers turn to face camera as it moves. Select layers, go to Layer>Transform>Auto Orient. choose Towards Camera AFTER EFFECTS TIP: Right-click on a property value to open Edit Value dialog. Here u can access different measurement units & adjust ranges. AFTER EFFECTS TIP: Rotate , scale, skew or move all layers by adding the Transform effect to Adjustment layer – keyframe to animate them After Effects tip: Scaled a layer down, nested the comp, then scaled it up? Click Collapse Transformations switch to fix resolution issues. AFTER EFFECTS TIP: Travis Wade presents his After Effects: Copy and Paste Shortcuts on Motionworks; http://t.co/nP2yA1nJ After Effects tip! Make layer automatically turn to follow direction of path – select layer, go to Layer > Auto Orient. Choose ‘Along Path’ AfterEffects Tip | Isolate a property group from the Effect Control Panel in Timeline by double-clicking Property Group name in ECW
#AfterEffects TINY TIPS: Do you have trouble with slow render speeds? Here’s a video workshop by Todd Kopriva to help: http://t.co/Y45ucGEl #AfterEffects TINY TIPS: Do you have trouble with slow render speeds? Here’s a video workshop by Todd Kopriva to… http://t.co/2fL7wE8l #AfterEffects Tip – Scale layers in comp without messing up composition – Select layers – Go to File > Scripts > Scale Selected Layers #AfterEffects Tip | @Doguib7 Create a Shape Layer, use Offset Paths & Trim Paths from Shape Layer ‘s “Add” menu to animate paths – lotsofun! #AfterEffects Tip | Animate property randomly – Alt-click Stopwatch to add expression. Type Wiggle(10,50) to change value 10 p/sec within 50 #AfterEffects Tip | Audio file plays at different speed than recorded? Check that RAM preview settings match the frame rate of the audio. #AfterEffects TIP | Custom Shape layers – 1 Layer > New Shape Layer 2 Draw path with pen 3 Select path property – paste custom path @Doguib7 #AfterEffects Tip | Drag comps directly to Adobe Media Encoder to render in background. Allows you to continue working on other comps in AE #AfterEffects Tip | Loop Footage – select clip, go to Interpret Footage > Main > Other Options > Choose how many time you want to loop 🙂 #AfterEffects Tip | Quickly deselect selected items by hitting F2. On Mac make sure to use Fn key to override system shortcuts. #AfterEffects Tip | Replace layer in Timeline with footage from Project panel (retaining fx + KFs) – Select both, hit Cmmd+Alt+/ Ctrl+Alt+/ #AFTEREFFECTS TIP | Rubbish at animating? Don’t worry! Use the Motion Sketch panel to record mouse or pen motion & apply it to your layer 🙂 #AfterEffects Tip | Video Tutorial – how to make your own “Old Film” effect using Turbulent Noise; http://t.co/IOn0bHVPuU @AdobeAE #Mograph #AfterEffects Tip | Video tutorial – Use the Stroke effect on Illustrator paths to make handwriting animate on screen http://t.co/APabrfE9FT #AFTEREFFECTS Tip 41: RT @i2cblog: In Project panel, search ‘unused’ or ‘missing’ to see what’s not used in any comp or source is missing #AfterEffects tip; Moving project to other machine or archiving? File > Collect Files gathers all source footage & project maintaining links #AfterEffects tip; Scale layers or comps without messing up composition. Go to File > Scripts > Demo palette. Use Scale Layers #AfterEffects Tip; Use Premiere Pro to cut footage, add simple animation to layers in real time. Dynamic Link portions to AE for finessing #AfterEffects Tip: @Franckmax If you want to do that, just Toggle hold the keyframe first, then right-click and choose “Easy Ease Out/In” 🙂 #AfterEffects tip: @jamesboorman To make the particles stay “alive” for longer, adjust the Lifespan property. #AfterEffects Tip: @MarkToddWagon No need for Alt, Page Up & Down on their own works. Home & End key to move to 1st & last frames of comp. #AfterEffects Tip: 3D layers have Material Options to control shadows. Cast Shadows & Accept Shadows can be switched on or off per layer. #AFTEREFFECTS tip: Animate Source Text property 2 make words change over time in text layer. Font & character panel attributes also animated #AfterEffects tip: Convert Text to Shape layers (Layer > Create shapes from Text) – Add cool Shape properties to get creative! Endless Fun! #aftereffects tip: Create a keyframe for a property on selected layers by holding alt key & tapping property shortcut. P for Position etc #AfterEffects Tip: Even out animation speed – select Keyframes in timeline (except 1st & last KF). Right-click & choose “Rove Across Time” #AfterEffects Tip: Found a camera move or lighting setup you like? Remember you can save them as Animation Presets to use in other comps. #AfterEffects Tip: Give footage instant punch & contrast – duplicate layer – make top layer Overlay Blend mode – adjust Opacity to taste 🙂 #AfterEffects Tip: Have layers in comp that you don’t want to render? Select Layer, go to Layer > Guide Layer to create non-rendering layer. #AfterEffects tip: Help with custom shatter maps. Re: Is this done with shatter effect? http://cr8v.co/wCe [Like it? http://bit.ly/lRPIGH ] #aftereffects tip: Huge files? Slow render times? Select layer in Project, go 2 File > Create Proxy. Makes linked low res version of file! #AfterEffects tip: Jump back & forth between visible keyframes & layer markers by hitting J & K. Trouble remembering? Think JUMP KEYFRAMES! #AfterEffects Tip: Learn Cinema 4D – soon – you won’t regret it! 🙂 @maxon3d @AdobeAE #Mograph @c4dtips #AfterEffects Tip: Locate missing footage by typing ‘missing’ in2 search field in Project panel. Relink by double-clicking it & relocating #AfterEffects Tip: Metric Kerning looks good on well-designed, classic fonts for broadcast – it includes a little more space than Optical #AfterEffects tip: Painting in Layer panel. Go to View > New View. Place comp & layer panels side by side. Lock them for nice ETLAT workflow #AfterEffects Tip: Pt 2. Select Camera, double-hit U key to expose adjusted properties, drag select them, drop into Effects & Presets panel #aftereffects tip: Remember the shortcuts for properties with the word ‘STRAP’. (S)cale, Opaci(T)y, (R)otation, (A)nchor Point, (P)osition #AfterEffects tip: Rendering more than one format? Select Render Item, go to Composition > Add Output Module to render once & format twice #AfterEffects Tip: Rendering movie for web? Choose poster frame displayed in thumbnail – Go to Composition > Set Poster Time before render. #AFTEREFFECTS Tip: Retime animation – select keyframes – hold Alt key & drag 1st or last keyframe. Keeps relative timing intact. #AfterEffects Tip: RT @theangietaylor: Re: After Effects Key Light – Some Spilling Occuring – How Do I Get Rid of it? http://t.co/azVs5mxn #AfterEffects Tip: RT @theangietaylor: Re: Moving Layers by n Pixels http://t.co/qtde4cIk #AfterEffects Tip: Select a layer, double-hit U key to expose properties adjusted from default state. Great way to understand effect presets #aftereffects tip: To auto-animate brush strokes as they’re drawn. Choose Paint tool & select ‘Write On’ in Duration Menu in Paint panel. #AfterEffects Tip: To create a template project simply save the project with .aet instead of .aep. Prevents u from accidentally over-writing #AfterEffects tip: To reduce the amount of motion blur in a comp go 2 Composition Settings > Advanced Tab & reduce the Shutter Angle value. #AfterEffects tip: To use included scripts enable General > Preference to ‘Allow scripts . . .’ and then restart… http://fb.me/BQbXk95K #AfterEffects Tip: Use Motion Sketch panel to capture motion from Wacom tablet & apply it to layers. Good way to record gestural animation. #AfterEffects Tip: Use the J & K keys to jump between visible keyframes #AfterEffects Tip: Use the “continue” Loop expression 2 continue an existing animation, maintaining speed &… http://t.co/u21TqofD #AfterEffects Tip: When overnight rendering, render out an image sequence, at least then if it crashes you can save frames already rendered. #AfterEffects tips from @AngieTaylor – Software Tips & Tricks Newsletter – http://t.co/kEF6ry0p [Like it? http://t.co/IzVYju0W ] -

After Effects and Cinema 4D
 I’ll be presenting After Effects and Cinema 4D in the Adobe Theater at Broadcast Video Expo 2013 in London between the 26th and 28th of February.
Here are links to some of my Tutorials that cover working with After Effects and Cinema 4D. I’ll be expanding on these at the event.

 Once again Adobe will bring its comprehensive suite of creative tools and services to the BVE audience in its dedicated Adobe Theatre on the show floor. The Adobe Theatre timetable can be found at www.bvexpo.com/adobe
Adobe’s experts will be on hand to discuss the advances that have been made in broadcast and production technology with Adobe’s comprehensive suite of tools and services for video content delivery, including Creative Cloud which makes it easier and more affordable to access all of Adobe’s production related tools. The theatre will also present demonstrations of After Effects and Premiere Pro.
In addition, a selection of Adobe’s hardware and software partners feature on the agenda. Maxon will be showing the slick interop between After Effects and Cinema 4D; EVS will talk about its advanced integration between Premiere Pro and EVS servers for fast-turnaround production; Dalet has created the Xtend panel module for Premiere Pro; Dell underpins Adobe’s software with its high performance T- and M- series desktop and mobile workstations; and NVIDIA powers high end capabilities using the latest Kepler technology on Quadro and Tesla graphics hardware.
Adobe will also be on Stand L16 where visitors can take a look at product demonstrations and participate in a prize draw to win a year’s subscription to Adobe Creative Cloud.
Full details of BVE’s entire seminar program can be found here, together with up-to-the-minute news about all aspects of the show. Information is also available across social media on twitter.com/bvexpo, Facebook, Google+ and LinkedIn. Visitors can also download the BVE 2013 App at www.bvexpo.com/app
-
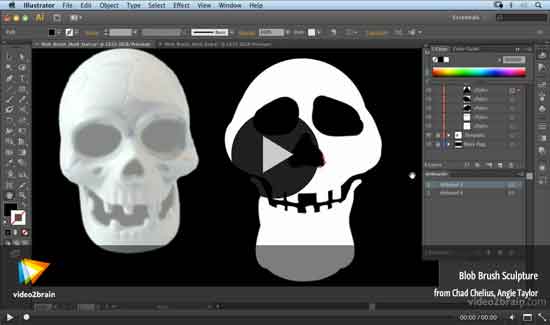
Halloween Video Tutorial
In this free Halloween Video Tutorial from the lovely, generous folks at video2brain, Angie Taylor shows how to use her Blob Brush Sculpture techniques to create a Skull in Adobe Illustrator. This movie is part of her Adobe Illustrator CS6: Learn by Video product, made for video2brain in partnership with co-author, Chad Chelius.

-

Review of After Effects CS6: Learn by Video
 I was very excited to read this very in-depth review of After Effects CS6: Learn by Video on Amazon today;
5.0 out of 5 stars | August 20, 2012
A good solid base upon which to build
Diane Cipollo (Editor at BellaOnline.com) – See all my reviewsThis review is from: Adobe After Effects CS6: Learn by Video (Paperback)I get many emails asking for the best way to begin learning a new software such as After Effects. My first suggestion is to start with a training video for the software of your choice. This is especially true for a robust and complex software such as After Effects CS6.
I found After Effects to be intimidating in spite of my strong Adobe Flash background but the Adobe After Effects CS6 Learn by Video training course from video2brain gave me a good solid base upon which to build. The authors Todd Kopriva and Angie Taylor share the instruction with Kopriva covering the technical aspects of the software and Taylor covering the creative.
The authors start with a short history of the After Effects software leading to what’s new in version CS6. With a panel-by-panel tour of the user interface, you are introduced to the basic project workflow and terminology.
Next, you learn what makes up a basic composition and how to build your own comps from scratch. You first learn how to create a line of text with the Character panel and a block of text with the Paragraph panel and then move on to using shape layers for creating simple and complex vector shapes.
The fun really starts with the Effects and Presets panel. You will learn how to apply a Keylight effect to turn the original background transparent. Then you create a new solid which will be your new background to which you can add effects such as the CC Mr. Mercury effect.
Not all comps are built from scratch. You learn how to import assets such as movies, stills, image sequences and audio. Also introduced is how to manage and organize the various assets for your comp. Of course, you will need to know the options for importing Photoshop, Illustrator, After Effects, Premiere Pro and Final Cut Pro files. You will also learn about interlacing, pixel aspect ratio, and trimming basics.
Halfway through the course, we get to the part I enjoy the most which is animation. First, you cover the basics including how to use keyframes and tweens to control the transformation of various properties. Next, you cover motion paths and how to use Motion Sketch to draw freehand paths. Delving deeper into animation, you learn about the various types of keyframes in After Effects and how to use the Keyframe Assistants and Graph Editor to refine your animations.
The next section covers text animations. Taylor covers options for importing text created in Photoshop and how to edit the text in After Effects. She then demonstrates an easy and fast way to animate each letter individually with the Text Animators. She shows you how to combine animators to create more complex animations and how to save your custom animators as presets. Next we see how shape layers can be used to create many effects, as well as using the Repeater to emulate a particle-like effect.
Switching back to Kopriva, we learn the basics of compositing and how many effects can be created using Blending Modes, Alpha Channels and Masks. Next he discusses common problems and how to correct them with Color Keying, Motion Tracking and Rotoscoping.
The next section concentrates more closely on how to create custom effects. Beginning with a discussion of the Effect Controls panel and categories. Taylor also covers how to use keyframes to animate properties and how to apply easing. One nice feature is the Brainstorm viewer that lets you preview variations of effects and save them as presets. She also discusses what she calls fixer effects for solving common problems such as rolling shutter. She ends this section by covering how to edit layer styles and adjustment layers imported from Photoshop to create effects.
When working with video, you can manipulate the frame rate to achieve various effects. Kopriva first discusses frame rate in general and then covers common retiming tasks such as Time Stretching, Time Remapping, Freeze Frame, Slow Motion and Reverse Frame.
The next section concentrates on your workflow and ways to use grouped and linked layers as well as nesting and pre-composing. One example of character animation demonstrates parenting hierarchy and IK. You also learn about expressions and how easy it is to write your own for complex animation.
Animating 3D effects can add realism to your projects and this section of the course begins by discussing how to use the 3D wireframe and other views needed to work in 3d space. Once you are familiar with working in 3d space, Taylor moves on to how to animate by bending layers. She also covers the basics of using camera presets and controls for depth of field and point of interest. Next, she adds lighting to the 3D scene and walks you through the various types of lighting such as Environmental, Point and Spotlight and how to work with cast shadows and reflections. Reflections can be very important to the realism of your scene and Taylor discusses the various controls such as Reflection Intensity, Sharpness and RollOff, as well as Specular Intensity and Shininess and Environmental Layer maps.
Switching back to Kopriva, we discuss optimizing software performance by adjusting the default preferences and taking advantage of Ram and Disk Catching. Next, he covers After Effects default render order and how this order determines the final render, much like the hierarchy in Cascading Style Sheets determines the final HTML document.
After Effects has several options for exporting your projects and in this section Kopriva discusses how to use the Render Queue. Much like other video exporting, he shows you how to set the various format options. He discusses how to use preset output templates and how to save your own custom settings as a template. He demonstrates how After Effects can save time by rendering several formats simultaneously. Next, he does a walk through of how to use the Adobe Media Encoder to choose output presets for Vimeo, Apple and Android.
The final section is a wrap up and final thoughts. It examines several projects and discusses how they were made. It also covers how to integrate After Effects with Cinema 4D.
The course includes 10+ hours of the video2brain Learn by Video series and supporting files for following along for a hands-on, watch-and-work teaching approach. Also included with the DVD is a small booklet with additional information. As with all the Learn by Video series, you have an easy-to-use control panel for viewing the videos.
Todd Kopriva has been with Adobe and After Effects since version 7.0. He creates Adobe documentation and training materials. Angie Taylor has worked 14 years in motion graphics and animation. Examples of her work have been featured on the BBC.
*Peachpit Press provided a copy to me for review purposes.
-

Life as a Motion Graphic Designer
 In my life as a motion graphic designer I’ve learned a few important lessons. In this interview with John Dickinson from Motionworks, I share my experiences in my career as an artist, author and motion graphic designer.
I really enjoyed this interview. John is excellent at getting the best from his interviewees. I just felt like we were having a chat. I hope that my ramblings help to inspire anyone thinking of following a career in motion graphic design.
-

Motion Graphics Webinar
 Creative Motion Graphics Webinar with Adobe Production Premium CS6
Friday 31st August 2012, 11.00 BST – Presented by: Angie TaylorJoin Angie for an engaging Motion Graphics Webinar packed full of the best tips and tricks for Production Premium CS6. Production Premium CS6 offers a sleek, fresh editing environment in Adobe Premiere Pro; 3D tracking and extruded text and shapes in Adobe After Effects; new Content-Aware tools in Adobe Photoshop Extended; and faster editing in Adobe Audition. Learn all about the new features of CS6 as well as new additions, Adobe Prelude for logging and ingest and Adobe SpeedGrade for color grading and finishing.
Click to register for this Complimentary Webinar

-
Vibrant Vignette Presets for Sapphire
My Vibrant Vignette Presets for Sapphire were released this week. This collection features a weird and wonderful collection of vignettes in an attempt to prove that vignettes don’t always need to be black and circular.
These vignettes which will give your footage extra atmosphere, extra mood, extra pop. Use them as they are or adapt them to fit your own designs.
These are free too all FX Central users. If you own Sapphire for any of the following hosts you can open the preset browser, login to FX Central and get working with them right away, on your own footage.
If you don’t own Sapphire you can find out more information and download a free trial here.


-

Adobe After Effects CS6 – Learn by Video
 It’s finally here, my brand new After Effects CS6 – Learn by Video course. I worked on this course with Adobe’s Todd Kopriva who I just love working with. Together we teamed up to provide a good mix of technical and creative training in our favorite software application. We hope you enjoy it. Here’s an intro to the course from us both.
This Learn by Video course offers in-depth training on the interface, workflow, and features of Adobe After Effects CS6. If you subscribe to my newsletter you can get 20% off this course with a discount code. The contents of this course include:
Introducing After Effects CS6
In this chapter you’ll get an overview of how After Effects works, what it does, and what the main controls are.Interface Tour
Before you start following along with the instructions in this training, it will help to learn what the controls are called and where things are located. You’ll learn about the basic controls and the most commonly used panels in this chapter.Creating Compositions and Layers
In After Effects we work in projects. Every project contains compositions, each of which is the framework of a movie; layers are assembled within the framework of these compositions. In this chapter you’ll learn how to create compositions and bring layers into them from the Project panel. You’ll also learn how to create layers from scratch.Importing Footage
In this chapter you’ll learn how to bring various types of files into After Effects. You’ll also see how to make sure After Effects interprets these files correctly and how to manage them once you get them in.Interpreting and Managing Footage
Sometimes you need to tell After Effects how to use source files. This chapter shows you how to set various parameters for how files are interpreted and used.Animation Basics
The most important aspect of learning to fully understand After Effects is getting to grips with how After Effects handles animation. Once you have mastered the topics covered in this chapter, you can really do anything in this powerful application.Fine-Tuning Animation
This chapter will take your animation skills further by showing you how to understand timing. You’ll learn how to work in the Layer panel and the Graph Editor for more precise control over layers and animation.Animating Text Layers
Text layers can be animated in a variety of different ways to create exciting and compelling motion graphics. In this chapter you’ll learn about the properties and methods used to control these layers. Text layer properties use a slightly different animation system than standard layer properties, so we’ll also discuss the idiosyncrasies involved in animating these wonderfully flexible design elements.Fun with Shape Layers
Shape layers are pretty unique but can be confusing to new users. This chapter will help demystify shape layers and give you the confidence to push them in all sorts of creative directions.Basic Compositing
Compositing is about stacking layers on top of one another and making parts of each layer show through others in specific ways. You’ll learn about many of the ways to composite layers together in this chapter.Effects
After Effects provides you with scores of effects that you can apply to your layers, allowing you to create virtually any look or style you like. Imagine being able to animate all of these over time and you get a real sense of the creative flexibility that After Effects can offer you. This chapter tells you everything you need to know to create amazing effects.Time
A movie is a series of images that plays over time, and After Effects provides many powerful controls for controlling exactly how this happens. This chapter will teach you about tools like frame blending, slow motion, freeze-frame, and more.Grouping and Linking
There are times when it makes sense to group layers together into a single item, either to simplify complicated comps or to make editing, moving, or applying effects a whole lot easier. In this chapter we’ll look at several methods for grouping layers together.Introduction to 3D
After Effects allows you to transform and animate your layers within a 3D environment. This adds some complexity to your compositions. After Effects CS6 also lets you work in ray-traced 3D, where you can extrude and bevel shapes and text and even bend video layers. In this chapter you’ll see how After Effects deals with mixing 2D and 3D in the same composition.Memory and Performance
Every person, project, and computer system is different. In this chapter you’ll learn how to configure After Effects to match your needs, the capabilities of your computer system, and the needs of your projects.Render Order and Collapsing Transformations
Layers and their components are processed in a specific order. In this chapter you’ll learn about that order and how to use special features to control itOutput Options
When you’re finished with your project, you need to get your data out of After Effects, usually as a finished movie. In this chapter, you’ll learn the basics of rendering and exporting movies.Project Explorations and Recap
This chapter contains some examples of animations created in After Effects along with explanations of how they were made. You’ll also get some tips on integrating After Effects with Cinema 4D, as well as some final thoughts on the course and suggestions for further learning.The lessons are wrapped in a feature-rich interface that lets you jump to any topic and bookmark individual sections for later review. Full-Screen mode provides a hi-def, immersive experience, and Watch-and-Work mode shrinks the video into a small window so you can play the videos alongside your application. Also included are exercise files that give you an easy way to try out the techniques you learn and a 48-page guide containing supplemental material.
-
Illustrator CS6 – Learn by Video

I’m very pleased to announce that my new workshop – Adobe Illustrator CS6 – Learn by Video – is now available to buy directly from the web store on my videos page. I’m also featuring some free example movies from this workshop right here so you can try before you buy.
Newsletter subscribers can also benefit from a 20% discount code off the price of the entire workshop so if you haven’t already subscribed you can do so now to take advantage of this and other special offers only available to my subscribers.
This Learn by Video course offers in-depth training on the interface, workflow, and features of Adobe Illustrator CS6. Amongst other things you’ll learn my own techniques for drawing characters including my “Illustrator” superhero. Here’s the intro movie where I tell you more about the course.
The contents of this course include:
Introducing Illustrator CS6
In this chapter you’ll be introduced to Adobe Illustrator — what it is and what it does — and get an overview of what will be covered in this course. You’ll also be taken on a tour of the new features in Illustrator CS6.Illustrator Fundamentals
This chapter explores two concepts that are crucial to an understanding of how Illustrator works: the difference between bitmap (or raster) images and vector images, and the concept of paths.Exploring the Illustrator Interface
In this chapter you’ll learn how to work with important elements of the Illustrator interface like panels, the Application bar and frame, artboards, and workspaces.Navigating and Using Views in Illustrator
Being able to easily move around your documents and see them in different ways can be a big help in your work. This chapter will explain how to navigate in Illustrator CS6 and use the different viewing and screen modes.Working with Documents
This chapter shows you how to efficiently create, modify, and view documents. You’ll learn how to use templates, guides, grids, Adobe Bridge, and more.Creating and Working with Shapes
Shapes are a very important part of Illustrator, and in this chapter you’ll learn about the various tools available for creating and modifying shapes.Transformations
You can transform objects in a variety of different ways in Illustrator CS6. This chapter shows you the various methods that can be used to transform and modify objects, including how to use the Transform panel.Understanding Objects and Layers
This chapter shows you how to select and modify objects in Illustrator CS6 and explores the multitude of options you can use to create artwork. We’ll look at saving selections, grouping items, layers and stacking order, and Isolation mode.Drawing
Drawing is at the heart of the work you’ll do in Illustrator. In this chapter you’ll learn all about the tools, techniques, and features related to drawing in Illustrator CS6.Using Symbols
Symbols are a handy feature in Illustrator, and in this chapter you’ll learn how to create them, move and rotate them, adjust their size and color, and apply graphic styles.Color
Color makes a big difference to the appearance of your artwork. In this chapter you’ll learn how to work with color-related features in Illustrator like the Colors panel, swatches, gradients, Live Paint, and more.Typography
In this chapter you’ll learn how to add text to your documents, format that text, create styles, and more.Working with Images
In this chapter, you’ll learn how to place graphics and see all the tools Illustrator offers once they are there to help you get great results in your designs.Working with Effects
With effects, you can apply a look to a path that doesn’t alter the path at all. It will print like what you see on your monitor, but in reality, it’s all just an illusion…a very powerful, editable, printable illusion that can be saved as a PDF, placed in Photoshop and InDesign, and more. You’ll learn all about this incredible technology in this chapter.Graphs
If you have information you want to convey as a graph or chart, Illustrator has the tool. The chart and graph tools in Illustrator aren’t new, but they are very powerful and allow you to present data in a more interesting way, as you’ll see in this chapter.Beyond Illustrator
Eventually there will come a time when you want to save your Illustrator work as a PDF or in one of the common web file formats, or output it for use in an animation. The videos in this chapter will show you how.Project Explorations
In this chapter you’ll apply the skills you’ve learned in this course to some projects that give you an idea of just what Illustrator is capable of.Closing Thoughts
In this chapter you’ll get a brief recap of what’s been covered in the course and a few final thoughts from the author.The lessons are wrapped in a feature-rich interface that lets you jump to any topic and bookmark individual sections for later review. Full-Screen mode provides a hi-def, immersive experience, and Watch-and-Work mode shrinks the video into a small window so you can play the videos alongside your application. Also included are exercise files that give you an easy way to try out the techniques you learn and a 48-page guide containing supplemental material.
Click here to subscribe to my Newsletter and enefit from a 20% discount code off the price of the entire workshop.