
My recommended workspace setup for this kind of 'Rostrum-style' work. You need to have the Layer panel and Comp panel visible.
I contribute to the Creative Cow Basic After Effects forum (amongst others) where this question was posted recently;
“Hi I am newish to after effects and I have created a old map effect that pans from the UK to africa now I want to add a red line that reveals like in the Indiana Jones graphic.”
There’s definitely a trick to getting this right but once you know the trick, it’s easy, so, here are the rough steps for getting it right.
BTW, a movie demonstrating this technique is available in my After Effects CS5 Learn by Video DVD if you are interested in that here’s a link to it.
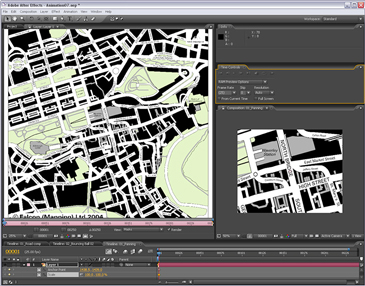
1. Place the map in a new comp, it’s best if the Map is bigger than the comp if you want to pan around it. In the Timeline, set a keyframe for the Anchor Point property as it’s this property you will animate to pan around the map. NB: Don’t animate the Position property as you’ll just run into problems.
2. Alt-double-click the layer to open up the Layer panel, this is where you’ll do the animation. It’s great as you’ll be able to see an overview of the whole image without having to faff around in the Comp panel. Make sure that the Target menu is set to Anchor Point Path.
3. In the timeline, move to where you want the next change in direction of the path to happen, and in the Layer panel, click and drag the anchor point to the landmark that you want to be central in the comp panel at that time. You’ll notice that, in the Comp panel, the point that the anchor point is on (in the Layer panel) is always central in the Comp panel, which is what you want exactly!
4. Keep repeating this till you have completed the journey you want the ‘camera’ to follow and so have completed the positional aspect of the animation.
5. If you want to smooth out the timing of the animation so that it maintains an even speed throughout, select all the keyframes except the first and last one, right-click on them and choose Rove Across Time. Once you’ve done that you can pull or push the first or last keyframes to speed up, or slow down the whole animation.
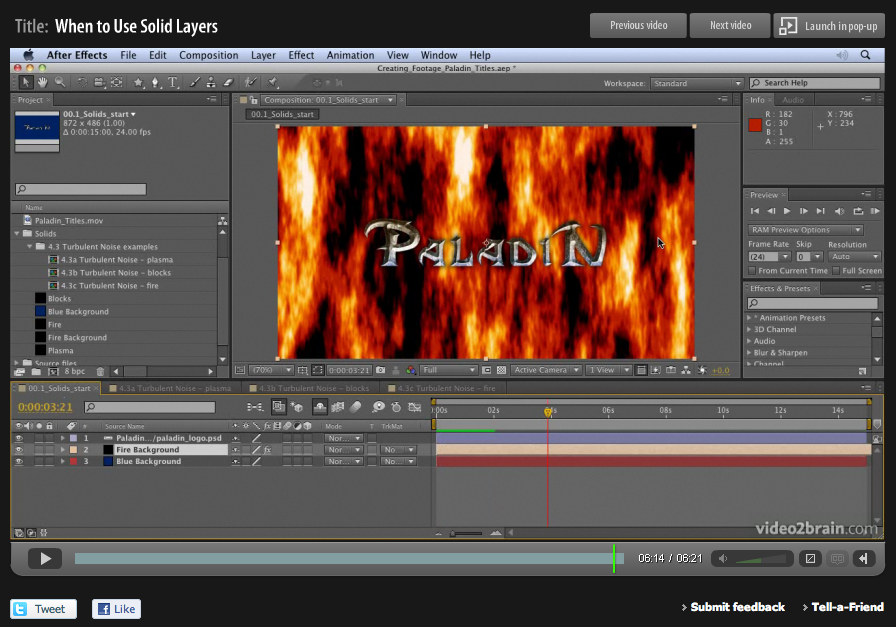
6. Now apply the Write On effect to the layer. Choose a color and style by adjusting the settings.
7. To make the Write on effect follow the path you can either use and expression to link the Brush Position property to the Anchor Point property of the layer (my preferred option) or, if you’re not keen on using expressions you can simply select all the keyframes from the Anchor Point property, copy them, then paste them into the Brush Position property.
8. In the Write On effect, make sure that the Paint Style property is set to On Original Image.
The nice thing about this technique is that it’s now easy to make it into a 3D map pan. All you need to do is add a camera and some lights, adjust the camera angle and animate the zoom property and that’s it! The camera and lights will automatically follow the anchor point so no further animation will be necessary unless you want to animate the angle, zoom, or depth of field.
To find out more details of this technique and others, check out my After Effects CS5 Learn by Video DVD that I created alongside the wonderful Todd Kopriva from Adobe.
 When designing motion graphics in Adobe After Effects there are times you just need to create a plain old layer to apply effects to. Solids are just right for this purpose, and for lots of other uses in After Effects.
This video is aimed at a basic level. It shows you how to create solid-color layers and walks you through some of their uses.
You can find more free videos like these from our After Effects CS5 Learn by Video product on the video2brain website. Please enjoy them – happy keyframing!

I found this to be a really great book and is suitable for anyone who works or has an interest in motion graphics or animation. It would help someone who is studying at college, but is also very useful for those that have been in the industry a long time. I fall into the later category and was formally trained at art school in the early 80’s but I found it very useful to revisit many of the fundamental ideas that I was taught in those days which give me a solid grounding. It also gave me many new ideas and covered areas that did not exist or were in their infancy when I was a student.
I really liked the sections on colour, typography and especially the section on composition which everyone in the industry should be familiar with but clearly are not. I’m sure this would fill in the gaps for people such as avid editors who have a purely technical background and would also inspire those who are creative technophobes to get stuck in with the computer packages today which frighten many with their complexity.
I have shown the book to my manager at Sky and he will be buying some copies for the post production dept to read. He was was also very impressed.
5.0 out of 5 stars on Amazon
Paul Mark Provencher “ppro” reviewed Design Essentials for the Motion Media Artist: A Practical Guide to Principles & Techniques,
Comprehensive, Wise, Pivotal…
I live in the corporate world of information technology. For the most part, this existence for me is based in an engineering mindset – plan, design, build, test, deliver.
In my IT world, artists are thought to be undisciplined in these areas. Angie Taylor’s book makes it clear that successful artists clearly execute in much the same way as the best scientists. While they bring a creative streak that may not appear…Read More
I live in the corporate world of information technology. For the most part, this existence for me is based in an engineering mindset – plan, design, build, test, deliver.
In my IT world, artists are thought to be undisciplined in these areas. Angie Taylor’s book makes it clear that successful artists clearly execute in much the same way as the best scientists. While they bring a creative streak that may not appear in engineering and science, they owe their success in business to their ability to plan, execute and deliver a satisfactory product on time, on budget.
The author takes the reader through a series of concepts, starting with sketching. At first I didn’t understand what this had to do with Motion Media. But it very quickly became obvious why this was important. The book gives a great primer and cites numerous references (including current online resources) that may be used to dig in deeper.
From there the book explores a number of concepts familiar to practicing artists – composition, story-boards, software packages (again with numerous references to some terrific resources), and all while developing the concepts in a way that follows the workflow of projects.
I am reading this book (and several others) to gain a better command of the concepts I hope to apply to the use of my HD-movie capability of my DSLR. I believe that making movies, even if they end up being glorified home movies of my family, will benefit from a basic understanding of what goes into good motion media.
This book has something to offer beginners like me as well as practicing professionals who need to update their understanding of motion media. I will probably read this book twice – the illustrations are wonderful, and perfectly on point, the explanations are very understandable, even for someone with little experience in this field (though I have been a photographer for a long time).
The many resources cited as places to dig deeper are all quality products and have clearly been vetted thoroughly by the author.
This is a solid book with much to offer. If you’re just getting into motion media like me, or perhaps you’d like to step into the latest tools and concepts, don’t hesitate to buy and read this book.
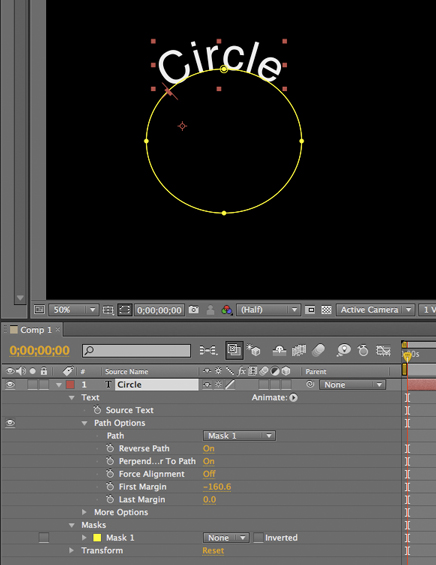
I saw a post on the After Effects mailing list today asking how to wrap text around a circle in After Effects. Here’s how it’s done;
 1) Create a text layer with the text you want.
2) Select the layer and then, with the Ellipse tool, draw a circular Mask on the Text layer.
3) Open the Layer in the Timeline by clicking it’s disclosure triangle and then open the ‘Text’ section too.
4) Open the ‘Path Options” and in there you’ll see a drop down menu under ‘Path’ where you can select your Mask, the text should now wrap around the circle.
5) You can use the controls under ‘Path’, and the controls on the selected path in the Composition panel to adjust it to suit.
Tip! Remember to save it as a preset for future jobs so you don’t have to continuously repeat the process each time you need a circular path text effect!
Tip! There are also a load of free Animation Presets that create text on paths in the Effects and Presets panel, or you can Browse them in Bridge to get a real preview of what they look like before applying them.
Well, what a busy old month I’ve had! I’ve crossed several time zones and been on more flights than I care to mention. But all for good reason.
Earlier this month I went to Graz, Austria to record an After Effects training DVD for the amazing folks at Video2Brain. It was really good to be back providing training for After Effects again. I’ve been looking for a new method of delivery since I stopped updating my “Creative After Effects” books and Video2Brain provide the perfect vehicle for it.
I’ll also be recording some more Video2Brain titles very soon and will keep you posted on those too. The DVD is available for pre-order now. 10 hours of me and Adobe’s own Todd Kopriva teaching you all we know about our favorite motion graphics application, Adobe After Effects CS5! Order it today and save 37% off!

GridIron Software have been very supportive too. It’s so refreshing to work for a company that actively encourages employees to keep real contact with the creative industry it services. I must say it’s too rare. There are so many occasions where I’ve seen creative people join software companies, only to be consumed totally by the business aspect of their job till eventually they struggle to use the products in a creative way or even understand the customers requirements. I’m very grateful to GridIron Software for having the foresight to avoid these problems and for allowing me to remain in touch with the creative aspects of my role.
I’m also happy to report that Adobe have also adopted a similar approach. I shared the training delivery with the amazing Todd Kopriva from Adobe. Together we recorded almost 18 hours of video based training in just over a week. It was intense but very rewarding. I really enjoyed working with Todd so thanks to Adobe too for allowing him to be involved in such a great project.
So I left Gratz, via Frankfurt, got home to Brighton and slept for a few hours and was then whisked off to Ottawa (via Halifax) the next day to meet with my new colleagues at GridIron Software. It was really great to meet the new team and have some face to face time with colleagues that I usually only meet remotely with.
On my way to the airport after four days of meetings I was then kidnapped by my friends and taken to a lovely cottage in the Canadian wilderness for a perfect wind-down weekend of swimming, fishing, eating and campfire singing. It felt very good to finally have some time off after four consecutive weeks of work.
I finally got home last Tuesday and it’s taken me a whole week to unpack and settle back into home life. It’s good to be home and be able to focus on my work again.
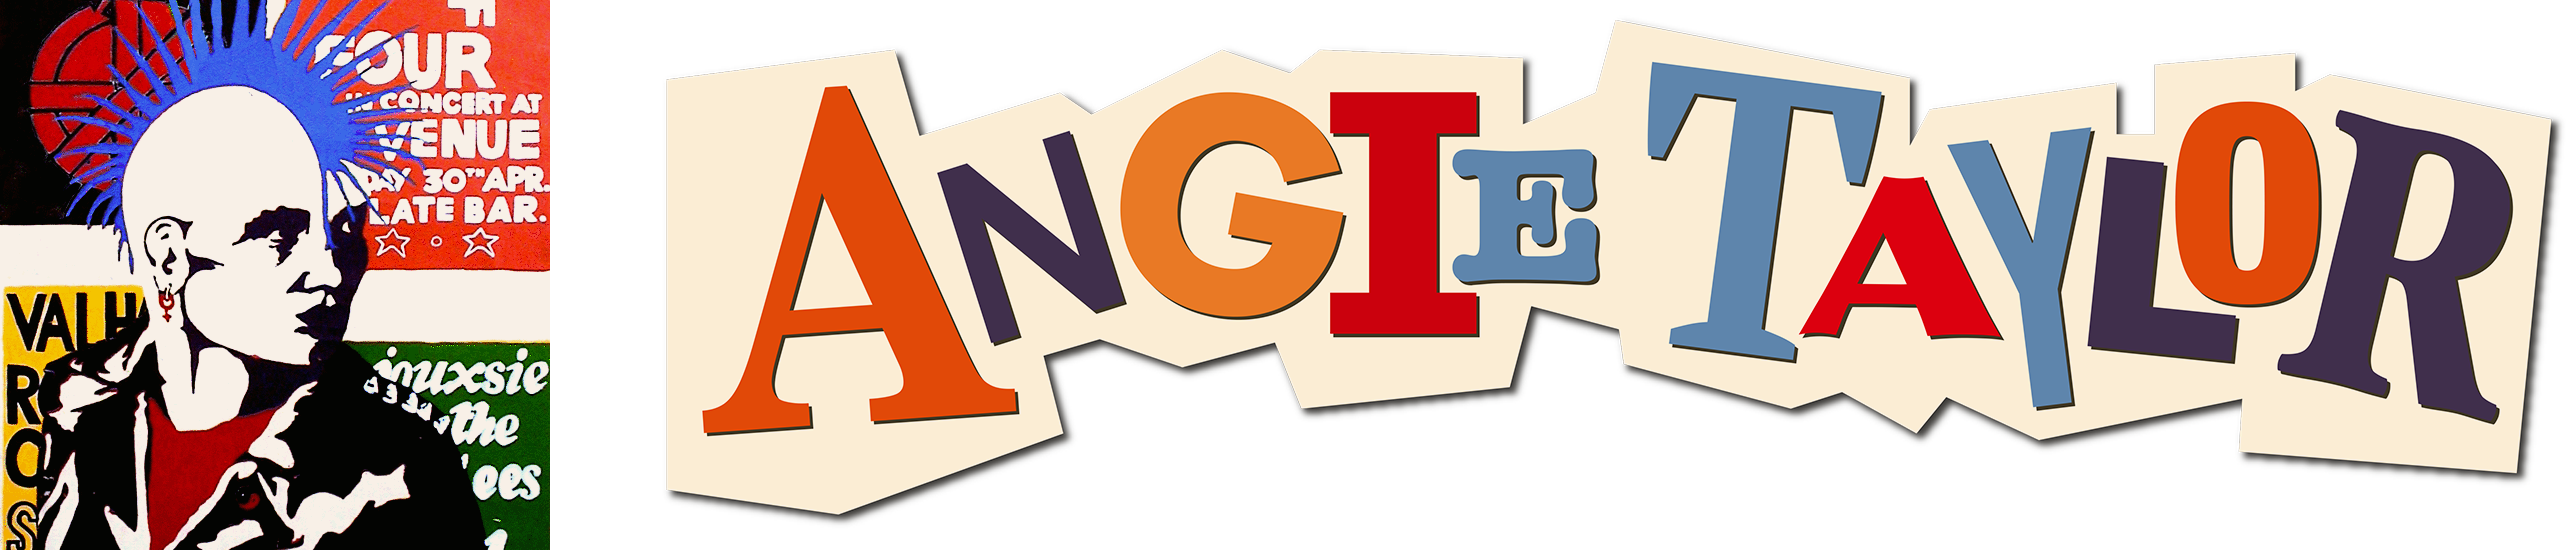
Last week I spoke about the influence of punk in motion graphic design, the Punk rock revolution in the UK and how inspiring it was to young people like me. Today I’ll talk about some of the great designers who emerged from that scene. I’ll start by looking at two of the key players who defined the style of the Punk Rock movement in the UK.
There’s not one person responsible for the style of Punk, it was a coming together of minds and styles. A collective, group activity gained momentum, and as a result, the various styles of the people involved merged into an established fashion. But the pivotal people were the ones who recognized the elements that would excite and brought them together with style, panache and, of course an eye for design.
The punk movement grew out of a basic disillusionment, with the establishment, the music scene, fashion, the media. What better way to show your dissatisfaction than to tear it all up and start again? That’s exactly what punks did. Essays on design refer to this as Deconstruction. This wasn’t a new concept, post-modern art movements like the Dadaists and, ironically, the Constructivists used techniques of disassembly and reassembly to shake up the status quo and embrace a new way of looking at things.
In New York in the early seventies, bands like the New York Dolls would dress up in womens clothes in an attempt to shock away the apathy that existed in the music scene. Richard Hell was the one who became a blueprint for thousands of young punks, defining the spikey hair and ripped t-shirt look before anyone else. But it was really Vivienne Westwood who took the look and developed it into a recognizable style. Now one of our top designers, she started off with a small clothes shop on the Kings Road in London. She and Malcolm McClaren owned Let it Rock, a shop selling biker gear and teddy boy clothes. In 1974 this was revamped and renamed SEX, catering to the S&M scene and positioning itself nicely to shock the nation and take punk rock to the headlines.
The Sex Pistols hung out in the shop and that’s where the whole thing took off, the band formed, McClaren became the manager, and Vivienne designed clothes for them under the label, Seditionaries – it was a symbiotic relationship. At Art School Malcolm McClaren met Jamie Reid, a political activist and Situationist who was producing a radical magazine called Suburban Press. He used a cut and paste style of graphics in this magazine, and it was then that he defined his trade-mark ransom-note lettering that was made famous by the Sex Pistols first album Never Mind the Bollocks, Here’s the Sex Pistols.
In the next installment we’ll take a look at the designers who emerged from, or were directly influenced by the Punk movement.
Patti Smith – Smells Like Teen Spirit, listen free on Last FM