Tag: video2brain

  • Uprezzing Comps

    Uprezzing Comps

    A question appeared on the Video Copilot website today about uprezzing old projects which can be a bit of a nightmare in AE. You can often find that layers positions get messed up and effects change appearance when you scale your comp.

    Some of the issues that you’ll come across are hard to avoid but you can make the process a little easier by using some of the scripts that come free with After Effects CS5.

    Incidentally, making projects bigger is a massive headache so always good (if you have the opportunity of course) to create your projects at the biggest size you think may be required. If there’s ANY chance of HD requirements then use HD, even if the immediate requirement is only for SD.

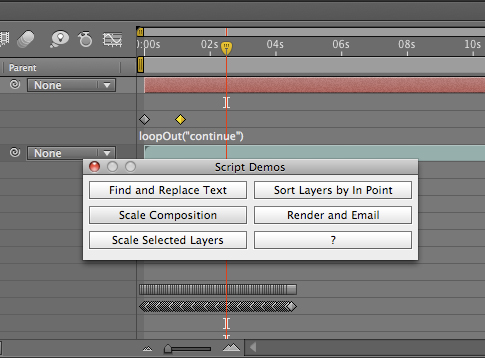
    Having said all that, there are always times when you need to up-rez. Updating old projects for showreels; adapating other old projects for new jobs etc. So, if you simply HAVE to do it, there’s a couple of scipts that will work. In the Demo Palette (can be opened by going to File > Scripts > Demo Palette) there are two gems, one is called ‘Scale Comp’ and can be used to scale your entire composition, keeping all layers in the correct position. The other is called ‘Scale Selected Layers’ which will work on a selection within a comp, again, maintaining their position relative to each other.

    You need to make sure your preferences are setup correctly to use scripts in order to use these. to do so, go to Preferences >General > Allow Scripts to Write Files and Access Network.

    You will still need to go through the somewhat painful process of editing effects but this will save you a lot of work with layers etc.

    To find out more about After Effects and download some FREE movies, check out my After Effects CS5 Learn by Video page where you can watch excerpts and learn more tips.

  • Animating a line drawn on a map – Indiana Jones Style

    Animating a line drawn on a map – Indiana Jones Style

    My recommended workspace setup for this kind of 'Rostrum-style' work. You need to have the Layer panel and Comp panel visible.

    I contribute to the Creative Cow Basic After Effects forum (amongst others) where this question was posted recently;

    “Hi I am newish to after effects and I have created a old map effect that pans from the UK to africa now I want to add a red line that reveals like in the Indiana Jones graphic.”

    There’s definitely a trick to getting this right but once you know the trick, it’s easy, so, here are the rough steps for getting it right.

    BTW, a movie demonstrating this technique is available in my After Effects CS5 Learn by Video DVD if you are interested in that here’s a link to it.

    1. Place the map in a new comp, it’s best if the Map is bigger than the comp if you want to pan around it. In the Timeline, set a keyframe for the Anchor Point property as it’s this property you will animate to pan around the map. NB: Don’t animate the Position property as you’ll just run into problems.

    2. Alt-double-click the layer to open up the Layer panel, this is where you’ll do the animation. It’s great as you’ll be able to see an overview of the whole image without having to faff around in the Comp panel. Make sure that the Target menu is set to Anchor Point Path.

    3. In the timeline, move to where you want the next change in direction of the path to happen, and in the Layer panel, click and drag the anchor point to the landmark that you want to be central in the comp panel at that time. You’ll notice that, in the Comp panel, the point that the anchor point is on (in the Layer panel) is always central in the Comp panel, which is what you want exactly!

    4. Keep repeating this till you have completed the journey you want the ‘camera’ to follow and so have completed the positional aspect of the animation.

    5. If you want to smooth out the timing of the animation so that it maintains an even speed throughout, select all the keyframes except the first and last one, right-click on them and choose Rove Across Time. Once you’ve done that you can pull or push the first or last keyframes to speed up, or slow down the whole animation.

    6. Now apply the Write On effect to the layer. Choose a color and style by adjusting the settings.

    7. To make the Write on effect follow the path you can either use and expression to link the Brush Position property to the Anchor Point property of the layer (my preferred option) or, if you’re not keen on using expressions you can simply select all the keyframes from the Anchor Point property, copy them, then paste them into the Brush Position property.

    8. In the Write On effect, make sure that the Paint Style property is set to On Original Image.

    The nice thing about this technique is that it’s now easy to make it into a 3D map pan. All you need to do is add a camera and some lights, adjust the camera angle and animate the zoom property and that’s it! The camera and lights will automatically follow the anchor point so no further animation will be necessary unless you want to animate the angle, zoom, or depth of field.

    To find out more details of this technique and others, check out my After Effects CS5 Learn by Video DVD that I created alongside the wonderful Todd Kopriva from Adobe.

  • ‘Sculpting’ paths in Adobe Illustrator

    ‘Sculpting’ paths in Adobe Illustrator

    Here’s another free tutorial from my first venture into making video tutorials for Adobe Illustrator. My tutorials are probably what you’d call non-standard! I’m not going to teach you how to ‘the cool look’ that we’ve all seen a million times before, that doesn’t really interest me, and there are plenty of other websites that will whow you those techniques.

    What I hope to do with my tutorials is to teach you new and interesting ways of using the tools creatively. How to ‘think’ with the software. It’s then up to you to add your own style to what you’ve learned to conjure up something unique.

    This tutorial focusses on Adobe Illustrator’s amazing reshape tools that can help you create more organic-looking drawings in Illustrator. These include Warp, Pucker & Bloat, and Wrinkle. In this movie you’ll use the Bloat tool to add muscle to your character, create hair with the Wrinkle tool, and use the Warp tool to transform primitive shapes into more realistic and organic body parts. Enjoy!

  • Basics on Solids in Adobe After Effects

    Basics on Solids in Adobe After Effects

    When designing motion graphics in Adobe After Effects there are times you just need to create a plain old layer to apply effects to. Solids are just right for this purpose, and for lots of other uses in After Effects.

    This video is aimed at a basic level. It shows you how to create solid-color layers and walks you through some of their uses.

    You can find more free videos like these from our After Effects CS5 Learn by Video product on the video2brain website. Please enjoy them – happy keyframing!

  • Animated Character Design in Adobe Illustrator

    Animated Character Design in Adobe Illustrator

    I’m very pleased to offer my readers a couple of free tutorials from my very first video2brain workshop on Adobe Illustrator. This workshop will teach you how to use Illustrator’s tools and features to prepare 2D files for animation in Adobe After Effects.

    You’ll learn how to make the most of Illustrator’s drawing tools and Autotrace feature, and to how use Live Paint and Kuler to recolor artwork. You’ll also get tons of tips and tricks for giving artwork a hand-drawn look and find out how to set up layers, aspect ratios, and transparency options for importing into After Effects.

    I’ll share many of my techniques for using Illutrator’s extensive drawing capabilities to create characters for animation. Topics covered include:

    • Setting up your workspace for video and animation
    • Working with Autotrace, Live Paint, and Kuler
    • Using multiple artboards for creating storyboards
    • Taking advantage of views and workspaces
    • Drawing freehand in Illustrator using a variety of tools including the new improved Eraser tool and the Blob Brush tool

    Whether you’re a motion graphic designer, animators, storyboard artists, video editors or illustrators, if you want to create 2D animation from flat, vector-based artwork, this workshop will be an invaluable resource.

    The lessons are wrapped in a feature-rich interface that lets you jump to any topic and bookmark individual sections for later review. Full-Screen mode provides a hi-def, immersive experience, and Watch-and-Work mode shrinks the video into a small window so you can play the videos alongside your application. Also included are exercise files that give you an easy way to try out the techniques you learn.

    Click here to get an overview of the workshop and download free tutorials using the following links;

    Working with Live Paint

    Working with the Brush Tool

  • Hand-drawn animation with After Effects Paint tools

    Hand-drawn animation with After Effects Paint tools

    Week four of 2011 brings my fourth FREE Giveaway Tutorial.

    This tutorial comes from my Adobe After Effects CS5 Learn by Video DVD from video2brain.

    The paint tools in After Effects are usually used for cloning or filling in mattes, but they can also be used to create stop-motion-style animation. In this movie you’ll see how they can be used to create a stop-motion style without the need for painful frame-by-frame tweaking of keyframes or drawings.

    In this Jumpstart tutorial I’ll show you how to create a little animated stickman, creating a looping walk cycle. I hope you can use the tips and tricks from this tutorial to create your own unique twist on my idea. If you do please come back here and post a link to your creation, I’d love to see it!

    There are a few Jumpstart tutorials included with the Learn by Video DVD. These  are designed to give you a quick overview of a particular technique.  The DVD also contains many more detailed tutorials, designed to take you through techniques and tech you After Effects using a more detailed step-by-step approach. I hope you enjoy watching them as much as I enjoyed making them.

    Happy Keyframing!

  • Lip Sync in After Effects

    Lip Sync in After Effects

    Lip-syncing is something that all animators will be asked to do at some point in their career. The following technique automates the process of lip sync in After Effects and uses only built-in features of Adobe After Effects – no extra software is required! This video tutorial is an updated version for Adobe CS5. Tutorial files and a text-based version of the tutorial for older versions of After Effects are available here if you want to follow along.


    This project
    was a test project for a job for the BBC. They contacted me and asked if it was possible to create a minute of lip-synced animation on a cartoon character. The budget was really tight, as was the deadline, so I had only one day to create a character that lip-synced to a provided sound track for a full minute.

    Of course it was the BBC so I could hardly say no! So I said “Yes, no problem, I’ll take the job!” The minute I put the phone down I thought, “Oh Blimey! What have I got myself into?” I went to bed that night worrying about how I’d manage to get the job done. I tossed and turned, having nightmares about failing in my first job with the BBC. Then suddenly I sat bolt upright in bed and thought, “hang on a minute, what if I use Time Remapping with the Convert Audio To Keyframes Assistant, I’m sure that’ll work!” (That’s the kind of sad geek I really am!) 😉

    Anyway, I leapt out of bed, ran over to my computer and put together a test project to see if it would work. This is the very project I put together as a test to see if the technique would work. Luckily, it did and I got the job done on time!

    The audio used in this tutorial is contributed with kind permission. “Memories Of Your Own” – Words and Music by Jason A. Levine © Jason Levine 2007

  • Creating a Cityscape in 3D

    I want to share an example of one of my tutorials that I’m very proud to say inspired a great piece of work, “Black Day to Freedom” by the amazing Rob Chiu. I met Rob after watching a very inspiring talk he gave at the Flash on the Beach conference a few years back. I approached him after the talk to tell him how much I enjoyed it and was blown away when he told me that the movie he had shown was partly inspired by my own tutorials. We have since kept in touch and Rob has contributed to my latest book, Design Essentials for the Motion Media Artist.

    I’ve recently recorded the tutorial on video and want to share it with you. I’m in the process of updating some of my most popular demos and tutorials for my video2brain Adobe After Effects CS5 Learn by Video DVD.I’m featuring one FREE tutorial per week for the next five weeks here in my blog. If you like these free tutorials you can also buy the DVD here.

    My 3D Cityscape tutorial is one that I’ve had great feedback on and it really was one of the biggest compliments when an artist I admire told me that this demo had inspired some of his own work. Rob Chiu (AKA The Ronin) is a well respected live action commercial director and photographer. Black Day to Freedom was one of his first films, an animation entirely built in After Effects. This was actually inspired at least technically by this tutorial where a very basic city is built with skyscrapers and lights. Rob took this as a starting point and created his own world to help anchor the story. You can find out more about Rob on his website or you can read the foreword he wrote and see exmples of his work in my latest book, Design Essentials for the Motion Media Artist.

    The tutorial was developed co-written with myself and my good friend, Paul Tuersley, visual effects artist and After Effects guru of the highest order. Paul has worked on various feature films including Kick Ass, Angels and Demons and 10,000 BC. Paul came up with the initial idea to build a real 3D environment from basic flat layers within After Effects. This technique has now been used widely in a variety of different ways both in Motion Graphic designs and animation projects. Paul is also the moderator at AE Enhancers, a fabulous resource for After Effects artists that you should also check out.

    In this updated tutorial you’ll see how easy it is to create graphics from absolutely nothing, directly within After Effects. You’ll also see how to create 3D environments and build scenes for your animations. I’ve also included the project file you’ll need to go through the tutorial here 3D_City.aep. After going through the tutorial I’d love to see examples of what you’ve done with it so please post links in the comments section.


  • Creative After Effects Bonus Tutorials

    Creative After Effects Bonus Tutorials

    These Creative After Effects Bonus Tutorials are ones created specifically for readers of my “Creative After Effects”books but are also freely available to everyone who visits my website.They were designed for previous versions of After Effects but still contain useful tips, tricks and techniques. These books contain many more in depth tutorials on Adobe After Effects and related topics. It also includes a free CD full of goodies and training materials for your delectation!I welcome feedback from readers as it is essential to the growth and development of the book and website. If you have any comments or feedback please feel free to leave comments.
    Keylight Training movie This is a sample movie from my book “Creative After Effects 7″. The tutorial focusses on how to use The Foundry’s Keylight in After Effects to key out really badly shot DV footage. Angie shares tips and tricks on how to avoid problems and to fix them once they occur.
    Character Animation tutorial I’ve done a fair bit of character animation using After Effects, mainly cut-out animation, similar to the style Terry Gilliam used in the Monty Python animations and not too dissimilar to South Park’s style of animation.Till Parenting was introduced, I always used complex nesting procedures to link the individual parts of my characters together. I would draw them in Illustrator with each part on a separate layer, bring it in as a Comp and then Pre-comp the body parts together as needed.Parenting gets rid of the need for complex nesting hierarchies, I can now link the body parts together in one composition. This tutorial simplifies and demystifies the processes, making them less intimidating to those who have never used Parenting.
    The Talking Dog Lip syncing Tutorial for After Effects 6 is based on the After Effects 5.5 Production Bundle but can also be followed using the version 5.0 PB. If you want to get hold of an updated After Effects CS5 version of this tutorial, complete with new footage, it’s available as part of my After Effects CS5 Learn by Video DVD in association with Adobe’s Todd Kopriva.
    This tutorial shows you how to use Motion Math scripts and Time Remapping on a 3D – rendered character to automate the process of lip-synching. I used this technique in an animated program which was broadcast on a major UK TV network.
    Multipass for After Effects 5.5 and Cinema 4DXL These comprehensive tutorials cover techniques for creating multipass renders as well as importing and manipulating the multiple passes in After Effects 5.5.Using a whole host of old and new features to bring your 3D scene to life you will learn the basic principles and discover the power and flexibility that can be achieved by rendering out your 3D scene in passes.

    Download files:

    Cinema 4DXL (Version 7.303)

    Multipass tutorials

    Tutorial notes: Cinema 4D Multipass Project files: Cinema 4D project files

    After Effects 5.5

    Multipass tutorials

    Tutorial notes: After Effects Multipass Tutorial Notes

    Project files: After Effects project files Footage files: Movies, Lights, Footage files

    The Cinema 4D tutorial was co-written by myself and Tim Clapham of HelloLux. Find out more about Tim and HelloLux by here.

  • Is drawing important for designers?

    Is drawing important for designers?

    Drawing from Sketchbook © Angie Taylor 1999

    It’s a hot debate, as a designer, is it important to have drawing skills? I mean, you don’t need to draw anymore really? Surely computers can do it all for you now, download a few images, treat them with filters, composite them together in Adobe PhotoshopBob’s yer uncle (as we say in the UK!)

    But drawing is not only a process used to create finished aesthetic imagery to include in a finished design, it’s much more than that. It’s a learning process that is an important stage in the development of a confident visual language. When you draw something you learn to see with a different, more focused awareness. You start to question why things appear in a certain way, as a result you can understand how things are constructed, how light interacts with surfaces and how colors affect each other. Things that may not occur to you by just simply looking at an object. you need to truly understand these things to make your drawings work. Even if you don’t like your finished drawings, that really doesn’t matter, it’s the process of losing yourself in the craft of drawing that matters.

    And it’s never too late to learn, in the Drawing chapter of my book, Design Essentials for the Motion Media Artist I talk about my mother who didn’t start drawing till she was in her 70’s. It has made a huge difference to her life and now she can draw and paint like she would never have thought. You can check out excerpts from this chapter using Amazon’s “Search Inside” feature now. The chapter also contains some of the exercises that helped me learn to draw during my time at Art College. There’s also a resources section on this website that contains some tips, tricks and links to useful tutorials, websites and a complete reading list.

    Drawing Exercise from Design Essentials book - draw 6 circular objects with the same drawing implement achieving different textures for each
    Drawing Exercise from Design Essentials book – draw 6 circular objects with the same drawing implement achieving different textures for each

    Writing this book inspired me to include more about drawing in my software tutorial too. I recently recorded a new video training workshop for video2brain on Animation Character Design in Adobe Illustrator which will be available soon. In this tutorial I showed that you don’t need to limit yourself to using traditional drawing materials. In one of the tutorials I show how to create body shapes from primitive shapes and then use Illustrators fabulous drawing tools to sculpt these into more organic shapes, it’s an addictive and very creative process.

    So, I hope that you’ll give drawing a chance, pick up whichever implement inspires you to make marks and get sketching! don’t worry about the outcome, just enjoy the process!

    Using primitive shapes in Adobe Illustrator to create complex body shapes © Angie Taylor 2010
    Using primitive shapes in Adobe Illustrator to create complex body shapes © Angie Taylor 2010
  • Adobe After Effects Training DVD and book

    Adobe After Effects Training DVD and book

    Well, it’s all happening this week! My new book, “Design Essentials for the Motion Media Artist” finally went on sale. I’m so excited and can’t wait to hear what people think of it – waiting for the first reviews is always an anxious time!

    As well as the book, I also have a new training DVD on the way which I worked on with the amazing Todd Kopriva from Adobe. “Adobe After Effects CS5 – Learn by Video” was produced by the brilliant team at video2brain and is available to pre-order now.


    As a little taster of what’s to come is available to view completely free now. Adobe After Effects CS5: Frequently Asked Questions – Zip Past Common Hurdles
    In this free course, Todd Kopriva, co-author of Adobe After Effects CS5 Learn by Video, helps you avoid common After Effects hiccups with a collection of answers to Frequently Asked Questions. Whether you´re having audio hiccups, getting pixelated vector graphics, or getting oversized files or jerky playback, Todd equips you to zip past these common hurdles and get back to creating great effects. I hope you enjoy these free tutorials and look forward to hearing your feedback.

  • After Effects CS5 – Learn By Video by Angie Taylor and Todd Kopriva

    Well, what a busy old month I’ve had! I’ve crossed several time zones and been on more flights than I care to mention. But all for good reason.

    Earlier this month I went to Graz, Austria to record an After Effects training DVD for the amazing folks at Video2Brain. It was really good to be back providing training for After Effects again. I’ve been looking for a new method of delivery since I stopped updating my “Creative After Effects” books and Video2Brain provide the perfect vehicle for it.

    I’ll also be recording some more Video2Brain titles very soon and will keep you posted on those too. The DVD is available for pre-order now. 10 hours of me and Adobe’s own Todd Kopriva teaching you all we know about our favorite motion graphics application, Adobe After Effects CS5! Order it today and save 37% off!

    GridIron Software have been very supportive too. It’s so refreshing to work for a company that actively encourages employees to keep real contact with the creative industry it services. I must say it’s too rare. There are so many occasions where I’ve seen creative people join software companies, only to be consumed totally by the business aspect of their job till eventually they struggle to use the products in a creative way or even understand the customers requirements. I’m very grateful to GridIron Software for having the foresight to avoid these problems and for allowing me to remain in touch with the creative aspects of my role.

    I’m also happy to report that Adobe have also adopted a similar approach. I shared the training delivery with the amazing Todd Kopriva from Adobe. Together we recorded almost 18 hours of video based training in just over a week. It was intense but very rewarding. I really enjoyed working with Todd so thanks to Adobe too for allowing him to be involved in such a great project.

    So I left Gratz, via Frankfurt, got home to Brighton and slept for a few hours and was then whisked off to Ottawa (via Halifax) the next day to meet with my new colleagues at GridIron Software. It was really great to meet the new team and have some face to face time with colleagues that I usually only meet remotely with.

    On my way to the airport after four days of meetings I was then kidnapped by my friends and taken to a lovely cottage in the Canadian wilderness for a perfect wind-down weekend of swimming, fishing, eating and campfire singing. It felt very good to finally have some time off after four consecutive weeks of work.

    I finally got home last Tuesday and it’s taken me a whole week to unpack and settle back into home life. It’s good to be home and be able to focus on my work again.