Tag: Video

  • Understanding Axis Modes

    Understanding Axis Modes


    After Effects can be a difficult application to learn simply because it offers you so may options. Many of these options are not immediately apparent to users so they muddle through using default settings when a better solution may be available to them. My job is to point you in the direction of these hidden helpers!

    When working in 3D, have you ever experienced difficulty when positioning or rotating layers, cameras or lights within 3D space? If the answer is yes, then understanding the 3D axis modes may help to you.

    Click on this image to enlarge it

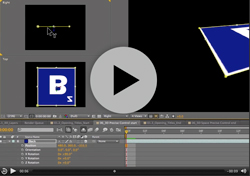
    In this example (taken from my After Effects CS5 Learn by Video DVD) you can see a Square layer inside a 3D comp. Notice in the Active camera view (top left) you can see the three-way-axes attached to the layer. It consists of three arrows, each representing one of the three dimensions of 3D space. The red axis (representing the horizontal ‘left-to-right’ X axis) is an arrow facing left to right. The green axis is pointing upwards and represents the vertical ‘top-to-bottom’ Y axis. Finally, it’s a bit tricky to see in this view but the blue arrow, representing the ‘near-to-far’ Z axis is pointing towards the viewer.


    It’s a bit easier to see this if you look at the layer in the Right view. Notice in this view that we see the axes (and the layer) from a different angle. We can imagine that we are now standing to the left of the layer, looking towards the right. therefore, the blue arrow, representing the Z axis is pointing to our right, towards our imaginary viewer, who is standing in front of the layer.

    Local Axis Mod is the default behavior for these axes in After Effects. In this mode the axes are attached to the layer. So, wherever the layer moves, the axes will follow as if attached to it. Let’s see what happens if I rotate the layer.

    Click on this image to enlarge it

    In this second example I’ve rotated the layer by 90 degrees on the X axis. When I rotate the layer, its 3D axes rotates with it. Notice in the Right view, the Green Y axis is now pointing towards the viewer.

    Local Axis Mode may seem logical, when you rotate a layer, the axes rotate with it. But confusion occurs when you then start using the axes to move or rotate the layer in the Composition panel as the axes may not actually affect the values you think you’re adjusting.


    Notice in this movie, if I grab the Y axis to move the layer in Right view, I’m actually  adjusting the Z value of the layer. axismodesThis can be seen refelcted in Z position value in the timeline, notice it changing as I drag. If I adjust the position by dragging on the Z axis, I’m actually adjusting the Y value in the Timeline. At times this can be very confusing!

    The good news is, if this causes you difficulty, there are two other axis modes to choose from. You can change the Axis mode by clicking on the Axis Mode buttons in the Tools panel that runs along the top of the application.

    If I switch to World Axis Mode notice what happens to the axes on the layer as I do so, it changes so that the axes is fixed to the coordinates of the Composition (or world) rather than to the layer itself. If I rotate the layer again on the X axis, the axes do not move with the layer, they remain relative to the composition.

    For new users to After Effects, this mode is perhaps more logical as dragging on the individual axes in the Comp panel will always adjust the corresponding values in the Timeline as they would expect. Adjusting the position by dragging on the Y axis will always adjust the Y value, adjusting X axis always affects X and adjusting the Z axis always affects the Z value. Regardless which view I select, or how much I rotate my view or my layers the axes will always be aligned to the edges of the Comp.

    The final axis mode, View Axis Mode can be a little tricky to get your head round so beware! View Axis mode will align the axes to whatever view you are in. It allows you to rotate around the geometric center of your scene as it is currently being viewed as opposed to the comp itself.

    I hope this has helped you understand the different axis modes available in After Effects and how they can help you when moving or rotating layers within 3D space. If you want to learn more about 3D in After Effects why not pop along to my session, ‘Introduction to 3D in After Effects’ at the NAB 2011 Post Production World Conference. Please say hello if you do! Happy Keyframing!

  • Free video training & discounted classes

    Free video training & discounted classes


    I’m giving away lots of goodies this week. In this blog I’m offering you some free sample movies from my ‘2D Character Animation in After Effects’ workshop from video2brain. I’m also pleased to announce some fantastic discounts on my training courses in London in March.

    A one-off funding offer means that there’s currently a massive 80% off my Photoshop and After Effects courses at the Bridge Training. You can find out about these offers here. Just to give you an idea of the sort of savings on offer, my After Effects training 2 day training courses (Fundamentals, Intermediate and Advanced) have been discounted from the usual price of £504 to the incredible price of £108 for anyone based in the London Westminster area. Please contact The Bridge Training here to book a place.

    I’m so excited to be able to introduce a set of video training products specifically aimed at character animation in Adobe After Effects CS5. I’ve included a link to a free sample from this workshop here, just click on this link to watch it in HD. There are also some other free videos available here.

    As a freelance illustrator and motion graphics designer, I use After Effects every day to create artwork and animations of various styles. As a result, I’ve developed some powerful techniques for creating quick but compelling 2D animation, and in this workshop I share them with you. You’ll learn how to import layered files and paths from Illustrator into After Effects and how to animate flat vector artwork in both 2D and 3D space.

    Topics covered include:

    • Setting up After Effects for creating 2D character animation
    • Using input devices to capture motion and apply it to your characters
    • Creating animation and lip-syncing with audio files, using expressions and scripting to make the process easier
    • Applying grouping techniques and using parenting to create hierarchical animations
    • Following the best working practices for outputting your animations for the web, TV, and mobile devices

    All this is presented in a series of short, focused, and solution-oriented videos that steer clear of technical jargon. Whether you’re a motion graphic designer, animator, storyboard artist, video editor, or illustrator, if you want to create 2D animation from flat, vector-based artwork, this is the workshop for you.

    The lessons are wrapped in a feature-rich interface that lets you jump to any topic and bookmark individual sections for later review. Full-Screen mode provides a hi-def, immersive experience, and Watch-and-Work mode shrinks the video into a small window so you can play the videos alongside your application. This course also includes project files so you can follow along and try out new techniques as you learn them.

  • Premiere Pro – real-time for After Effects?

    Premiere Pro – real-time for After Effects?

    Quite a question – Is Premiere Pro a real-time engine for After Effects? Well this week I hope to answer it at Broadcast Video Expo 2011 I’ll be on the Adobe booth demonstrating and sharing my favorite tips and tricks about Adobe After Effects CS5.

    I’ll also be sharing excerpts from my books and DVDs, giving away a free copy each day of my “Design Essentials for the Motion Media Artist” book and my “After Effects CS5 Learn by Video” DVD (Created with the amazing Todd Kopriva of Adobe).

    Those of you who have used After Effects will know that it isn’t really designed as a video editing application. there’s no real-time engine so it can be really tiresome editing footage there and waiting for previews. However, did you know that the Adobe CS5 Production Premium comes with a special, little known, real time engine for After Effects, it’s called Premiere Pro and I’m rapidly falling in love with it all over again!

    I’ll explain a little about why I describe Premiere Pro as a real-time engine for AE in a minute, but first a little bit of history (imagine wavy transition and spacey music, signifying time passing!) The first NLE I used was Adobe Premiere 4.0 on Mac, back in the mid-nineteen-ninety’s (Oh dear – showing my age there!). It was amazing to be able to edit video on a Mac and it opened video editing up to a whole host of new people after being a pretty exclusive domain, primarily owned by Avid at the time. Sadly Premiere never kept up with the pack and it’s reputation was almost destroyed with the disappointing release of version 5. Final Cut Pro also raised it’s rather sexy head at that time and it almost put a nail in dear old Premiere’s coffin.

    But I’m glad to say that Adobe have persevered and have battled to bring Premiere Pro back to being a serious contender in the bloody battle of the NLEs .They still have a way to go, to convince folks that it really can give FCP a run for it’s money. Many people are still cast under the Apple Marketing spell and many of the people who ‘dis’ Premiere Pro have never actually tried it so keep that in mind and make your own decision about whether it’s a worthy contestant. I’ve used it in real-world projects and have found it to be reliable, fast and creatively flexible. And I also use Final Cut Pro in my work as a freelancer so I know both applications well and am speaking from a real-world user point of view. Incidentally, did I also mention that the BBC are using it throughout the organization? ‘Nuff said?

    OK, back to the present! Why do I call Premiere Pro a ‘real-time engine for AE’? Well, as I said, working in AE can be a PIA (don’t you just love those TLA’s?). Often when working on music videos or opening title sequences, I’d want to edit a few clips quickly in time with music, add a few text animations, experiment a bit with the edit and timing. After Effects doesn’t facilitate this easily, you have to wait for things to render before you see them. But this is a perfect situation to use the Dynamic Link features in CS5 – you’ll get the best of both worlds by using Prem Pro and AE in conjunction with each other.

    Premiere Pro is excellent for real-time editing. You can even set up keyframe animation, time-remapping  and effect animations in real time, creating a rough cut of your finished piece. Adobe Dynamic Link then allows you to send this to AE, maintaining a live (dynamic) link between the apps, and whats more, it works!!!! The sequence opens in AE with no rendering required, ready for you to tweak and fine tune FX and keyframes. I’ll be demo’ing techniques using Dynamic Link (on a real world project) next week at Broadcast Video Expo. For those of you who can’t make it, here’s a few quick tips on the basic workflow & how it works!

    Create your project in Premiere Pro – capture or import all your source files into this project and save it.
    You can use the thumbnail view in the Project panel to create a rough storyboard for the piece before you bring footage down into the timeline, making sure that shot order and duration is roughly correct – this will save time later. Once you’ve done that, place your audio in the Timeline and then add the footage in the order it is sorted by using Premiere Pro’s amazing “Automate to Sequence’ button. So that’s the rough cut done.

    Still in PremPro, make any edit adjustments required. Keyframe any basic transformations, add effects if necessary. Once you are happy with the rough edit, and ready to jump to AE, make a selection of clips that you want to finesse in the Timeline, Right-click and choose ‘Replace with After Effects Composition’ to open the selected clips in a translated After Effects timeline. Here you can do whatever you need to do in AE.

    The beauty of this technique is that the link between the apps remains live so any changes made in AE automatically update in PremPro and visa versa, no need for rendering either way till the project is finally finished. I used this technique on the last project I worked on and reckon it saved me about 40% of the time it would have taken me only using AE.

    If you’re in the UK please pop along to Broadcast Video Expo later this month where I’ll be demo’ing this exact technique on the Adobe booth. Please say hello if you do. 🙂

  • Uprezzing Comps

    Uprezzing Comps

    A question appeared on the Video Copilot website today about uprezzing old projects which can be a bit of a nightmare in AE. You can often find that layers positions get messed up and effects change appearance when you scale your comp.

    Some of the issues that you’ll come across are hard to avoid but you can make the process a little easier by using some of the scripts that come free with After Effects CS5.

    Incidentally, making projects bigger is a massive headache so always good (if you have the opportunity of course) to create your projects at the biggest size you think may be required. If there’s ANY chance of HD requirements then use HD, even if the immediate requirement is only for SD.

    Having said all that, there are always times when you need to up-rez. Updating old projects for showreels; adapating other old projects for new jobs etc. So, if you simply HAVE to do it, there’s a couple of scipts that will work. In the Demo Palette (can be opened by going to File > Scripts > Demo Palette) there are two gems, one is called ‘Scale Comp’ and can be used to scale your entire composition, keeping all layers in the correct position. The other is called ‘Scale Selected Layers’ which will work on a selection within a comp, again, maintaining their position relative to each other.

    You need to make sure your preferences are setup correctly to use scripts in order to use these. to do so, go to Preferences >General > Allow Scripts to Write Files and Access Network.

    You will still need to go through the somewhat painful process of editing effects but this will save you a lot of work with layers etc.

    To find out more about After Effects and download some FREE movies, check out my After Effects CS5 Learn by Video page where you can watch excerpts and learn more tips.

  • ‘Sculpting’ paths in Adobe Illustrator

    ‘Sculpting’ paths in Adobe Illustrator

    Here’s another free tutorial from my first venture into making video tutorials for Adobe Illustrator. My tutorials are probably what you’d call non-standard! I’m not going to teach you how to ‘the cool look’ that we’ve all seen a million times before, that doesn’t really interest me, and there are plenty of other websites that will whow you those techniques.

    What I hope to do with my tutorials is to teach you new and interesting ways of using the tools creatively. How to ‘think’ with the software. It’s then up to you to add your own style to what you’ve learned to conjure up something unique.

    This tutorial focusses on Adobe Illustrator’s amazing reshape tools that can help you create more organic-looking drawings in Illustrator. These include Warp, Pucker & Bloat, and Wrinkle. In this movie you’ll use the Bloat tool to add muscle to your character, create hair with the Wrinkle tool, and use the Warp tool to transform primitive shapes into more realistic and organic body parts. Enjoy!

  • Lip Sync in After Effects

    Lip Sync in After Effects

    Lip-syncing is something that all animators will be asked to do at some point in their career. The following technique automates the process of lip sync in After Effects and uses only built-in features of Adobe After Effects – no extra software is required! This video tutorial is an updated version for Adobe CS5. Tutorial files and a text-based version of the tutorial for older versions of After Effects are available here if you want to follow along.


    This project
    was a test project for a job for the BBC. They contacted me and asked if it was possible to create a minute of lip-synced animation on a cartoon character. The budget was really tight, as was the deadline, so I had only one day to create a character that lip-synced to a provided sound track for a full minute.

    Of course it was the BBC so I could hardly say no! So I said “Yes, no problem, I’ll take the job!” The minute I put the phone down I thought, “Oh Blimey! What have I got myself into?” I went to bed that night worrying about how I’d manage to get the job done. I tossed and turned, having nightmares about failing in my first job with the BBC. Then suddenly I sat bolt upright in bed and thought, “hang on a minute, what if I use Time Remapping with the Convert Audio To Keyframes Assistant, I’m sure that’ll work!” (That’s the kind of sad geek I really am!) 😉

    Anyway, I leapt out of bed, ran over to my computer and put together a test project to see if it would work. This is the very project I put together as a test to see if the technique would work. Luckily, it did and I got the job done on time!

    The audio used in this tutorial is contributed with kind permission. “Memories Of Your Own” – Words and Music by Jason A. Levine © Jason Levine 2007

  • Creating a Cityscape in 3D

    I want to share an example of one of my tutorials that I’m very proud to say inspired a great piece of work, “Black Day to Freedom” by the amazing Rob Chiu. I met Rob after watching a very inspiring talk he gave at the Flash on the Beach conference a few years back. I approached him after the talk to tell him how much I enjoyed it and was blown away when he told me that the movie he had shown was partly inspired by my own tutorials. We have since kept in touch and Rob has contributed to my latest book, Design Essentials for the Motion Media Artist.

    I’ve recently recorded the tutorial on video and want to share it with you. I’m in the process of updating some of my most popular demos and tutorials for my video2brain Adobe After Effects CS5 Learn by Video DVD.I’m featuring one FREE tutorial per week for the next five weeks here in my blog. If you like these free tutorials you can also buy the DVD here.

    My 3D Cityscape tutorial is one that I’ve had great feedback on and it really was one of the biggest compliments when an artist I admire told me that this demo had inspired some of his own work. Rob Chiu (AKA The Ronin) is a well respected live action commercial director and photographer. Black Day to Freedom was one of his first films, an animation entirely built in After Effects. This was actually inspired at least technically by this tutorial where a very basic city is built with skyscrapers and lights. Rob took this as a starting point and created his own world to help anchor the story. You can find out more about Rob on his website or you can read the foreword he wrote and see exmples of his work in my latest book, Design Essentials for the Motion Media Artist.

    The tutorial was developed co-written with myself and my good friend, Paul Tuersley, visual effects artist and After Effects guru of the highest order. Paul has worked on various feature films including Kick Ass, Angels and Demons and 10,000 BC. Paul came up with the initial idea to build a real 3D environment from basic flat layers within After Effects. This technique has now been used widely in a variety of different ways both in Motion Graphic designs and animation projects. Paul is also the moderator at AE Enhancers, a fabulous resource for After Effects artists that you should also check out.

    In this updated tutorial you’ll see how easy it is to create graphics from absolutely nothing, directly within After Effects. You’ll also see how to create 3D environments and build scenes for your animations. I’ve also included the project file you’ll need to go through the tutorial here 3D_City.aep. After going through the tutorial I’d love to see examples of what you’ve done with it so please post links in the comments section.


  • Creative After Effects Bonus Tutorials

    Creative After Effects Bonus Tutorials

    These Creative After Effects Bonus Tutorials are ones created specifically for readers of my “Creative After Effects”books but are also freely available to everyone who visits my website.They were designed for previous versions of After Effects but still contain useful tips, tricks and techniques. These books contain many more in depth tutorials on Adobe After Effects and related topics. It also includes a free CD full of goodies and training materials for your delectation!I welcome feedback from readers as it is essential to the growth and development of the book and website. If you have any comments or feedback please feel free to leave comments.
    Keylight Training movie This is a sample movie from my book “Creative After Effects 7″. The tutorial focusses on how to use The Foundry’s Keylight in After Effects to key out really badly shot DV footage. Angie shares tips and tricks on how to avoid problems and to fix them once they occur.
    Character Animation tutorial I’ve done a fair bit of character animation using After Effects, mainly cut-out animation, similar to the style Terry Gilliam used in the Monty Python animations and not too dissimilar to South Park’s style of animation.Till Parenting was introduced, I always used complex nesting procedures to link the individual parts of my characters together. I would draw them in Illustrator with each part on a separate layer, bring it in as a Comp and then Pre-comp the body parts together as needed.Parenting gets rid of the need for complex nesting hierarchies, I can now link the body parts together in one composition. This tutorial simplifies and demystifies the processes, making them less intimidating to those who have never used Parenting.
    The Talking Dog Lip syncing Tutorial for After Effects 6 is based on the After Effects 5.5 Production Bundle but can also be followed using the version 5.0 PB. If you want to get hold of an updated After Effects CS5 version of this tutorial, complete with new footage, it’s available as part of my After Effects CS5 Learn by Video DVD in association with Adobe’s Todd Kopriva.
    This tutorial shows you how to use Motion Math scripts and Time Remapping on a 3D – rendered character to automate the process of lip-synching. I used this technique in an animated program which was broadcast on a major UK TV network.
    Multipass for After Effects 5.5 and Cinema 4DXL These comprehensive tutorials cover techniques for creating multipass renders as well as importing and manipulating the multiple passes in After Effects 5.5.Using a whole host of old and new features to bring your 3D scene to life you will learn the basic principles and discover the power and flexibility that can be achieved by rendering out your 3D scene in passes.

    Download files:

    Cinema 4DXL (Version 7.303)

    Multipass tutorials

    Tutorial notes: Cinema 4D Multipass Project files: Cinema 4D project files

    After Effects 5.5

    Multipass tutorials

    Tutorial notes: After Effects Multipass Tutorial Notes

    Project files: After Effects project files Footage files: Movies, Lights, Footage files

    The Cinema 4D tutorial was co-written by myself and Tim Clapham of HelloLux. Find out more about Tim and HelloLux by here.

  • A free tutorial gift for the holidays

    A free tutorial gift for the holidays

    Well, another year comes to an end and the holidays are about to begin. What better way to spend your time off than sitting back comfortably and allowing me to entertain you with some of my latest After Effects CS5 tutorials?

    Here’s a free tutorial movie for you, taken from the “Jumpstarts” section of the video2brain After Effects CS5 Learn by Video DVD that I created this year in collaboration with Todd Kopriva from Adobe. You’ll also find lots of other free tutorials alongside this one so please enjoy them and let us know what you think. You can read what Eran Stern said about our DVD training here in his blog.

    After Effects has great tools for character animation called the Puppet tools. The Puppet Pin tool places a mesh over your footage using the alpha channel. You can add points to this mesh that allow to distort it and animate it, providing some really natural movement for your animations and motion graphics projects.

    The Puppet tool is as fun to use as a kids toy so get stuck in, have some fun and learn how to use this great set of tools to create your own fun animations.

    You can also find links to lots of other free tutorials and an extensive reading list right here on my website.

    Happy Holidays!

    Angie Taylor

    Promote your Page too

  • Adobe After Effects Training DVD and book

    Adobe After Effects Training DVD and book

    Well, it’s all happening this week! My new book, “Design Essentials for the Motion Media Artist” finally went on sale. I’m so excited and can’t wait to hear what people think of it – waiting for the first reviews is always an anxious time!

    As well as the book, I also have a new training DVD on the way which I worked on with the amazing Todd Kopriva from Adobe. “Adobe After Effects CS5 – Learn by Video” was produced by the brilliant team at video2brain and is available to pre-order now.


    As a little taster of what’s to come is available to view completely free now. Adobe After Effects CS5: Frequently Asked Questions – Zip Past Common Hurdles
    In this free course, Todd Kopriva, co-author of Adobe After Effects CS5 Learn by Video, helps you avoid common After Effects hiccups with a collection of answers to Frequently Asked Questions. Whether you´re having audio hiccups, getting pixelated vector graphics, or getting oversized files or jerky playback, Todd equips you to zip past these common hurdles and get back to creating great effects. I hope you enjoy these free tutorials and look forward to hearing your feedback.

  • Angie’s software favourites of the month

    There are a few nice pieces of software around at the moment that I want to share with you. The first is Beauty Box from Digital Anarchy. An incredible plug-in for video applications (like After Effects, Premiere Pro and Final Cut Pro). If you shoot interviews or wedding videos and don’t have a good make up person on hand to fix their spotty complexions, you can simply do it in post with this plug-in, it works miracles! Here’s an example where I’ve used it on a particularly blemish-ridden shot of me! This was a one-click job but Beauty Box offers you a multitude of fine controls to really perfect results, and remember this works across frames too, it’s pretty damned amazing!

    Angie, before and afetr Beauty Box treatment

    The next app I want to feature is Red Giant Software‘s amazing Plastic Bullet. It only costs a couple of dollars for your iPhone and does an amazing job of randomizing fantastic Holga-esque effects on your pictures. It’s addictive and makes nearly every photo a masterpiece in the click of a button. Those who want to apply similar looks in Photoshop or video applications can check out the more mature sibling applications, Magic Bullet Looks for Photoshop, After Effects and Final Cut Pro. Here you can see a range of effects that I applied to the pictures above.

    Oh, and before I forget, just a note to remind my blog readers of our very own special software offer this month! We have recently released a new version of GridIron Flow 1.0.4, which is compatible with Adobe CS5 applications. To celebrate this release we’re having a very special launch offer on pricing till June 4th 2010. you can pick up a copy of Flow for the incredible price of $99.99 (MSRP $299.99).

    I’d love to hear about your own apps of choice so please chime in with comments.

  • Creative Video Workflow

    Angie TaylorI’m busy preparing to leave on a mammoth journey to San Fransisco to speak at the Macworld 2010 conference for the first time.

    I’ll be talking about production workflow, specifically broadcast production as that’s where I spent 12 years of my life freelancing as a motion graphic designer/ animator.

    I’ll also share some of the challenges I’ve faced in the transition from designer to creative director, and my methods for overcoming those hurdles.

    The talk is part of the users conference (session code: US964) and is titled “Creative Video Workflow – From Storyboard to Completion“. It’s taking place on Friday February 12th, between 15:00  – 16:15.

    Of course I’ll be talking about the software I use in my everday work, and will share some top tips and tricks. But my main focus will be on my creative processes. How do I come up with ideas? What do I do to make sure my skills are up to date? How to I collaborate with others and manage remote working?

    If you’re interested in finding out more use the priority code TWEETMW when you register to get a $15 Expo pass or 15% off of any conference package. Onsite expo passes are $45, so it’s a great deal!

    I hope to see you there!