Tag: motion Graphics
-
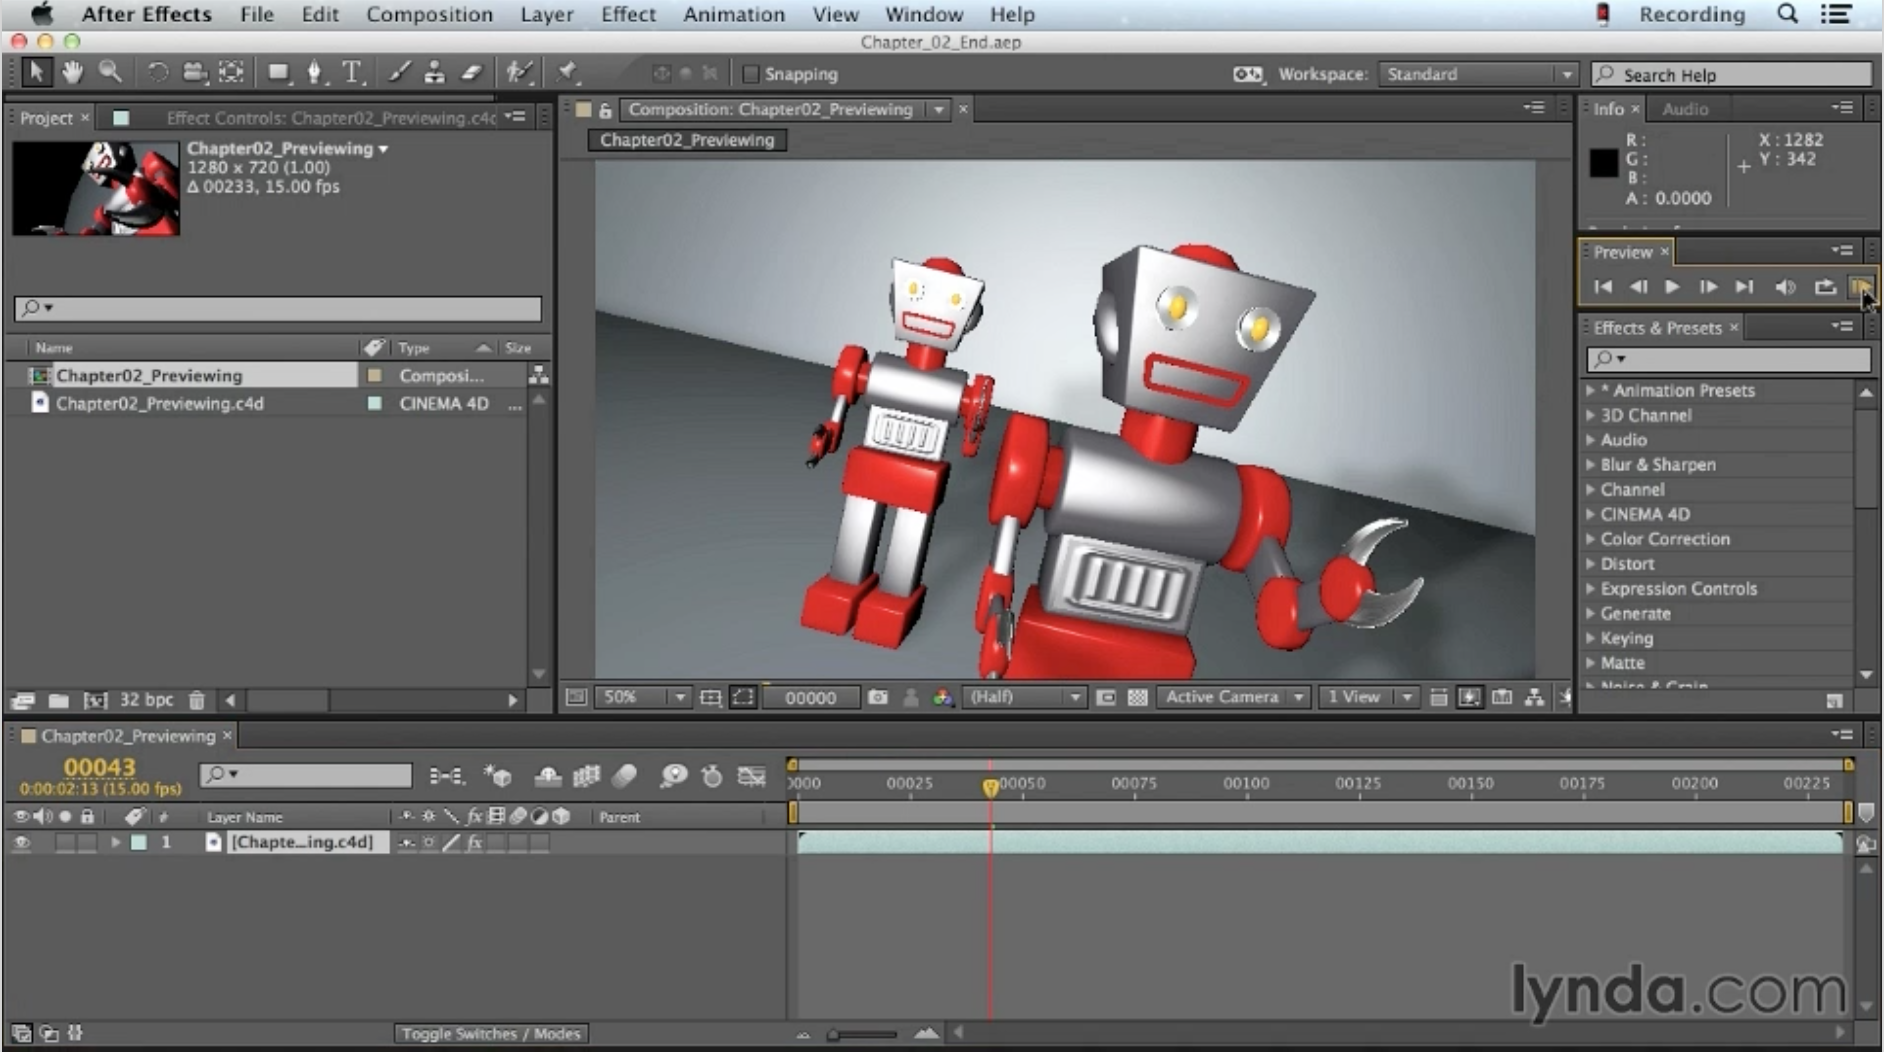
Using the Picture Viewer in CINEMA 4D
Using the Picture Viewer in CINEMA 4D
from Up and Running with CINEMA 4D Lite for After Effects
-
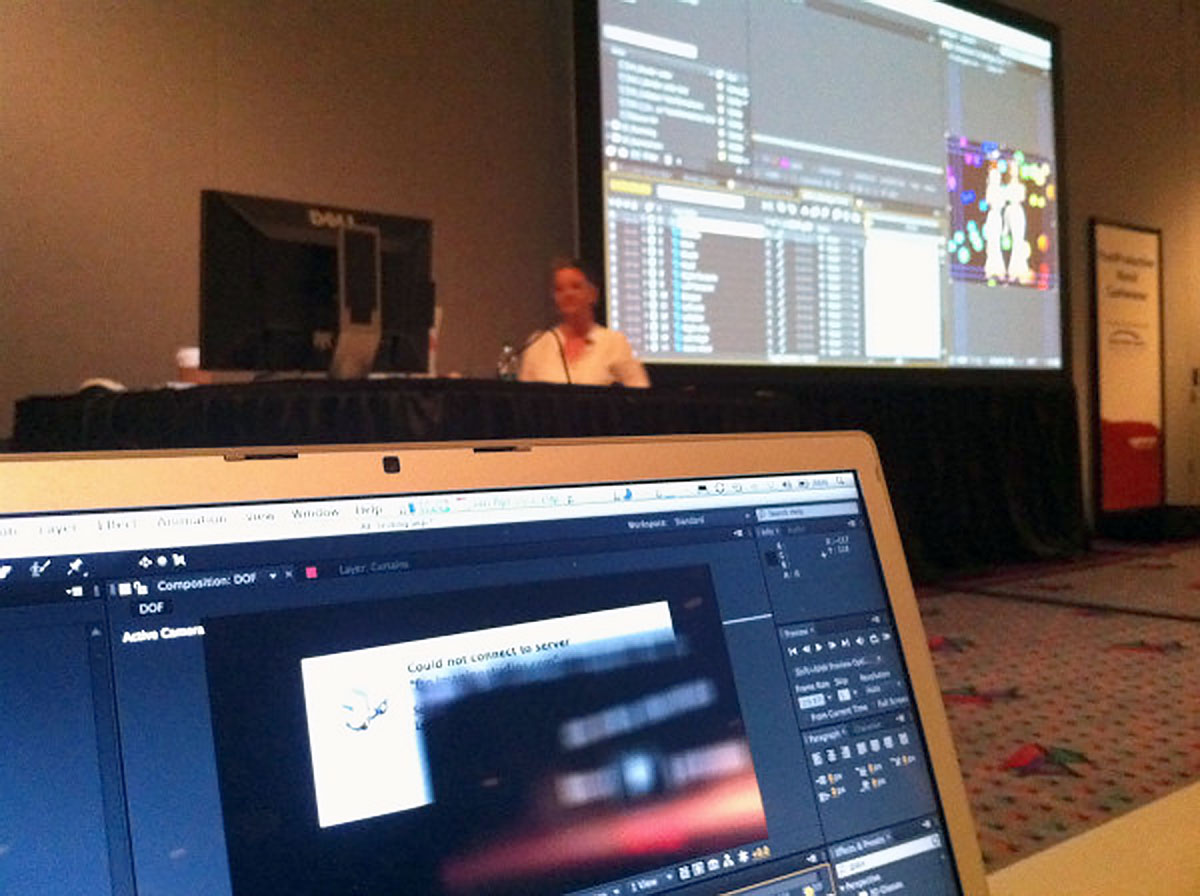
NAB 2015 Presentations by Angie Taylor

Well, it’s that time of year again, NAB 2015 is just round the corner. It’s the event of the year for our industry. The who’s-who of the broadcast industry gather together in Las Vegas for this massive trade show, conference and countless parties. It’s a great opportunity to meet old friends, make new contacts, learn new techniques and see new products and technologies on show.
Interview with That Studio
 Come to the That Studio booth, in the Plugin Pavillion at 1.15 on Wednesday to partake in the audience. I’ll be interviewed by the lovely Kanen Flowers about my relatively new venture The Creative Cabin. I’ll also be giving away some free Creative Cabin products!
Sessions and Demo’s
This year I’ll have a varied schedule – speaking at the Post Production World Conference and also doing software demo’s on the trade show floor. If you want to learn my latest tips and techniques and see new content from up and coming video tutorials, there’s plenty to see.
RE:Vision Effects Inc.
Booth SL5807
 I’m proud to say I’ll be working the trade show floor on behalf of RE:Vision Effects Inc. Who make Academy Award winning Plugins for After Effects, Autodesk Systems, Avid Systems, Final Cut Pro, Fusion, genQ, HitFilm, Natron, Nucoda, Nuke, Premiere Pro, Resolve, Scratch and Vegas Pro.
I’ll be showcasing all of their plugins, in particular my personal favourite RE:Flex that I used on the Chris Cunningham’s Rubber Johnny music video. You can find us at booth SL5807. I’ll be there Monday from 2-6, Tuesday from 3.30-6 and Wednesday from 9-1.
Boris FX
Booth SL4225
This year Boris FX will be teaming up with their friends at Imagineer Systems to present awesome new time-saving technologies and vfx tools jointly developed for the first-time by the Boris FX and the Imagineer teams. Swing by thebooth SL4225 on Tuesday the 14th April at 12pm midday to see my talk about creating 3D titles right inside After Effects. See how to us Boris FX 3D plug-ins with the built in 3D Camera Tracker inside After Effects to mimic famous movie titles.
Post Production World Conference
South Upper Hall
I’ll also be speaking at the Post Production World conference during the week. This premiere technical training program is produced by Future Media Concepts. Click here to review the full schedule of this year’s Post|Production World offerings.
I have two sessions at this event this year;
Building After Effects Templates and Source Elements
Tue. April 14| 2:00 PM – 3:15 PM | N252
Designers can make extra income by designing templates for other designers. Websites like Adobe Exchange and VideoHive make it easy to market and sell them. In this session Angie Taylor will share tips and techniques for building solid templates and source elements for After Effects and Premiere Pro. She’ll also share information about how to protect your content legally and make money from it online.
This session will feature workflows in After Effects, Premiere Pro and Illustrator.
By the end of this session, attendees will know how to….
• Design templates that are useful and practical
• Organize template projects so they are easy to use
• Create expression controllers for adjusting template elements
• Lock and hide and add notes to project elements
• Create accounts to market and sell templates
• Make additional income by selling productsGet More from Cinema 4D Lite & After Effects
Wed. April 15| 3:30 PM – 4:45 PM | N252
The Cineware plugin allows users to integrate Cinema 4D, 3D objects and scenes into your After Effects projects. Angie will look at the many creative ways this powerful software combination can work. You’ll pick up all the skills you need to feel confident with Cinema 4D Lite as well as see some inspiring ideas to drive you forward. The session will finish with Angie showing you how you can use classic camera moves from famous movies in your 3D scenes.
By the end of this session, attendees will know how too…
• Build models from primitive objects Cinema 4D Lite
• Apply and modify materials in Cinema 4D Lite
• Animate properties in Cinema 4D Lite
• Make use of free content in Cinema 4D Lite
• Incorporate your 3D objects into After Effects
• Recreate classic camera moves with the After Effects 3D Camera TrackerConference: Post|Production World
Registration Package: A Post|Production World registration or SMART Pass will get you into these sessions. Please check here for registration prices.
I hope to see some of you there. I am quite short-sighted so often don’t recognise people from a distance so please make sure to come and say hello if you see me.
-
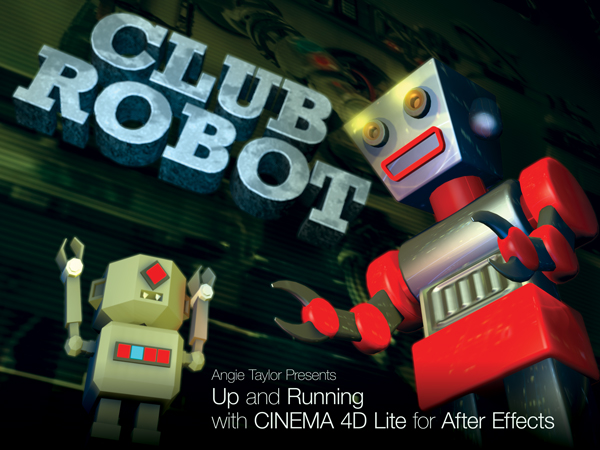
Cinema 4D Lite Tutorials
Cinema 4D Lite Tutorials from
Up and Running with CINEMA 4D Lite for After Effects
Intimidated by 3D modeling packages? Dip a toe in the water with CINEMA 4D (C4D) Lite, a slimmed down version of CINEMA 4D included with After Effects CC. Motion graphics designer Angie Taylor shows you how to build a complete sequence in C4D Lite, progressing from initial object modeling, to animation, lighting, camera rigging, texturing, and final render. Plus, learn to animate text, create random movement with wiggle expressions, track cameras in live-action footage to add new 3D elements, and light your scene. Angie also round-trips the project files to After Effects for visual effects and color correction. With over 100 videos, this course allows you to explore almost every aspect of 3D motion graphics creation, within this accessible introductory tool.
Topics include:
- What is CINEMA 4D Lite?
- Understanding the CINEMA 4D Lite and After Effects CC workflow
- Editing primitive objects
- Spline modeling with NURBS
- Animating with keyframes
- Using Xpresso to link properties
- Importing music and soundtracks
- Creating and animating cameras
- Working with text
- Scripting
- Creating and applying materials and textures
- 3D camera tracking
- Compositing layers
- Lighting with visible lights and ambient occlusion
- Adding visual effects in After Effects
- Rendering in After Effects and the Adobe Media Encoder
What is CINEMA 4D Lite?
Using the Picture Viewer in CINEMA 4D
Linking body parts using object hierarchy
Adding surface detail with a Relief object
Understanding coordinates
Understanding rotation
Keyframe interpolation
Creating multiple cameras in CINEMA 4D Lite
Creating a wiggle expression
Casting shadows on layers in CINEWARE
Multipass compositing explained
Layer styles
-
After Effects Twitter Tips
Here’s my latest collection of After Effects Twitter Tips from my archive. Learn all sorts of useful tips and tricks in bite sized portions. Make sure to Follow me on Twitter to get these tips regularly as well as other goodies I like to share.

After Effects tip – To make a one node camera point at a layer, select the layer, then with the unified camera tool selected, hit the F key AFTER EFFECTS TIP | Copy & Paste any mask shape into a position property to make layer move along the path. Click on property name to select AFTER EFFECTS TIP | Give Adobe your feedback | Report Feature Requests & bugs here; http://t.co/s7f1NOPs @AdobeAE #AfterEffects AFTER EFFECTS TIP | To stretch or squash an animation – select all keyframes – hold Alt key & drag first or last Keyframe in selected group After Effects Tip | Video tutorial – Use the Stroke effect on Illustrator paths to make handwriting animate on screen http://t.co/0E6UHcKOsr After Effects Tip of the day! How to make a layer follow a path copied from Adobe Illustrator artwork. http://fb.me/CEapjgCw After Effects tip; add new Refine Matte effect to ANY matte in AE to refine edges or add motion blur. Not just for Rotobrush! Fabulous tool! After Effects tip; Animating characters, use expression pickwhip 2 link body parts 2 cntrl layer. Expression control effect 4 each movement. After Effects Tip; How to make a layer follow a path copied from Adobe Illustrator artwork; http://bit.ly/f8tP4w After Effects tip; Lay down markers in time with audio by previewing the audio and hitting * on number pad when you want markers to appear. After Effects tip; to edit the path of an effect’s positional property (e.g. Particles) got to Layer panel & choose effect in target menu. After Effects tip; To use more than one layer as matte without precomping. Add multiple copies of Sett Matte effect to layer needing matted. After Effects Tip: @butlerm_com Try combining transfer modes, use more than one layer with a different mode and opacity value on each! 🙂 After Effects tip: Add keyframes for hidden Transform properties by selecting layers & hitting alt & property letter (eg alt-p for position) After Effects tip: Applied a preset & wanna find out how it’s made? Select layers then double-hit the U key to expose adjusted properties. After Effects tip: Make 3D layers turn to face camera as it moves. Select layers, go to Layer>Transform>Auto Orient. choose Towards Camera AFTER EFFECTS TIP: Right-click on a property value to open Edit Value dialog. Here u can access different measurement units & adjust ranges. AFTER EFFECTS TIP: Rotate , scale, skew or move all layers by adding the Transform effect to Adjustment layer – keyframe to animate them After Effects tip: Scaled a layer down, nested the comp, then scaled it up? Click Collapse Transformations switch to fix resolution issues. AFTER EFFECTS TIP: Travis Wade presents his After Effects: Copy and Paste Shortcuts on Motionworks; http://t.co/nP2yA1nJ After Effects tip! Make layer automatically turn to follow direction of path – select layer, go to Layer > Auto Orient. Choose ‘Along Path’ AfterEffects Tip | Isolate a property group from the Effect Control Panel in Timeline by double-clicking Property Group name in ECW
#AfterEffects TINY TIPS: Do you have trouble with slow render speeds? Here’s a video workshop by Todd Kopriva to help: http://t.co/Y45ucGEl #AfterEffects TINY TIPS: Do you have trouble with slow render speeds? Here’s a video workshop by Todd Kopriva to… http://t.co/2fL7wE8l #AfterEffects Tip – Scale layers in comp without messing up composition – Select layers – Go to File > Scripts > Scale Selected Layers #AfterEffects Tip | @Doguib7 Create a Shape Layer, use Offset Paths & Trim Paths from Shape Layer ‘s “Add” menu to animate paths – lotsofun! #AfterEffects Tip | Animate property randomly – Alt-click Stopwatch to add expression. Type Wiggle(10,50) to change value 10 p/sec within 50 #AfterEffects Tip | Audio file plays at different speed than recorded? Check that RAM preview settings match the frame rate of the audio. #AfterEffects TIP | Custom Shape layers – 1 Layer > New Shape Layer 2 Draw path with pen 3 Select path property – paste custom path @Doguib7 #AfterEffects Tip | Drag comps directly to Adobe Media Encoder to render in background. Allows you to continue working on other comps in AE #AfterEffects Tip | Loop Footage – select clip, go to Interpret Footage > Main > Other Options > Choose how many time you want to loop 🙂 #AfterEffects Tip | Quickly deselect selected items by hitting F2. On Mac make sure to use Fn key to override system shortcuts. #AfterEffects Tip | Replace layer in Timeline with footage from Project panel (retaining fx + KFs) – Select both, hit Cmmd+Alt+/ Ctrl+Alt+/ #AFTEREFFECTS TIP | Rubbish at animating? Don’t worry! Use the Motion Sketch panel to record mouse or pen motion & apply it to your layer 🙂 #AfterEffects Tip | Video Tutorial – how to make your own “Old Film” effect using Turbulent Noise; http://t.co/IOn0bHVPuU @AdobeAE #Mograph #AfterEffects Tip | Video tutorial – Use the Stroke effect on Illustrator paths to make handwriting animate on screen http://t.co/APabrfE9FT #AFTEREFFECTS Tip 41: RT @i2cblog: In Project panel, search ‘unused’ or ‘missing’ to see what’s not used in any comp or source is missing #AfterEffects tip; Moving project to other machine or archiving? File > Collect Files gathers all source footage & project maintaining links #AfterEffects tip; Scale layers or comps without messing up composition. Go to File > Scripts > Demo palette. Use Scale Layers #AfterEffects Tip; Use Premiere Pro to cut footage, add simple animation to layers in real time. Dynamic Link portions to AE for finessing #AfterEffects Tip: @Franckmax If you want to do that, just Toggle hold the keyframe first, then right-click and choose “Easy Ease Out/In” 🙂 #AfterEffects tip: @jamesboorman To make the particles stay “alive” for longer, adjust the Lifespan property. #AfterEffects Tip: @MarkToddWagon No need for Alt, Page Up & Down on their own works. Home & End key to move to 1st & last frames of comp. #AfterEffects Tip: 3D layers have Material Options to control shadows. Cast Shadows & Accept Shadows can be switched on or off per layer. #AFTEREFFECTS tip: Animate Source Text property 2 make words change over time in text layer. Font & character panel attributes also animated #AfterEffects tip: Convert Text to Shape layers (Layer > Create shapes from Text) – Add cool Shape properties to get creative! Endless Fun! #aftereffects tip: Create a keyframe for a property on selected layers by holding alt key & tapping property shortcut. P for Position etc #AfterEffects Tip: Even out animation speed – select Keyframes in timeline (except 1st & last KF). Right-click & choose “Rove Across Time” #AfterEffects Tip: Found a camera move or lighting setup you like? Remember you can save them as Animation Presets to use in other comps. #AfterEffects Tip: Give footage instant punch & contrast – duplicate layer – make top layer Overlay Blend mode – adjust Opacity to taste 🙂 #AfterEffects Tip: Have layers in comp that you don’t want to render? Select Layer, go to Layer > Guide Layer to create non-rendering layer. #AfterEffects tip: Help with custom shatter maps. Re: Is this done with shatter effect? http://cr8v.co/wCe [Like it? http://bit.ly/lRPIGH ] #aftereffects tip: Huge files? Slow render times? Select layer in Project, go 2 File > Create Proxy. Makes linked low res version of file! #AfterEffects tip: Jump back & forth between visible keyframes & layer markers by hitting J & K. Trouble remembering? Think JUMP KEYFRAMES! #AfterEffects Tip: Learn Cinema 4D – soon – you won’t regret it! 🙂 @maxon3d @AdobeAE #Mograph @c4dtips #AfterEffects Tip: Locate missing footage by typing ‘missing’ in2 search field in Project panel. Relink by double-clicking it & relocating #AfterEffects Tip: Metric Kerning looks good on well-designed, classic fonts for broadcast – it includes a little more space than Optical #AfterEffects tip: Painting in Layer panel. Go to View > New View. Place comp & layer panels side by side. Lock them for nice ETLAT workflow #AfterEffects Tip: Pt 2. Select Camera, double-hit U key to expose adjusted properties, drag select them, drop into Effects & Presets panel #aftereffects tip: Remember the shortcuts for properties with the word ‘STRAP’. (S)cale, Opaci(T)y, (R)otation, (A)nchor Point, (P)osition #AfterEffects tip: Rendering more than one format? Select Render Item, go to Composition > Add Output Module to render once & format twice #AfterEffects Tip: Rendering movie for web? Choose poster frame displayed in thumbnail – Go to Composition > Set Poster Time before render. #AFTEREFFECTS Tip: Retime animation – select keyframes – hold Alt key & drag 1st or last keyframe. Keeps relative timing intact. #AfterEffects Tip: RT @theangietaylor: Re: After Effects Key Light – Some Spilling Occuring – How Do I Get Rid of it? http://t.co/azVs5mxn #AfterEffects Tip: RT @theangietaylor: Re: Moving Layers by n Pixels http://t.co/qtde4cIk #AfterEffects Tip: Select a layer, double-hit U key to expose properties adjusted from default state. Great way to understand effect presets #aftereffects tip: To auto-animate brush strokes as they’re drawn. Choose Paint tool & select ‘Write On’ in Duration Menu in Paint panel. #AfterEffects Tip: To create a template project simply save the project with .aet instead of .aep. Prevents u from accidentally over-writing #AfterEffects tip: To reduce the amount of motion blur in a comp go 2 Composition Settings > Advanced Tab & reduce the Shutter Angle value. #AfterEffects tip: To use included scripts enable General > Preference to ‘Allow scripts . . .’ and then restart… http://fb.me/BQbXk95K #AfterEffects Tip: Use Motion Sketch panel to capture motion from Wacom tablet & apply it to layers. Good way to record gestural animation. #AfterEffects Tip: Use the J & K keys to jump between visible keyframes #AfterEffects Tip: Use the “continue” Loop expression 2 continue an existing animation, maintaining speed &… http://t.co/u21TqofD #AfterEffects Tip: When overnight rendering, render out an image sequence, at least then if it crashes you can save frames already rendered. #AfterEffects tips from @AngieTaylor – Software Tips & Tricks Newsletter – http://t.co/kEF6ry0p [Like it? http://t.co/IzVYju0W ] -

Happy Birthday After Effects
 I’d just like to celebrate a momentous occasion by saying Happy 20th Birthday After Effects. It may seem odd to wish a software application birthday greetings but After Effects is so much more than just an app. It’s the great team of people who build it, the strong user community that support it, the network of professionals who push it’s boundaries to new directions, the third-party community who provide extra functionality and take risks with user-demands and of course the company who bought it and nourished it, and allowed the original team enough freedom to develop it into the De Facto motion graphics application, bar none.
After Effects has a life of it’s own and she has her own personality. She is intelligent, good-looking, hard-working, courageous, funny, belligerent, stubborn, creative, inventive, reliable, naughty, reckless and smart – who could resist such a lethal combination? Not me, I was smitten as soon as I animated one of her properties! I’ve seldom looked back.
Before After Effects (BAE) I would go from job to job, sticking at them for a maximum of two years before getting bored and moving onto the next thing. I’ve been dishwasher, kitchen assistant, chef, prop-maker, model-maker, airbrush artist, cartoonist, deejay, sound engineer but none of them fulfilled me. After Effects did, it offered me so much creative flexibility I would never be bored again. In fact she still throws up endless ideas and new ways of working each time I delve into her timeline, it’s like After Effects has become an extension of my brain. I lose myself in her, and I love it.
To celebrate this occasion I’m giving away some of my latest animation presets in my newsletter. Check out the movie above to see them in action;
These are used in the image illustrating this article and are made with native After Effects features (no additional software required). I’ll also be sharing some tips and tricks so if you don’t want to lose out, please subscribe here.
I could go on but there are many people who I’d like to thank for my career and inspiration. I can’t name them all but special shout-outs go to the entire After Effects team past and present. In particular I’d like to thank these Adobe people; Dave Simons, Dan Wilk, Todd Kopriva, Steve Forde, Kevin Monahan, Jim Guerard, Michael Coleman, Steve Kilisky, Mansi Grover, Eve Hatton, Rory Duncan, Mark Harrison, Mitch Wood, David Trescot, Al Mooney, Bill Hensler, Bruce Bowmann, Bruce Bullis, Ton Fredricks, Karl Lee Soule, Jason Levine, Johan Jonker, Erica Schisler, Amacker Bullwinkle, Nina Ramos, Ellen Wixted, Michael O’Neil, Jane Birch, Michelle Galina, Simon Hayhurst, Simon Williams, Matthew Gyves, Niels Stevens, Eric McCashey, Robin Charney and Dawn Osbourne. there are countless others – I thank you all.
I’d also like to add a big thanks to all the plug-in developers who helped push the product to where it is today (you know who you are). Also to the script-geniuses (or is that genii?) at AEscripts.com.
And finally a special thanks go to René Hedemyr for the amazing Media-Motion list where I met all my AE-pals and learned all about the application from some of the best in the business including Trish Meyer, Chris Meyer, Brian Maffit and countless others. I love this community. Thank you all.
Happy Keyframing!
-

Inspirational motion graphic designs
Here are some Inspirational motion graphic designs I include in my seminars on “Typography and Dynamic Text animation”. These are inspirational examples of opening title sequences that I have been inspired by throughout the years.
Big thanks especially to the “Art of the Title” website for providing such lovely, high-quality clips for us all to enjoy. They also have some great articles on the inspiration and processes used to create some of these stunning pieces of work. Enjoy!
Anemic Cinema – Marcel Duchamp & Man Ray
Saul Bass:
It’s a Mad, Mad, Mad, Mad World
Pablo Ferro:
Kuntzel and Deygas – Catch me if you Can
De Patie – Freleng – The Pink Panther
Kurtz & Friends – The Pink Panther
Arcady & Maurice Binder – Barbarella
Daniel Kleinman – Casino Royale
Saul Bass – North by Northwest
Danny Yount:
Matt Mulder & Rama Allen – True Blood
Jamie Caliri – Lemony Snickett
Karin Fong & Steve Fuller – the Mummy Tomb of the Dragon Emporer
-

Life as a Motion Graphic Designer
 In my life as a motion graphic designer I’ve learned a few important lessons. In this interview with John Dickinson from Motionworks, I share my experiences in my career as an artist, author and motion graphic designer.
I really enjoyed this interview. John is excellent at getting the best from his interviewees. I just felt like we were having a chat. I hope that my ramblings help to inspire anyone thinking of following a career in motion graphic design.
-
Vibrant Vignette Presets for Sapphire
My Vibrant Vignette Presets for Sapphire were released this week. This collection features a weird and wonderful collection of vignettes in an attempt to prove that vignettes don’t always need to be black and circular.
These vignettes which will give your footage extra atmosphere, extra mood, extra pop. Use them as they are or adapt them to fit your own designs.
These are free too all FX Central users. If you own Sapphire for any of the following hosts you can open the preset browser, login to FX Central and get working with them right away, on your own footage.
If you don’t own Sapphire you can find out more information and download a free trial here.


-
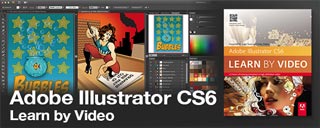
Illustrator CS6 – Learn by Video

I’m very pleased to announce that my new workshop – Adobe Illustrator CS6 – Learn by Video – is now available to buy directly from the web store on my videos page. I’m also featuring some free example movies from this workshop right here so you can try before you buy.
Newsletter subscribers can also benefit from a 20% discount code off the price of the entire workshop so if you haven’t already subscribed you can do so now to take advantage of this and other special offers only available to my subscribers.
This Learn by Video course offers in-depth training on the interface, workflow, and features of Adobe Illustrator CS6. Amongst other things you’ll learn my own techniques for drawing characters including my “Illustrator” superhero. Here’s the intro movie where I tell you more about the course.
The contents of this course include:
Introducing Illustrator CS6
In this chapter you’ll be introduced to Adobe Illustrator — what it is and what it does — and get an overview of what will be covered in this course. You’ll also be taken on a tour of the new features in Illustrator CS6.Illustrator Fundamentals
This chapter explores two concepts that are crucial to an understanding of how Illustrator works: the difference between bitmap (or raster) images and vector images, and the concept of paths.Exploring the Illustrator Interface
In this chapter you’ll learn how to work with important elements of the Illustrator interface like panels, the Application bar and frame, artboards, and workspaces.Navigating and Using Views in Illustrator
Being able to easily move around your documents and see them in different ways can be a big help in your work. This chapter will explain how to navigate in Illustrator CS6 and use the different viewing and screen modes.Working with Documents
This chapter shows you how to efficiently create, modify, and view documents. You’ll learn how to use templates, guides, grids, Adobe Bridge, and more.Creating and Working with Shapes
Shapes are a very important part of Illustrator, and in this chapter you’ll learn about the various tools available for creating and modifying shapes.Transformations
You can transform objects in a variety of different ways in Illustrator CS6. This chapter shows you the various methods that can be used to transform and modify objects, including how to use the Transform panel.Understanding Objects and Layers
This chapter shows you how to select and modify objects in Illustrator CS6 and explores the multitude of options you can use to create artwork. We’ll look at saving selections, grouping items, layers and stacking order, and Isolation mode.Drawing
Drawing is at the heart of the work you’ll do in Illustrator. In this chapter you’ll learn all about the tools, techniques, and features related to drawing in Illustrator CS6.Using Symbols
Symbols are a handy feature in Illustrator, and in this chapter you’ll learn how to create them, move and rotate them, adjust their size and color, and apply graphic styles.Color
Color makes a big difference to the appearance of your artwork. In this chapter you’ll learn how to work with color-related features in Illustrator like the Colors panel, swatches, gradients, Live Paint, and more.Typography
In this chapter you’ll learn how to add text to your documents, format that text, create styles, and more.Working with Images
In this chapter, you’ll learn how to place graphics and see all the tools Illustrator offers once they are there to help you get great results in your designs.Working with Effects
With effects, you can apply a look to a path that doesn’t alter the path at all. It will print like what you see on your monitor, but in reality, it’s all just an illusion…a very powerful, editable, printable illusion that can be saved as a PDF, placed in Photoshop and InDesign, and more. You’ll learn all about this incredible technology in this chapter.Graphs
If you have information you want to convey as a graph or chart, Illustrator has the tool. The chart and graph tools in Illustrator aren’t new, but they are very powerful and allow you to present data in a more interesting way, as you’ll see in this chapter.Beyond Illustrator
Eventually there will come a time when you want to save your Illustrator work as a PDF or in one of the common web file formats, or output it for use in an animation. The videos in this chapter will show you how.Project Explorations
In this chapter you’ll apply the skills you’ve learned in this course to some projects that give you an idea of just what Illustrator is capable of.Closing Thoughts
In this chapter you’ll get a brief recap of what’s been covered in the course and a few final thoughts from the author.The lessons are wrapped in a feature-rich interface that lets you jump to any topic and bookmark individual sections for later review. Full-Screen mode provides a hi-def, immersive experience, and Watch-and-Work mode shrinks the video into a small window so you can play the videos alongside your application. Also included are exercise files that give you an easy way to try out the techniques you learn and a 48-page guide containing supplemental material.
Click here to subscribe to my Newsletter and enefit from a 20% discount code off the price of the entire workshop.
-

Adobe CS6 Software Training Videos
This week, to celebrate the launch of Adobe’s Creative Suite I’ve released a whole host of new Adobe CS6 software training videos from new and forthcoming workshops produced with video2brain. So now you know why I’ve been relatively quiet for the last couple of months!
The workshops will be out very soon but meanwhile we thought it would be nice for you to get a sneak preview of what you can expect from the full workshops. Here’s a little bit about CS6, from the perspective of the video2brain authors. You can more free example movies from each of my new titles listed below.
Adobe After Effects CS6: Learn by Video
Master the Fundamentals
Adobe After Effects is an incredibly deep and rich set of tools for creating motion graphics, manipulating movies, adding visual effects, and more. In this Learn by Video course, created in partnership with our friends at Peachpit Press, experts Todd Kopriva and Angie Taylor teach you how to make the most of this powerful software, including the new features in After Affects CS6.
After getting an overview of the workflow and the user interface, you will learn how to bring assets into After Effects and configure the software for optimum performance. You’ll also learn a range of compositing features, including the new variable-width masks and 3D camera tracker features, as well as basic masking and color keying. Tips on everything from troubleshooting and avoiding common problems to creating finished movie files round out this comprehensive training.
To be notified when this product is released, please visit this page and click on the Notify Me link.
Adobe Illustrator CS6 workshops
I’ve also finished working on two new titles for Adobe Illustrator CS6 which will be out really soon. Below are some taster movies from my Adobe Illustrator CS6 – Getting Started course and my Adobe Illustrator CS6 – Learn by Video course that I created with co-author Chad Chelius.
If you’d like to be kept up to date as soon as new courses become available you can subscribe using your favourite browser or email client.
video2brain Feeds
New Courses: http://www.video2brain.com/en/rss-trainings.xml
Free Lessons: http://www.video2brain.com/en/rss-videos.xml
Upcoming Titles: http://www.video2brain.com/en/rss-preview.xml
-
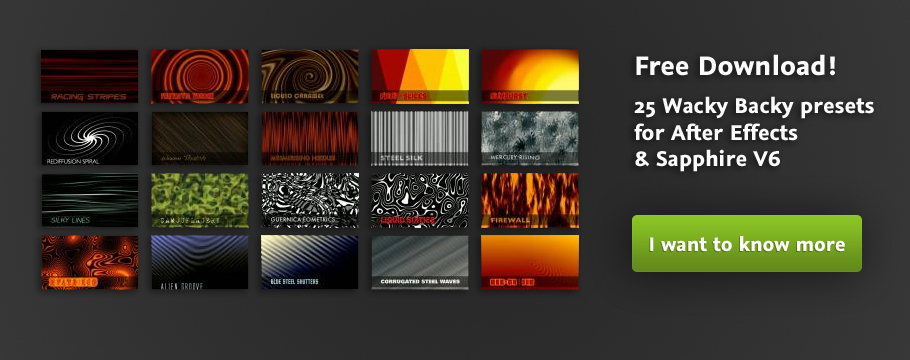
Free After Effects Preset Collection
“Wacky Backy” is my free After Effects preset collection for Sapphire V6. It is now freely available to download from Genarts FX Central. These animated backgrounds have a slightly wacky quality and can be used freely in your own creative projects.
Use them as they come or as a starting point for your own presets – you could try using the Brainstorm tool on properties to come up your own variations – it’s addictive! Subscribers to my video training can watch a movie on Brainstorming in After Effects free here. If you’re not already subscribed, here’s a link to join us. For as little as $12.99 per month you can have free access to all of the training on my website plus all the other training by other authors at video2brain.
If you’re not already a member of FX Central it’s free and easy to join. Then you can download as many presets as you like. If you want to try out my presets on Sapphire for After Effects you can download a trial version of the software here. Find out more about the amazing software that Genarts has to offer and customer stories here on their website
These dynamic presets can be used for backgrounds, displacement maps or organic elements in your project.


