
My recommended workspace setup for this kind of 'Rostrum-style' work. You need to have the Layer panel and Comp panel visible.
I contribute to the Creative Cow Basic After Effects forum (amongst others) where this question was posted recently;
“Hi I am newish to after effects and I have created a old map effect that pans from the UK to africa now I want to add a red line that reveals like in the Indiana Jones graphic.”
There’s definitely a trick to getting this right but once you know the trick, it’s easy, so, here are the rough steps for getting it right.
BTW, a movie demonstrating this technique is available in my After Effects CS5 Learn by Video DVD if you are interested in that here’s a link to it.
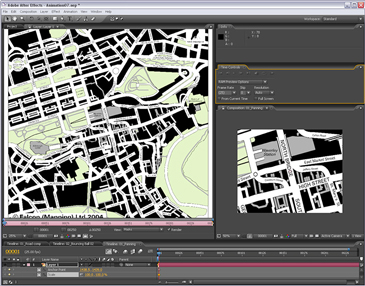
1. Place the map in a new comp, it’s best if the Map is bigger than the comp if you want to pan around it. In the Timeline, set a keyframe for the Anchor Point property as it’s this property you will animate to pan around the map. NB: Don’t animate the Position property as you’ll just run into problems.
2. Alt-double-click the layer to open up the Layer panel, this is where you’ll do the animation. It’s great as you’ll be able to see an overview of the whole image without having to faff around in the Comp panel. Make sure that the Target menu is set to Anchor Point Path.
3. In the timeline, move to where you want the next change in direction of the path to happen, and in the Layer panel, click and drag the anchor point to the landmark that you want to be central in the comp panel at that time. You’ll notice that, in the Comp panel, the point that the anchor point is on (in the Layer panel) is always central in the Comp panel, which is what you want exactly!
4. Keep repeating this till you have completed the journey you want the ‘camera’ to follow and so have completed the positional aspect of the animation.
5. If you want to smooth out the timing of the animation so that it maintains an even speed throughout, select all the keyframes except the first and last one, right-click on them and choose Rove Across Time. Once you’ve done that you can pull or push the first or last keyframes to speed up, or slow down the whole animation.
6. Now apply the Write On effect to the layer. Choose a color and style by adjusting the settings.
7. To make the Write on effect follow the path you can either use and expression to link the Brush Position property to the Anchor Point property of the layer (my preferred option) or, if you’re not keen on using expressions you can simply select all the keyframes from the Anchor Point property, copy them, then paste them into the Brush Position property.
8. In the Write On effect, make sure that the Paint Style property is set to On Original Image.
The nice thing about this technique is that it’s now easy to make it into a 3D map pan. All you need to do is add a camera and some lights, adjust the camera angle and animate the zoom property and that’s it! The camera and lights will automatically follow the anchor point so no further animation will be necessary unless you want to animate the angle, zoom, or depth of field.
To find out more details of this technique and others, check out my After Effects CS5 Learn by Video DVD that I created alongside the wonderful Todd Kopriva from Adobe.
 Here’s another free tutorial from my first venture into making video tutorials for Adobe Illustrator. My tutorials are probably what you’d call non-standard! I’m not going to teach you how to ‘the cool look’ that we’ve all seen a million times before, that doesn’t really interest me, and there are plenty of other websites that will whow you those techniques.
What I hope to do with my tutorials is to teach you new and interesting ways of using the tools creatively. How to ‘think’ with the software. It’s then up to you to add your own style to what you’ve learned to conjure up something unique.
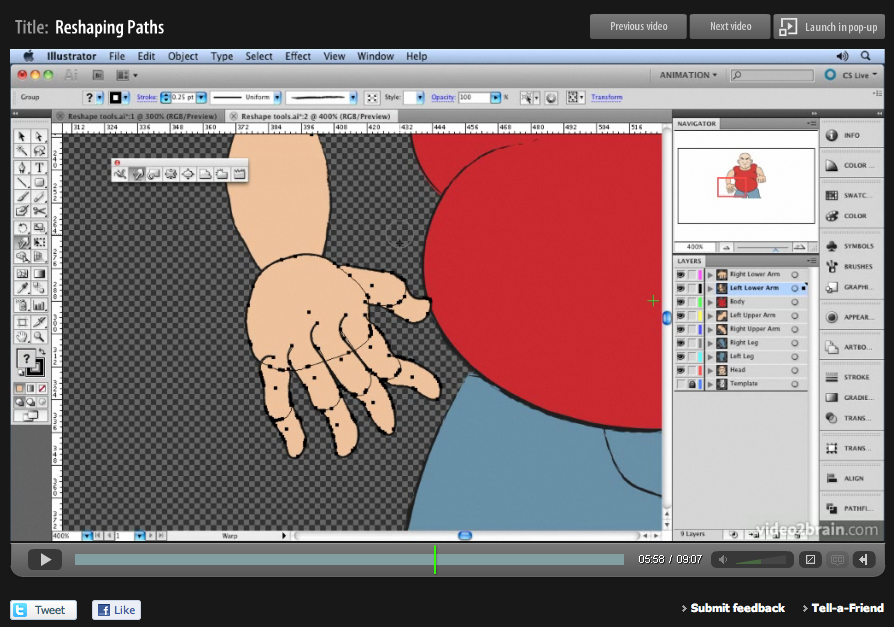
This tutorial focusses on Adobe Illustrator’s amazing reshape tools that can help you create more organic-looking drawings in Illustrator. These include Warp, Pucker & Bloat, and Wrinkle. In this movie you’ll use the Bloat tool to add muscle to your character, create hair with the Wrinkle tool, and use the Warp tool to transform primitive shapes into more realistic and organic body parts. Enjoy!
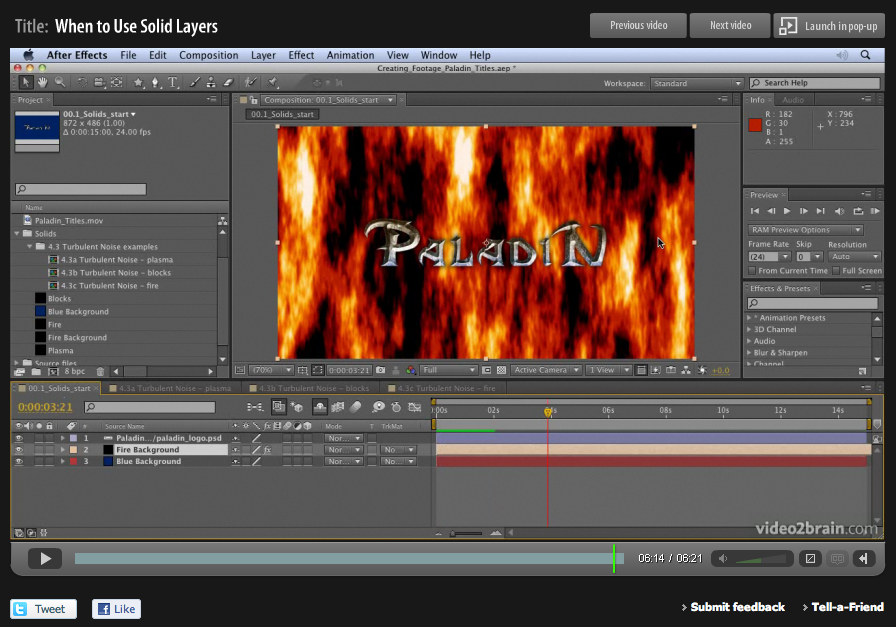
 When designing motion graphics in Adobe After Effects there are times you just need to create a plain old layer to apply effects to. Solids are just right for this purpose, and for lots of other uses in After Effects.
This video is aimed at a basic level. It shows you how to create solid-color layers and walks you through some of their uses.
You can find more free videos like these from our After Effects CS5 Learn by Video product on the video2brain website. Please enjoy them – happy keyframing!
 I’m very pleased to offer my readers a couple of free tutorials from my very first video2brain workshop on Adobe Illustrator. This workshop will teach you how to use Illustrator’s tools and features to prepare 2D files for animation in Adobe After Effects.
You’ll learn how to make the most of Illustrator’s drawing tools and Autotrace feature, and to how use Live Paint and Kuler to recolor artwork. You’ll also get tons of tips and tricks for giving artwork a hand-drawn look and find out how to set up layers, aspect ratios, and transparency options for importing into After Effects.
I’ll share many of my techniques for using Illutrator’s extensive drawing capabilities to create characters for animation. Topics covered include:
- Setting up your workspace for video and animation
- Working with Autotrace, Live Paint, and Kuler
- Using multiple artboards for creating storyboards
- Taking advantage of views and workspaces
- Drawing freehand in Illustrator using a variety of tools including the new improved Eraser tool and the Blob Brush tool
Whether you’re a motion graphic designer, animators, storyboard artists, video editors or illustrators, if you want to create 2D animation from flat, vector-based artwork, this workshop will be an invaluable resource.
The lessons are wrapped in a feature-rich interface that lets you jump to any topic and bookmark individual sections for later review. Full-Screen mode provides a hi-def, immersive experience, and Watch-and-Work mode shrinks the video into a small window so you can play the videos alongside your application. Also included are exercise files that give you an easy way to try out the techniques you learn.
Click here to get an overview of the workshop and download free tutorials using the following links;
Working with Live Paint
Working with the Brush Tool
 Week four of 2011 brings my fourth FREE Giveaway Tutorial.
This tutorial comes from my Adobe After Effects CS5 Learn by Video DVD from video2brain.
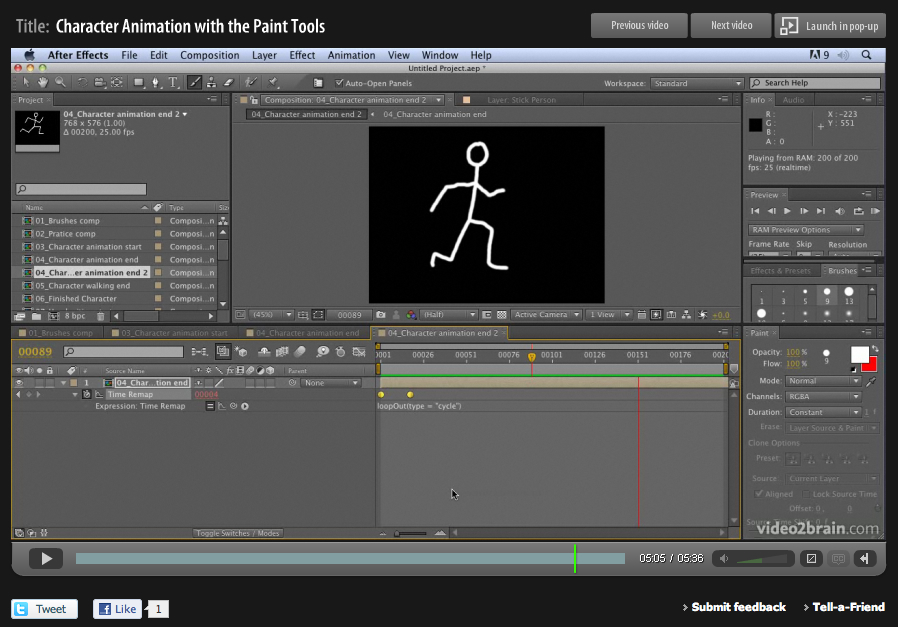
The paint tools in After Effects are usually used for cloning or filling in mattes, but they can also be used to create stop-motion-style animation. In this movie you’ll see how they can be used to create a stop-motion style without the need for painful frame-by-frame tweaking of keyframes or drawings.
In this Jumpstart tutorial I’ll show you how to create a little animated stickman, creating a looping walk cycle. I hope you can use the tips and tricks from this tutorial to create your own unique twist on my idea. If you do please come back here and post a link to your creation, I’d love to see it!
There are a few Jumpstart tutorials included with the Learn by Video DVD. These are designed to give you a quick overview of a particular technique. The DVD also contains many more detailed tutorials, designed to take you through techniques and tech you After Effects using a more detailed step-by-step approach. I hope you enjoy watching them as much as I enjoyed making them.
Happy Keyframing!
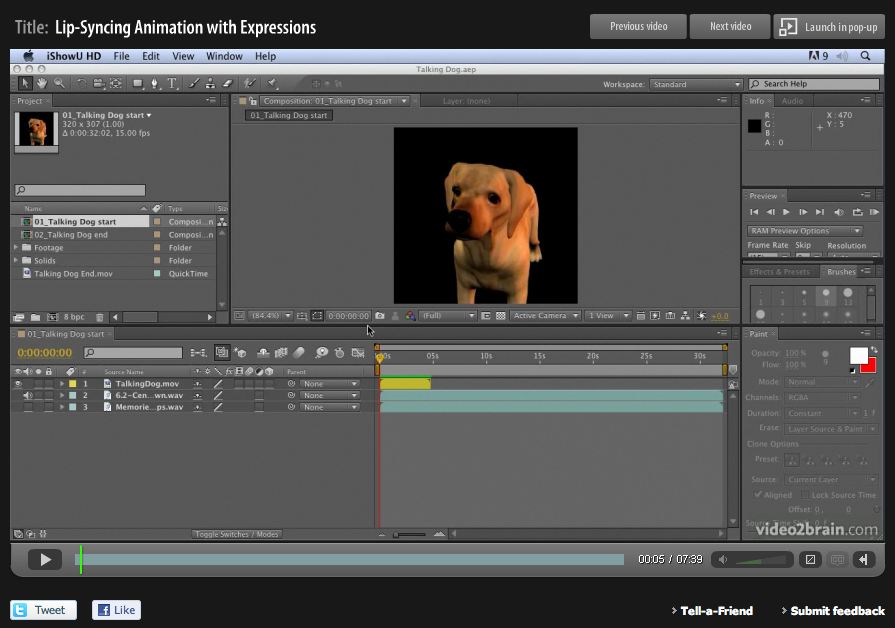
 Lip-syncing is something that all animators will be asked to do at some point in their career. The following technique automates the process of lip sync in After Effects and uses only built-in features of Adobe After Effects – no extra software is required! This video tutorial is an updated version for Adobe CS5. Tutorial files and a text-based version of the tutorial for older versions of After Effects are available here if you want to follow along.
This project was a test project for a job for the BBC. They contacted me and asked if it was possible to create a minute of lip-synced animation on a cartoon character. The budget was really tight, as was the deadline, so I had only one day to create a character that lip-synced to a provided sound track for a full minute.
Of course it was the BBC so I could hardly say no! So I said “Yes, no problem, I’ll take the job!” The minute I put the phone down I thought, “Oh Blimey! What have I got myself into?” I went to bed that night worrying about how I’d manage to get the job done. I tossed and turned, having nightmares about failing in my first job with the BBC. Then suddenly I sat bolt upright in bed and thought, “hang on a minute, what if I use Time Remapping with the Convert Audio To Keyframes Assistant, I’m sure that’ll work!” (That’s the kind of sad geek I really am!) 😉
Anyway, I leapt out of bed, ran over to my computer and put together a test project to see if it would work. This is the very project I put together as a test to see if the technique would work. Luckily, it did and I got the job done on time!
The audio used in this tutorial is contributed with kind permission. “Memories Of Your Own” – Words and Music by Jason A. Levine © Jason Levine 2007