This kind of training is perfect for those who have encountered problems that they can’t resolve on their own. You can ask Angie any questions regarding how to do something with the software and she’ll find a solution for you and demonstrate to you how to solve it.
This involves sitting at your own computer while Angie Shares her screen with you to show you her tips and techniques and answer your questions. You can follow her steps as you watch and ask questions, just like you can in a regular training course. It’s easy to set up. all you need to do is to contact Angie with your requirements and then she’ll help you with the rest.
What does it cost?
For individuals, the cost of this bespoke one-to-one software training is $74.95 per hour (Bookings of 5 hours or more are charged at $45.95 per hour). Setting up is free, you won’t be charged till the training begins.
How do I pay?
Payment is made before the session and can be done via your own Paypal account or by direct Bank transfer.
Remote Training for Groups
Angie can also provide training for groups via Skype, Google Hangouts or Adobe Connect. In a classroom situation, this can be done via a TV that can display Skype. Angie can help you set this up.
Alternatively, people can access the training at their own desktops using Adobe Connect. This is ideal for training groups who include people in different locations or situations where a single training room is not available. The cost for group training is a flat rate of $99.95 per hour.
Product manager Steve Forde said today in his Adobe Blog about the new features in next version of After Effects After Effects;
“with what’s coming to the next version of After Effects – we set a new standard I don’t know that we can match again – EVER”
Announced today is the astounding next version of After Effects, along with the other professional video and audio applications such as Premiere Pro and Audition.
I’ve had my hands on the next version of After Effects and I’m hooked, I’m sure you will be too. Here’s a run down on my favourite features and improvements.
CINEMA 4D Lite
The inclusion of a lite version of CINEMA 4D application with After Effects is a fabulous thing. Now everyone can learn and use this amazing 3D application.
Although this is essentially a pared down version of the software it’s by no means limited for new users and it’s feature set is on a par with CINEMA 4D Prime R14 which normally retails for $995 so you are getting a lot of new 3D bang for your buck!
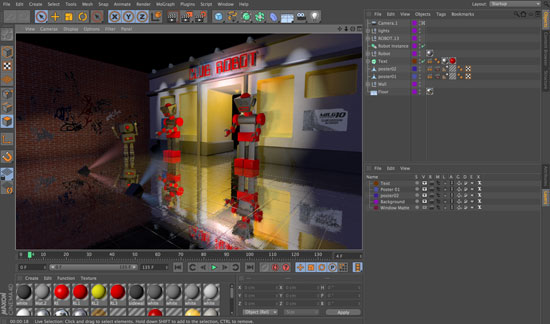
Live 3D pipeline between CINEMA 4D and After Effects
C4D files can now be imported directly into After Effects. Just import them like any other file and drop them into your comps without the need to render.
You can also create new Cinema 4D files directly from within After Effects by choosing
File > New > MAXON CINEMA 4D File. The Edit Original command can also be used on a selected C4D file to edit it in C4D and see it automatically update back in After Effects. Popular 3D formats such as OBJ, FBX, and Alembic are all supported and can now be integrated into your After Effects scene.
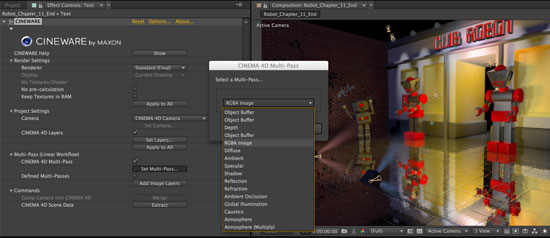
The background CineRender renderer takes care of business in terms of getting those pixels made. There are several choices for render modes. The Software render allows you to work quickly and displays your scene with the current viewport settings in C4D while the Standard render modes allow you to see detail that can be customised from the Cinema 4D Render Settings like anti-aliasing and reflections. There are also options for redisplaying scenes in wireframe mode to quickly check animation.
With the Cineware plugin you can extract 3D data such as cameras, lights and nulls from Cinema 4D so you can match up new elements into the scene. Cinema 4D layers are also supported, making it easy to treat different elements of the scene individually.
To top it all off you can also work with individual passes by selecting the Multipass options. These can include standard Multipasses like Reflection, Caustics and Shadows which can be tweaked and perfected in post. A depth matte can be combined with the Lens Blur filter in After Effects to adjust depth of field effects.
External Compositing and regular Compositing tags can be used to isolate individual objects by the way of Object Buffers (Mattes). It really is a flexible solution to what once was a complex and time-consuming workflow. Huge speed boost will be achieved from this massive new feature.
You can also modify a .c4d file to include the camera data from After Effects. This is especially useful for transferring camera data created by the 3D Camera Tracker effect.
I’m currently recording a four hour video workshop. This will be aimed at After Effects users who want to get into Cinema 4D but find 3D apps challenging. It will cover the entire After Effects and Cinema 4D workflow as well as getting you comfortable with Cinema 4D so that you love it just as much as already love AE.
Meanwhile, my good friend, John Dickinson has a great overview video of the new Cinema 4D Lite and the Cineware plugin here on Motionworks.
The Refine Edge tool allows you to improve an existing matte by creating semi-transparent areas for the fine detail commonly found at the edge of a matte. A typical example of where this is useful is in keying out hair.
Inspired by, and giving a nod to, the Refine Edge feature in Photoshop, the Refine Edge tool is also integrated in the Roto Brush & Refine Edge effect. To use Refine Edge you must already have an alpha channel defined for the layer. This could be created by Rotobrush, masking or by a keying effect.
Roto Brush & the Refine Edge effect only affect areas defined by the Refine Edge strokes. These strokes can vary in terms of width and can be confined to specific areas of the matte.
The new Refine Soft Matte effect is also excellent at edge refinement. Refine Soft Matte effect applies identical edge refinements as the Refine Edge tool but applies it to an entire matte.
Warp Stabilizer VFX, improvements to the Warp Stabilizer effect
I’m most excited by the fact that you can now also reverse any stabilization created with the Warp Stabilizer. This makes it doubly-useful. So for example you can remove camera movement, making it easier to apply an effect or remove an element from a shot. Then you can reintroduce the camera movement to the shot, making it seem as though your modifications existed when the footage was shot – brilliant!
The new Objective options for using Warp Stabilizer VFX also allow you to use the effect for compositing a new layer into a scene containing camera movement. Simply run the warp stabilizer on one layer and apply the data to another layer. the composited layer will appear naturally in the shot as if it has always been there.
The Preserve Scale option in Warp Stabilizer VFX effec doesn’t get confused by point-of-view shots like the previous one did in CS6. It will no longer attempt to correct for movement of the camera by changing the scale when you enable the Preserve Scale option. Underlying tracking points can now be revealed and if necessary, deleted, making it easier to select portions of the track you want to keep.
These’s a new overview movie, outlining this featurehere by Matthias Mohl.
Improvements to the 3D Camera Tracker effect
The Auto-delete Points Across Time feature in 3D Camera Tracker and Warp Stabilizer VFX effect allow you to delete corresponding track points when you delete track points in the Composition panel. This means you no longer have to delete the track points on a frame-by-frame basis, saving loads of time.
You can also now define a ground plane and origin in a scene using tracking points and the Camera Tracker target. This makes it a whole lot easier to define fixed points in the tracked scene and avoid errors.
These’s a new overview movie, outlining this feature here by Matthias Mohl.
Snapping to layer features, including anchor points and masks
Snapping is one of those unglamorous features that will seem irrelevant to some people but will simply improve all After Effects users lives immeasurably. Basically, layers will now snap to each other when they are placed in close proximity to each other. Edges, Anchor Points, Corners can be used as snap points. It also works with Masks to vertices and points can be snapped to make sure they are perfectly lined up. It works in 3D as well as 2D so finding the centre of a 3D object is now a whole lot easier.
Pixel Motion Blur effect
The new Pixel Motion Blur effect analyzes your video footage and creates a “fake” motion blur. It uses the same motion vector estimation as the Timewarp effect, and is great for adding realistic motion blur to anything that is animated and rendered elsewhere, then composited in After Effects. Of course this can include files that originated in Cinema 4D.
For illustrations, videos and more information about these top new features, check out the the “After Effects Preview” PDF document available here.
The Adobe websitefeatures videos from all the product managers as well as screenshots of the apps.
My good friends and mentors, Chris and Trish Meyer have a fantastic definitive article covering the new features of After Effects
If you’re keen to get hold of these new features as soon as they are available, Adobe are offering an NAB Show special to save 40% off Creative Cloud (valid till19th April 2013). Sadly this promotion is available through the US store only.
I’m presenting After Effects and Cinema 4D at FMX 2013 with Maxon in April.
You can purchase tickets for FMX here. It promises to be an exciting lineup of 3D art and visual effects. Confirmed FMX highlights include:
Cloud Atlas, Life of Pi, Skyfall, The Croods, Crysis 3. I hope to see some of you there.
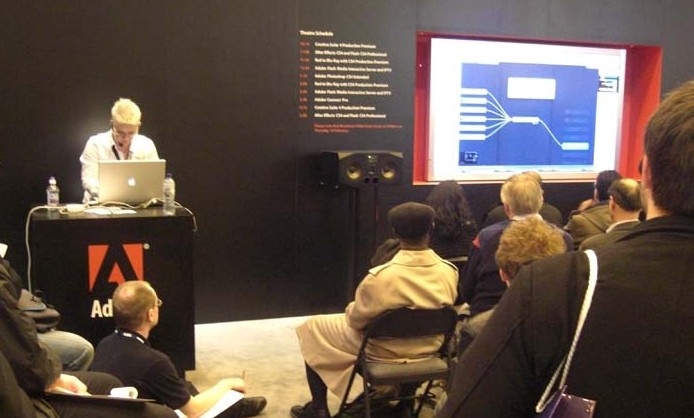
I’ll be presenting After Effects and Cinema 4D in the Adobe Theater at Broadcast Video Expo 2013 in London between the 26th and 28th of February.
Here are links to some of my Tutorials that cover working with After Effects and Cinema 4D. I’ll be expanding on these at the event.
Once again Adobe will bring its comprehensive suite of creative tools and services to the BVE audience in its dedicated Adobe Theatre on the show floor. The Adobe Theatre timetable can be found at www.bvexpo.com/adobe
Adobe’s experts will be on hand to discuss the advances that have been made in broadcast and production technology with Adobe’s comprehensive suite of tools and services for video content delivery, including Creative Cloud which makes it easier and more affordable to access all of Adobe’s production related tools. The theatre will also present demonstrations of After Effects and Premiere Pro.
In addition, a selection of Adobe’s hardware and software partners feature on the agenda. Maxon will be showing the slick interop between After Effects and Cinema 4D; EVS will talk about its advanced integration between Premiere Pro and EVS servers for fast-turnaround production; Dalet has created the Xtend panel module for Premiere Pro; Dell underpins Adobe’s software with its high performance T- and M- series desktop and mobile workstations; and NVIDIA powers high end capabilities using the latest Kepler technology on Quadro and Tesla graphics hardware.
Adobe will also be on Stand L16 where visitors can take a look at product demonstrations and participate in a prize draw to win a year’s subscription to Adobe Creative Cloud.
Full details of BVE’s entire seminar program can be found here, together with up-to-the-minute news about all aspects of the show. Information is also available across social media on twitter.com/bvexpo, Facebook, Google+ and LinkedIn. Visitors can also download the BVE 2013 App at www.bvexpo.com/app