Learn How to Model and Animate with Cinema 4D Lite
Have you ever wanted to learn how to model and animate with Cinema 4D Lite? Want to take advantage of the great free application that’s now bundled with After Effects CC?
I’m just putting the finishing touches to my brand new course “Up and Running with Cinema 4D Lite”. I wanted to write a training course specifically aimed at After Effects users with little or no experience with 3D applications. It’s an accessible and comprehensive course that covers all aspects of this application.
Real World Projects
You’ll learn how to build models from primitive objects, link objects and animate them. I’ll show you how to light your scenes and animate cameras changing in time with music. You’ll create your own custom materials as well as utilizing the amazing free presets that come with Cinema 4D Lite.
All this is applied to a single project so you’ll be able to understand how each of the features can be used in conjunction with each other on real-world projects. Here’s a taster of what you’ll be creating.
You’ll also discover how to use Cinema 4D Lite alongside After Effects, taking advantage of the new Cineware plug-in. We’ll also explore some third party scripts and plug-ins that’ll help you along the way.
Subscribe Now
So, if you want to know how to make best use of this new software that’s arrived on your doorstep, sign up for Lynda.com and be one of the first to get the training when it’s released. If you want to try out a free trial to Lynda.com here’s a link for a week of free video training.
“Hi I am newish to after effects and I have created a old map effect that pans from the UK to africa now I want to add a red line that reveals like in the Indiana Jones graphic.”
There’s definitely a trick to getting this right but once you know the trick, it’s easy, so, here are the rough steps for getting it right.
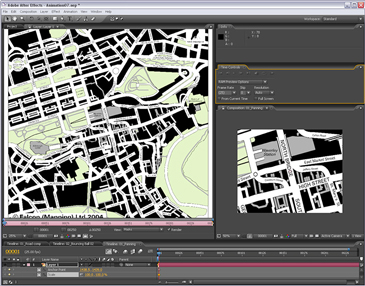
1. Place the map in a new comp, it’s best if the Map is bigger than the comp if you want to pan around it. In the Timeline, set a keyframe for the Anchor Point property as it’s this property you will animate to pan around the map. NB: Don’t animate the Position property as you’ll just run into problems.
2. Alt-double-click the layer to open up the Layer panel, this is where you’ll do the animation. It’s great as you’ll be able to see an overview of the whole image without having to faff around in the Comp panel. Make sure that the Target menu is set to Anchor Point Path.
3. In the timeline, move to where you want the next change in direction of the path to happen, and in the Layer panel, click and drag the anchor point to the landmark that you want to be central in the comp panel at that time. You’ll notice that, in the Comp panel, the point that the anchor point is on (in the Layer panel) is always central in the Comp panel, which is what you want exactly!
4. Keep repeating this till you have completed the journey you want the ‘camera’ to follow and so have completed the positional aspect of the animation.
5. If you want to smooth out the timing of the animation so that it maintains an even speed throughout, select all the keyframes except the first and last one, right-click on them and choose Rove Across Time. Once you’ve done that you can pull or push the first or last keyframes to speed up, or slow down the whole animation.
6. Now apply the Write On effect to the layer. Choose a color and style by adjusting the settings.
7. To make the Write on effect follow the path you can either use and expression to link the Brush Position property to the Anchor Point property of the layer (my preferred option) or, if you’re not keen on using expressions you can simply select all the keyframes from the Anchor Point property, copy them, then paste them into the Brush Position property.
8. In the Write On effect, make sure that the Paint Style property is set to On Original Image.
The nice thing about this technique is that it’s now easy to make it into a 3D map pan. All you need to do is add a camera and some lights, adjust the camera angle and animate the zoom property and that’s it! The camera and lights will automatically follow the anchor point so no further animation will be necessary unless you want to animate the angle, zoom, or depth of field.
To find out more details of this technique and others, check out my After Effects CS5 Learn by Video DVD that I created alongside the wonderful Todd Kopriva from Adobe.
 Have you ever wanted to learn how to model and animate with Cinema 4D Lite? Want to take advantage of the great free application that’s now bundled with After Effects CC?